
Home / Product Selection / TV / How do I
-
How can I connect my TV to the Internet?
-
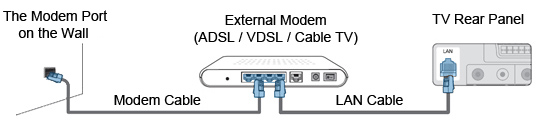
STEP 1. LAN connection using DHCP. The procedures to set up an automatic IP (Internet Protocol) address are described below.
NOTE: Once an IP address, subnet mask, gateway, and DNS are automatically allocated when DHCP is selected, you do not have to enter them manually.
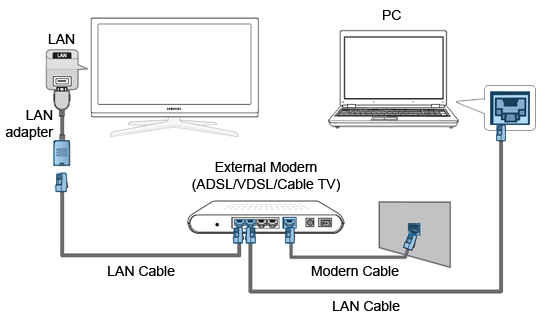
- Connect the LAN port on the rear panel of the TV and the external modem with a LAN cable. Connect the LAN port on the wall and the external modem with a Modem cable.
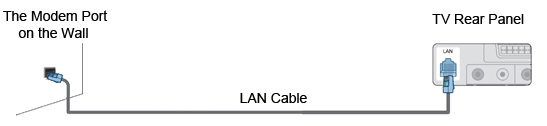
- Depending on how your network is configured, you may be able to connect your TV to your LAN by connecting the LAN port on the back of your TV directly using a LAN cable.
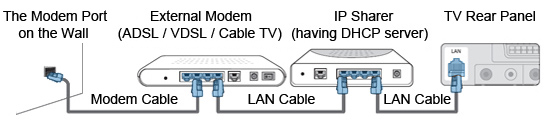
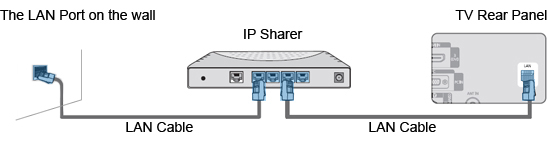
- You can connect your TV to the LAN via an IP Sharer (Access Point or Router).
STEP 2. LAN connection for a static IP environment. The procedures to set up the network using a static IP address are described below.
NOTE: You will have to manually enter the IP address, subnet mask, gateway, and DNS that are provided by your Internet Service Provider (ISP).
- Connect the LAN port on the rear panel of the TV and the LAN port on the wall using a LAN cable.
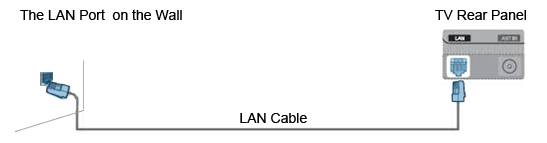
- You can connect to the LAN via a Sharer (Access Point or Router).
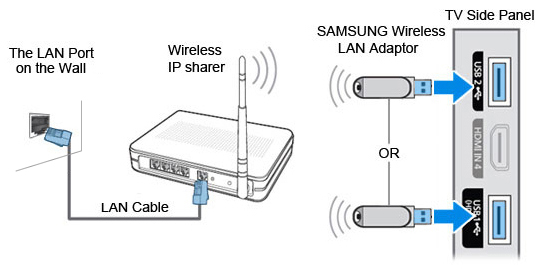
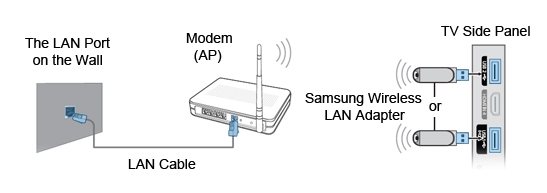
STEP 3. Wireless connection and the network setup. You can connect to the network via wireless through a wireless IP sharer (Access point or router).
Connect the Samsung Wireless LAN Adaptor for InfoLive into the USB1 (HDD) or USB2 terminal on the side panel of your TV.
To set up the network, please proceed as follows.
- Select the network type.
- Select the network setup type.
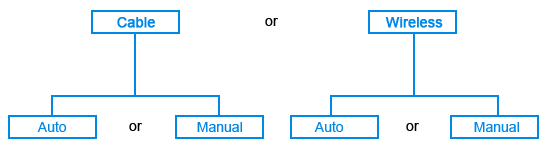
STEP 4. Network type. Select Cable or Wireless as the method to connect to the network. Please follow the steps below.
- Press MENU button on the remote control.
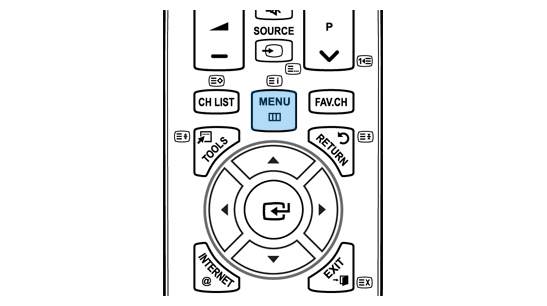
- Select Setup > Network type > Cable or Wireless by using navigation wheel on the remote control.
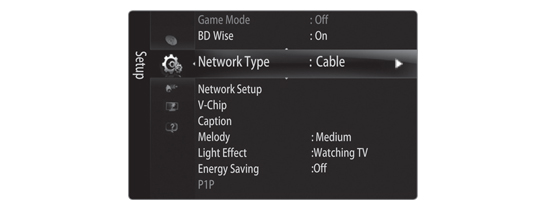
- Press EXIT button to finish.
STEP 5. Network setup type: Cable Network Setup – Auto Setup. If you connect the LAN cable and it supports DHCP, the Internet Protocol (IP) settings are automatically configured. Please check if the LAN cable is connected.
- Set Network Type to Cable.
- Select Cable Network Setup.
- Set Internet Protocol Setup to Auto Setup.
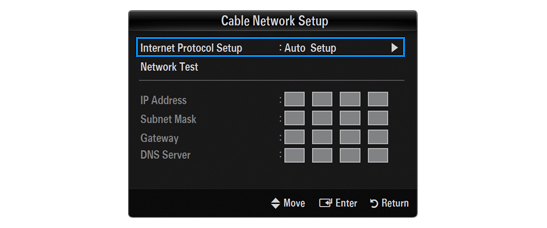
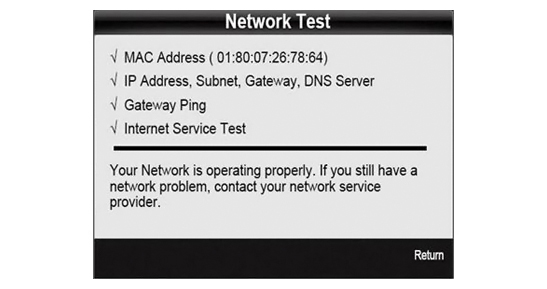
- Select Network Test to check the network connectivity.
STEP 6. Network setup type: Cable Network Setup – Manual Setup. To connect the TV to the LAN using a static IP address, you must set up the Internet Protocol (IP) manually. Please check if the LAN cable is connected.
- Set Network Type to Cable.
- Select Cable Network Setup.
- Set Internet Protocol Setup to Manual Setup.
- Insert IP Address, Subnet Mask, Gateway and DNS Server by pressing the corresponding number buttons on the remote control.

- Select Network Test to check the network connectivity.
NOTE: If the IP address information is unknown, contact your ISP / network provider. If you use a static IP address, you need to connect via Manual Setup, using the static IP information. If connecting using an auto IP, select Auto Setup.
STEP 7. Wireless network setup – Auto Setup. The menu is activated only if the Samsung Wireless LAN Adaptor for InfoLive is connected. If you connect the LAN cable and it supports DHCP, the Internet Protocol (IP) settings are automatically configured. The wireless IP sharer (Access Point or Router) to be connected to this product must support DHCP. Please check the network connectivity as follows.
- Set Network Type to Wireless.
- Select Wireless Network Setup.
- Set Internet Protocol Setup to Auto Setup.
- Select an AP through Select Access Point.
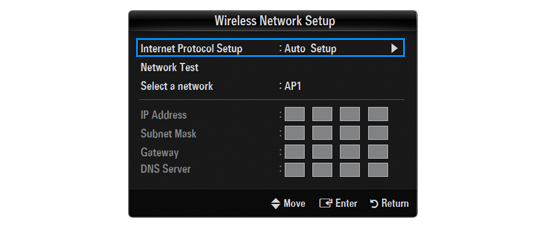
- Select Network Test to check the network connectivity.
STEP 8. Wireless network setup – Manual Setup. The menu is activated only if the Samsung Wireless LAN Adaptor for InfoLive is connected. Please check the network connectivity as follows.
- Set Network Type to Wireless.
- Select Wireless Network Setup.
- Set Internet Protocol Setup to Manual Setup.
- Insert IP Address, Subnet Mask, Gateway and DNS Server by pressing the corresponding number buttons on the remote control.
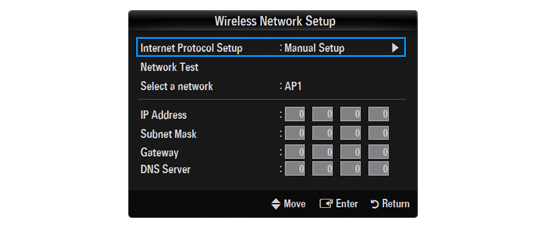
- Select Network Test to check the network connectivity.
- View More: Samsung How can I connect my TV to the Internet?
- View Answer at http://skp.samsungcsportal.com/integrated/popup/HtgDetailGuide.jsp?cdsite=uk&seq=7333
-
-
How do I configure the Samsung PC Share Manager software?
- Spare
STEP 1. Connecting the TV to the internet (wired connection) After installing the PC Share Manager software on your computer, you are ready to connect your Samsung TV to the computer through the Ethernet network. In order to connect, please follow the steps below.
- Connect the LAN port on the back of the TV to the external modem with a LAN cable.
- Connect the PC, on which the PC Share Manager software is installed, to the external modem using a LAN cable.
- Connect the LAN port on the wall and the external modem with a Modem cable.
STEP 2. Connecting the TV to the internet (wireless connection) You can connect your Samsung TV to the computer via wireless as follows.
- Turn on the AP (Access Point - Router or Modem) and the TV.
- After 5 - 10 minutes, plug the Samsung Wireless LAN Adaptor into a USB port on the back or side panel of your TV.
- A pop-up message will appear on your screen and inform you about the progress. Click Yes to switch to wireless network and wait until the connection is established.
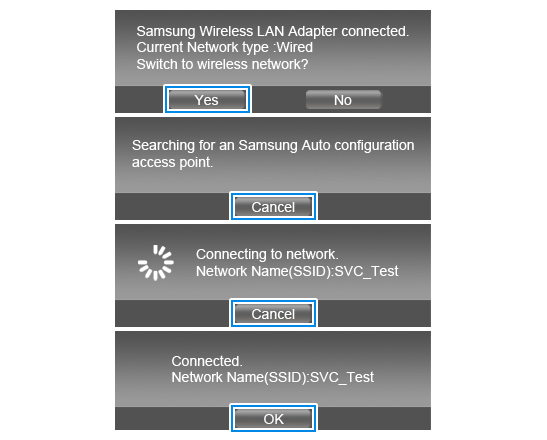
- If the connection fails, reset the router and start again.
NOTE: If you are connected to your router you can see your PC with windows.
To check whether the internet connection is set up normally, perform 'Network Test'.
STEP 3. Configuring the PC Share Manager When your TV is connected to your computer through the network, you can configure the PC Share Manager. To do so, please follow the steps below.
- Turn on your TV and the computer. Wait for Windows to boot up.
- Open the PC Share Manager on your computer.
- Click Share in the upper left corner of the Share Manager window.

- Select Set Device Policy from the drop down menu. The Set Security Policy window appears.

- If your TV is connected to the network and the DLNA feature is working properly, the PC Manager displays the TV and its IP address in the Set Security Policy window.
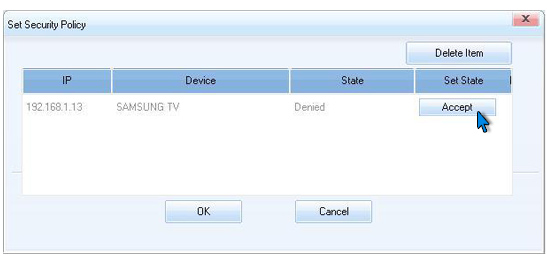
NOTE: The share connection state is set for all devices to Denied by default.
- To allow the connection between your TV and your computer, click Accept. Your TV now has access to any compatible media you have set to be shared in the PC Share Manager.
STEP 4. Changing the computer name In the PC Share Manager on your computer, your TV access is listed as a server. The name of this server is WiseLinkPro PC server by default. In case you use your TV to access more then one computer, it is advisable to rename each one, so you can easily differentiate among them.
To change the name of a computer you want to use, please follow the steps below.
- Open the PC Share Manager.
- Near the upper right corner, the PC Share Manager window displays the server name and a triangle. Click the triangle to open a drop down menu.

- In the drop down menu, click Change Server Name.

- The Change Server Name dialog opens. Type in the new server name and then click OK.
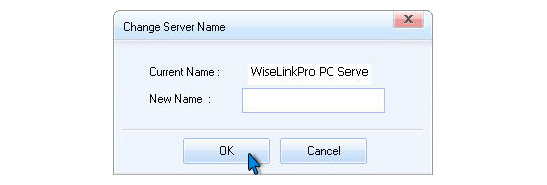
- Your TV will now recognise the new server name.
STEP 5. Problem solving – 'No external storage device found' error message If your TV displays an error message No external storage device found, check the connection status, it means that there is no network connection or your TV can not find the server created by the PC Share Manager on your computer.
To resolve the problem, follow the steps below.
- Make sure your television has a network connection. To run the network test go to the Setupmenu under the Cable Network Setup on your TV.
- Make sure that the PC Share Manager is running and your TV is listed as accepted in the Set Security Policy window.
- Verify that the media (music, pictures, videos) you are trying to access meets the format requirements specified in the user's manual.
- If none of the above helps, disable the firewall software on your computer.
NOTE: Your firewall software may prompt you to allow PC Share Manager to access the network. Click to Allow PC Share Manager access through the firewall.
NOTE: Your firewall may allow you to use Share Manager. Before you disable your firewall, see if you can add Share Manager to the list of programs permitted to breach the firewall.
- In case this still does not help, you may need to uninstall your firewall or antivirus protection software and then reinstall it after PC Share Manager is installed to stop the communication failure.
STEP 6. Problem solving – 'Request cannot be completed' error message When accessing media your TV displays Request cannot be completed. Wiselink Pro will return to the main screen, check the following steps below to resolve the problem.
- Make sure your TV is set to the correct server. Press the Red button and then select the correct server.
- You may not have set any media files to be shared in the PC Share Manager or set only the main folder to be shared. Make sure that you have set up the folders (My Pictures, My Music, My Videos, for example) to be shared in the PC Share Manager instead of just the My Documents folder.
- If the first two options do not resolve the problem, your firewall or antivirus software may be blocking the file sharing and the transfer. Try disabling the software.
STEP 7. Software download If your TV loads only some media, first check the format of the media that will not load and verify if it is compliant with the video, audio or image formats required by PC Share Manager.
If you have installed the PC Share Manager from a CD, upgrade the software to the latest version.
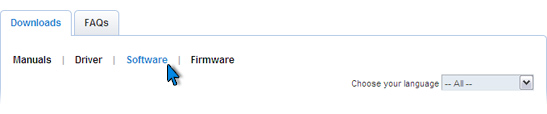
The software can be downloaded from the Downloads section on the Samsung UK website. You can easily get there by following the guidelines below.
Click on Support on the global navigation bar at the top of the page.

Select TV & AV.
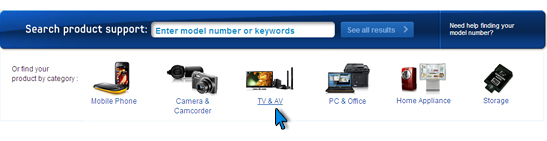
Choose your product type, subtype and model number, and click Select.
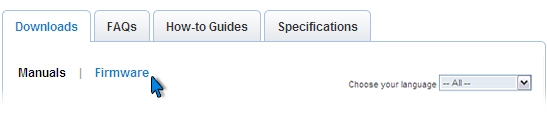
Under Downloads, click on the Software link.
- View More: Samsung How do I configure the Samsung PC Share Manager software?
- View Answer at http://skp.samsungcsportal.com/integrated/popup/HtgDetailGuide.jsp?cdsite=uk&seq=7334
- Spare
-
How can I access the DTV channels on my television?
-
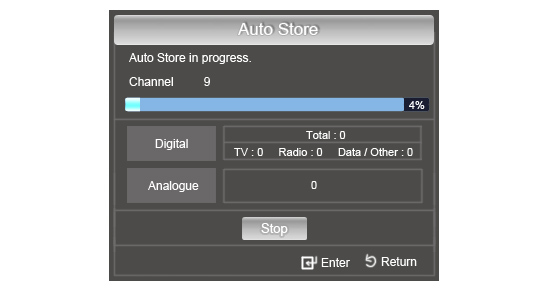
STEP 1. Using an integrated DTV tuner If your TV has an integrated DTV tuner, please follow the steps below.
- Use the Auto Store function to search and store all of the available channels.
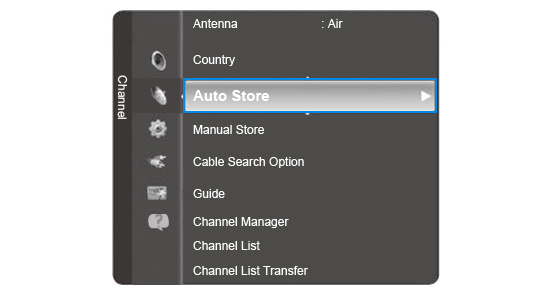
- You can tune analogue, digital or both types of channels.
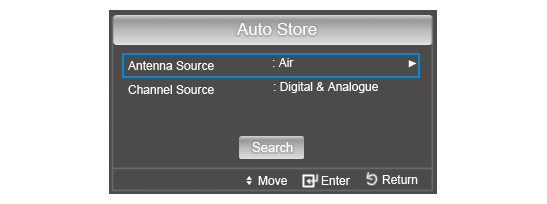
- You can then access them by selecting the number of channels on your remote control. If you press the number twice, you will switch from an analogue channel to a digital one or vice versa.
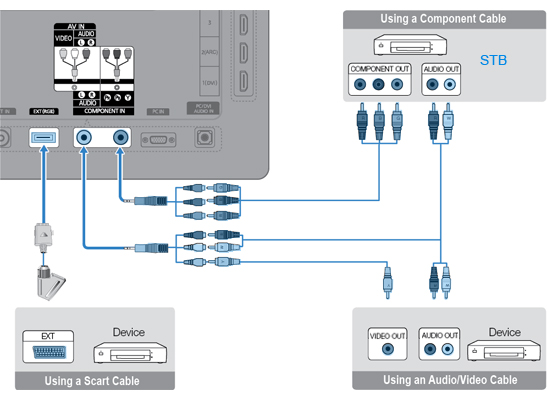
STEP 2. Using an external DTV tuner If the TV does not have an integrated DTV tuner, you have to use an external DTV tuner – STB (set-top-box). Connect the receiver to the rear panel of your TV, install and configure it going after the instructions provided with the device. Then follow the steps below.
- Connect your STB (set-top-box) to your TV by using an HDMI, SCART or an analogue cable.
- Turn your TV on.
- Press the SOURCE button on the remote control until the external DTV receiver is selected.

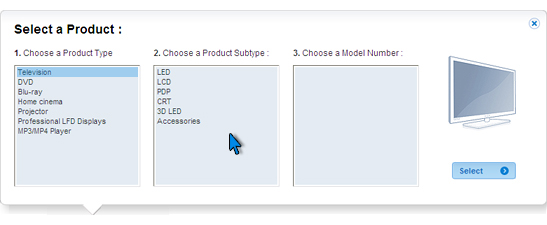
STEP 3. TV specifications To find out if your television model has an integrated DTV receiver, visit the Television section on the Samsung UK website. You can easily get there by following the guidelines below.
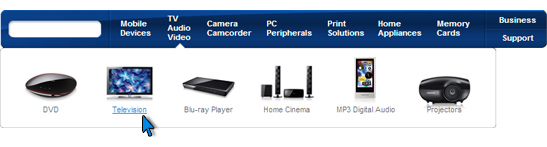
Click on TV Audio Video on the global navigation bar on the Samsung UK website, and clickTelevision.
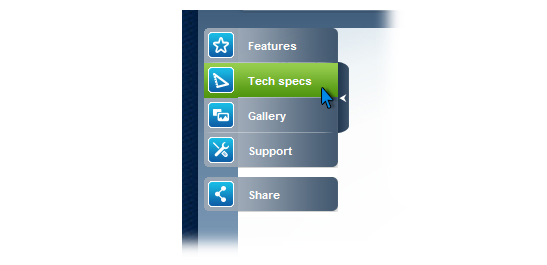
Choose your product type and click on Tech Specs.
NOTE: If you can not get specific channels, please upgrade your TV to the latest firmware by USB, and then please contact a DTV signal supplier if the issue persists.
STEP 4. Firmware download The firmware upgrade can be downloaded from the Downloads section on the Samsung UK website. You can easily get there by following the guidelines below.
Click on Support on the global navigation bar at the top of the page.

Select TV Audio Video.
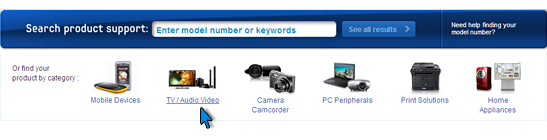
Choose your product type, subtype and model number, and click Select.
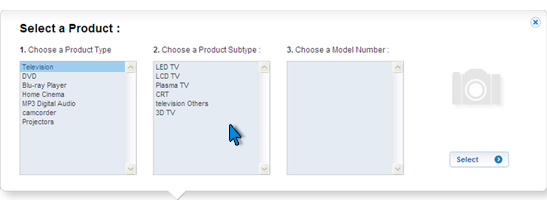
Under Downloads click on the Firmware link.
- View More: Samsung How can I access the DTV channels on my television?
- View Answer at http://skp.samsungcsportal.com/integrated/popup/HtgDetailGuide.jsp?cdsite=uk&seq=7279
-
-
How do I use Internet@TV?
-
STEP 1. Accessing Internet@TV Internet@TV is a feature which brings the best from the internet directly to your TV. You do not need to connect to your computer to access your favourite content.
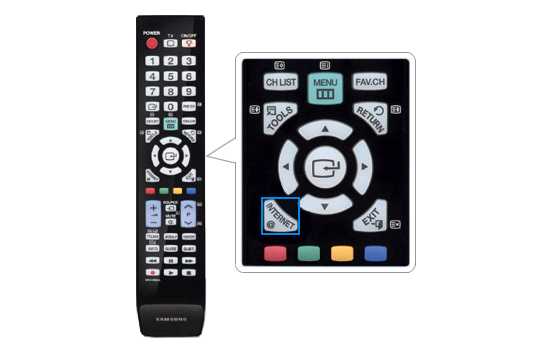
You can quickly access this feature by pressing the INTERNET@TV button on your remote control. This will load the Internet@TV homepage. You will be asked to log in to your account.
NOTE: You have to perform a network setup before you can access Internet@TV for the first time.
STEP 2. Creating new account Internet@TV is a universal feature. Each member of your family can customise it according to their own preferences. You can create a new account and link your favourite applications to it.
To create a new account, go to Internet@TV Settings > Internet@TV ID or press the Abutton on your remote control on the Login screen.
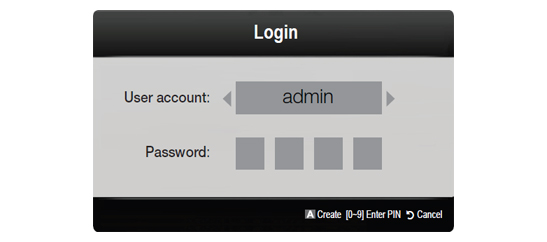
When you are asked to create a new Internet@TV ID, you will see the remote control schema on the screen of your TV. Use the corresponding buttons on your remote control to type in the name and password for your account. The password should have up to 8 characters and must be entered twice for verification. You will now have access to your personal account.
STEP 3. Working with widgets Widgets are Internet@TV applications that allow you to easily access content on the internet. You can manage the list of content according to your personal preferences. You will see the list of your widgets in the My Applications section on the Internet@TV homepage. You can get new widgets from the Recommended applications dock or from the Samsung Apps. Just click on the widget you want and this will be added to your applications.

NOTE: The list of available widgets is updated regularly and is specific for each location.
In some cases you may find that certain widgets or apps do not work as the access to them is restricted by territory or IP address.For more information about this feature, visit Internet@TV page on the Samsung UK website.
- View More: Samsung How do I use Internet@TV?
- View Answer at http://skp.samsungcsportal.com/integrated/popup/HtgDetailGuide.jsp?cdsite=uk&seq=7229
-
-
Make calls and video calls with Skype on your TV
-
Getting started with Skype
Make calls and video calls with Skype on your TV.
OMade possible by Internet@TV - bringing useful and entertaining features directly from the web to your TV.
NOTE
Connect your webcam directly to the TV, not through a USB hub.
If the webcam isn't working properly, turn the TV off then on again, and relaunch Skype.
Skype is disabled when the TV is turned off.
Voice quality may be affected in a noisy environment.
Using a wireless network can degrade call quality.
Use of the Skype software is subject to the Skype End User License Agreement (skype.com/legal/eula), Skype Terms of Service (skype.com/legal/tos) and the Skype Privacy Policy (skype.com/legal/privacy/ general).
If Skype is deleted or upgraded, saved information (History and Options) is deleted.
For help using Skype, visit skype.com
SMS(short message service) and instant messaging are not available.
You need to configure your network before using Skype on your TV. See instructions in this manual.
Screen display
The picture from your webcam is displayed under My video.
If you haven't connected a webcam yet, you will see the message "We can't detect your webcam..." Connect your TV compatible webcam into a USB port on the back of your TV. Buy compatible webcams from skype. com/
Welcome to Skype!
My video
John001
7.92 EUR Skype Credit
Contact
The best one has not....
Video Call
 Your Skype Name, online 1/6status, credit balance and
mood message are displayed here, next to your profi le picture.
Select from the menu items Contact, History, Call phones, and Options. From the menu item press ENTERE and scroll to the A Sign out B Online status C Add contact D Camera Off R Return desired option. The picture from your Sign out: Select to Sign out or Quit Skype. webcam is displayed here. Online status: Select your status. Add contact: Add a Skype contact or a phone number. Camera off: Switches to a voice call. T Options: Displays the Options menu. Skype_ENG.indd 2 2010-06-01 오후 5:34:53 Scroll down to Sign in and press the ENTERE button.✎If you're unable to login, even though the network is operating normally, visit skype.com for help.Enter your password and press the ENTERE button.✎Be sure you have the cursor where you want it when entering the password.✎Once you return to the welcome page, you can tellSkype to sign you in or start up automatically; select the respective box and press theENTERE button.Press [Enter]* Password* Repeat Password Country/RegionPress [Enter]Press [Enter]Sign up* Fields marked with an asterisk are required.* Skype Name Press [Enter]E InputAuto Start when my TV power onPassword Press [Enter]Sign in Create accountSign me in when Skype startse ExitSigning into Skype
When running Skype on your TV for the first time, enter your Skype Name and password or create an account. If you can't login, check the network connection.
To sign in with an existing account:
✎If you have signed in on your TV before, scroll to the right, select ▼ and press the ENTEREbutton. Select your Skype Name and press the ENTERE button.
1
2
3
4
Press the ENTERE button with the box next to Skype Name highlighted. Two OSD (on screen display) windows appear.
✎The application of remote control buttons—
 , ENTERE button and RETURN—is explained at the bottom of the main OSD window. and µ are explained in the right-hand side.
Enter your account name and press the ENTERE button.
Scroll down to the box next to Password and press the ENTERE button.
Welcome To Skype
Skype Name John001
5
To create a new account:
1 Scroll down to Create account.
2 Press the ENTERE button.
3The License Agreement will appear on the screen. Select
Agree or Disagree.
✎For more information on the license agreement, refer to “www.skype.com/legal/eula/”.
✎If you select Disagree, you won't be able to create a Skype account.
4When the sign up window appears, enter your Skype Name,
Password, Country/Region (optional) and E-mail, and select the corresponding box if you would like to receive news and special offers from Skype. Select Sign In.
* E-mail
Yes, send me Skype news and special offers
Sign In
E Input R Return Skype_ENG.indd 3 2010-06-01 오후 5:34:54 Welcome to Skype
Using Skype
Contact
Each contact has an icon next to it:
Icons Status Online Away Offline / Invisible Do not disturb John001 7.92 EUR Skype Credit Contact 1/6 The best one has not.... Video Call To call a contact:
1 Scroll to a contact who is online.
✎When a contact is selected, their picture and mood message are displayed.
2Select Video or Call and press the ENTERE button to call them.
■■ View Profile: See the selected contact's profile.
■■ Send Voicemail: Send a voicemail message to the selected contact. ■■ Remove : Remove the person from your Contact list.
■■ Block: Block this person from contacting you.
View Profile
Send Voicemail
Remove
Block
Skype_ENG.indd 4 2010-06-01 오후 5:34:55 When in a video call
Both you and the person you are talking with are displayed on the screen. The banner near the top of the screen displays the call duration and signal quality.
If you can't see video but hear audio, the person yor are chatting with should update the Skype software in his PC.
Call Duration 00:00:05 Quality John001 Mother Volume Mute Mic. Hold A Sign Out C Full View D Camera Off T Options When in a voice call
The caller ID (identifi cation) and call duration appear in the OSD.
Welcome to Skype!
John001
7.92 EUR Skype Credit
Mother
My Audio
Call Duration 00:00:04 Video Hold Volume Mute Mic. A Sign out T Options ■
 : Hang up the call.
■Volume: Adjusts the volume.
■Mute Mic. / Unmute Mic.: Turns off/on microphone.
■Hold / Resume: Hold/resume the call.
A Skype contact will see a notification message when they are put on hold.
■Video: Switches to a video call.
Help icon
 RED (Sign out): Select to Sign out, Quit Skype or Exit.
C Yellow (Full view / Normal view): Expands the image of the person you're talking with.
D Blue (Camera off): Switches to a voice call.
T Options: Displays the Options menu.
Skype_ENG.indd 5 2010-06-01 오후 5:34:56 Welcome to Skype
Add a contact
Only available when the menu item Contact is selected.
1After pressing the C button, select Add a Skype contact or
Add a phone number.
2If you selected Add a Skype contact, press the ENTERE button with the box under Find people on Skype... highlighted. Enter the person's Skype Name, full name or email.
Add a contact
Add a Skype contact
Add a phone number
E Enter R Return 3Select Find. If you selected Add a phone number, enter the person’s name (optional) and phone number. Select Add.
✎Add a contact can be limited by memory capacity.
✎If someone has sent you a contact request, Add / Reject will appear instead of Video / Call.
History
Shows the history of calls you’ve made, listed from most recent to oldest, top to bottom respectively. Each call has an icon next to it:
Icons Meaning Icons Meaning Incoming call Incoming voicemail Outgoing call Missed voicemail Missed call Incoming conference call Failed outgoing call Missed conference call Scroll to a call, select Video or Call, and press the ENTEREbutton to start a call.
■■ View Profile: View the selected contact's profile.
■■ Send Voicemail: Send a voicemail message to the selected contact.
■■ Add to Contacts: Add this person as a contact.
✎This option is available when you don't have this person saved in your Contact list.
■■ Block : Block this person from contacting you.
■■ Delete This Item: Remove this item from your History.
John001
7.92 EUR Skype Credit
History 1/1
 Father
Fri Jan 1 00:05:20 2010
Video Call
View Profile
Send Voicemail
Add to Contacts
Block
DeleteThis Item
✎History can be limited by memory capacity.
✎The time set on the TV is applied to the History. If your TV's time is not set, the time in the History will not be shown.
Skype_ENG.indd 6 2010-06-01 오후 5:34:58 Call phones
Call phone and mobile numbers from Skype.
✎To use this feature, visit skype.com on your computer to buy Skype Credit or a subscription.
1 Select the country or region you are dialing.
2 Enter the phone number with area code.
✎If a phone number with 00 followed by the country code is entered, the entered number will be dialed regardless of the selected country or region.
3 Select Call.
Receiving a call
John001
7.92 EUR Skype Credit
Call phones
Select the Country/Region you are dialing
Korea, south +82 Enter the phone number with area code
Call
When you receive a call, a window will appear in the bottom, right- hand corner of your screen. Choose betweenVideo, Voice, and Reject by selecting the appropriate icon and pressing the ENTERE button.
✎If a call comes in when another application is running, the call notification window appears. You must close the application before you can answer the call.
✎If a conference call comes in, the Video option is disabled.
Incoming Call
Uncle
Video Voice Reject Skype_ENG.indd 7 2010-06-01 오후 5:34:59 Welcome to Skype
Setting up Skype
Options
✎Be sure to save any changes made for each menu item (User Profile, Change Passwordetc.). If you do not do so before scrolling back to the vertical list, your changes will be lost. To save, press the
 button on your remote control.
■■ User profile: Add or change personal information - picture, email address, country/region and phone number(s)— here. To change your profile picture:
1 Select Change.
2Scroll to the desired picture, and press the ENTERE button, or select Video snapshot to take a picture with your webcam.
✎If you want to add your state/ province, city, gender etc. sign into Skype on a computer (available for download at skype.com).
Options
User profile Change password General Settings Audio Settings Video Settings Privacy Settings Blocked Users Call Diverting Voicemail
About Skype
John001 Change E-mail Enter your E-mail address Country/Region Korea, South Home phone Enter Phone Number Office phoneEnter Phone Number Mobile phone Enter Phone Number State/Province City Gender Birth Date Date Month Year D Save R Return ■■ Change password: To change your password, first enter your old password; then enter a new password twice.
■■ General settings: Select whether you want Skype to launch automatically when you turn on the TV.
✎In case the picture from your camera flickers (image brightness varies quickly), you should fix the power line setting in Anti Flicker and choose the power line frequency used in your country.
■■ Audio settings: Select whether you want Skype to Automatically adjust microphone settings. If you don’t want the microphone adjusted automatically, select Off and adjust the Microphone volume manually.
■■ Video settings: Adjust the privacy settings for video. Choose who you will receive video from by selecting
Anyone, Only people in my Contact list or No one. Choose who you send video to by selecting People in my Contact list or No one.
■■ Privacy Settings: Choose who you will receive calls from. Select Allow anyone to contact me or Only allow people in my Contact list.
■■ Blocked Users: If you don’t want to hear from someone, block them by entering their Skype Name or phone number. Any blocked persons will be listed in this window.
✎You can also block a person in the Contact and History lists by selecting the contact and pressing the TOOLST button.
■■ Call forwarding (diverting calls): To forward calls from your Skype account when you’re not on Skype, add the phone numbers you want calls directed to. Select the country and enter the number with the area code. Enter the divert time to specify the delay before the call is diverted.
✎You need to buy Skype Credit from skype.com to use this feature.
■■ Voicemail: This feature allows people to leave audio messages when you are away. You can listen to the messages wherever you are signed into Skype. For more information or to get voicemail, go to skype.com and click on Account.
■■ About Skype: View the Skype copyright information.
- View More: Samsung Make calls and video calls with Skype on your TV
- View Answer at http://downloadcenter.samsung.com/content/UM/201006/20100603094513375/Skype_Eng-0601-2.pdf
-
-
Can I use Skype with a 2009 TV?
- Unfortunately, 2009 televisions do not have the ability to use Skype as a USB connection is needed.
- View More: Panasonic Can I use Skype with a 2009 TV?
- View Answer at http://www.panasonic.co.uk/html/en_GB/Support/Ask+a+question/3580816/index.html
-
How do I change the layout of the thumbnails in Viera Cast?
- To change the layout of the thumbnails, access Viera Cast and once the main screen has opened, highlight the Set-up & Help thumbnail and press OK. Once the new options appear, highlight Customize Homescreen and press OK. You will then see a three-tier platform with all of the icons on display. To change the layout, you will have to use the circular keypad on your remote to highlight the icon you want to move. Once it is highlighted press OK and then use the circular keypad again to move to the location you want to move it to and then press OK.
- View More: Panasonic How do I change the layout of the thumbnails in Viera Cast?
- View Answer at http://www.panasonic.co.uk/html/en_GB/Support/Ask+a+question/3580816/index.html
-
Can I use my plasma as a PC monitor?
- We would not recommend using a plasma television as a monitor for more than two hours a day. Any longer and this may cause image retention on the television. This is not a manufacturing fault and would not be covered by warranty.
- View More: Panasonic Can I use my plasma as a PC monitor?
- View Answer at http://www.panasonic.co.uk/html/en_GB/Support/Ask+a+question/3580816/index.html
-
How do I connect my PC to my TV?
- If the television has a VGA connection, then we would suggest connecting via the VGA connection. You would need to ensure that the PC is outputting a compatible signal to the television; compatible signals can be found in your television’s instruction manual.
You will need to select the PC input from the input menu on your television.
If you are connecting your PC to the HDMI connection of the TV, you might need to contact your PC or graphics card manufacturer to enquire as to whether their product can output a standard video signal for Televisions. Outputting PC resolutions may result in no picture being displayed on the TV.
Unfortunately, Panasonic cannot guarantee compatibility with all third party products, even if the above requirements are met. - View More: Panasonic How do I connect my PC to my TV?
- View Answer at http://www.panasonic.co.uk/html/en_GB/Support/Ask+a+question/3580816/index.html
- If the television has a VGA connection, then we would suggest connecting via the VGA connection. You would need to ensure that the PC is outputting a compatible signal to the television; compatible signals can be found in your television’s instruction manual.
-
How do I get my TV to default to my Sky/Virgin box?
- You can change the Power On Preference setting in the Setup/Other Settings menu. Please change this setting to AV.
If using HDMI, connect the Sky/Virgin box to HDMI 1. - View More: Panasonic How do I get my TV to default to my Sky/Virgin box?
- View Answer at http://www.panasonic.co.uk/html/en_GB/Support/Ask+a+question/3580816/index.html
- You can change the Power On Preference setting in the Setup/Other Settings menu. Please change this setting to AV.