- Question
How do I configure the Samsung PC Share Manager software?
- Answer
- Spare
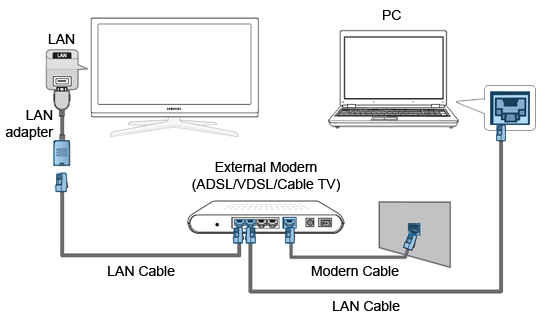
STEP 1. Connecting the TV to the internet (wired connection) After installing the PC Share Manager software on your computer, you are ready to connect your Samsung TV to the computer through the Ethernet network. In order to connect, please follow the steps below.
- Connect the LAN port on the back of the TV to the external modem with a LAN cable.
- Connect the PC, on which the PC Share Manager software is installed, to the external modem using a LAN cable.
- Connect the LAN port on the wall and the external modem with a Modem cable.
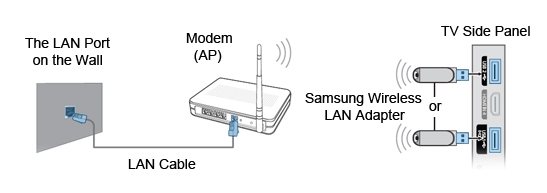
STEP 2. Connecting the TV to the internet (wireless connection) You can connect your Samsung TV to the computer via wireless as follows.
- Turn on the AP (Access Point - Router or Modem) and the TV.
- After 5 - 10 minutes, plug the Samsung Wireless LAN Adaptor into a USB port on the back or side panel of your TV.
- A pop-up message will appear on your screen and inform you about the progress. Click Yes to switch to wireless network and wait until the connection is established.
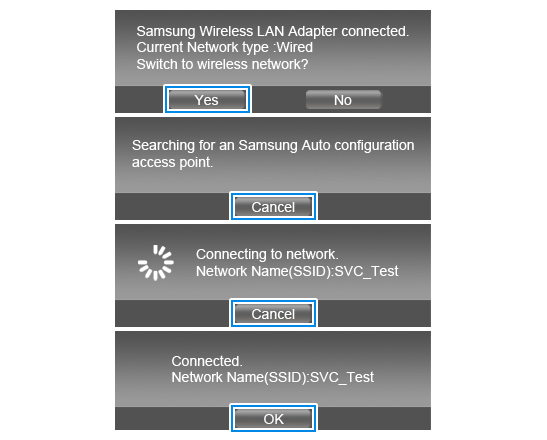
- If the connection fails, reset the router and start again.
NOTE: If you are connected to your router you can see your PC with windows.
To check whether the internet connection is set up normally, perform 'Network Test'.
STEP 3. Configuring the PC Share Manager When your TV is connected to your computer through the network, you can configure the PC Share Manager. To do so, please follow the steps below.
- Turn on your TV and the computer. Wait for Windows to boot up.
- Open the PC Share Manager on your computer.
- Click Share in the upper left corner of the Share Manager window.

- Select Set Device Policy from the drop down menu. The Set Security Policy window appears.

- If your TV is connected to the network and the DLNA feature is working properly, the PC Manager displays the TV and its IP address in the Set Security Policy window.
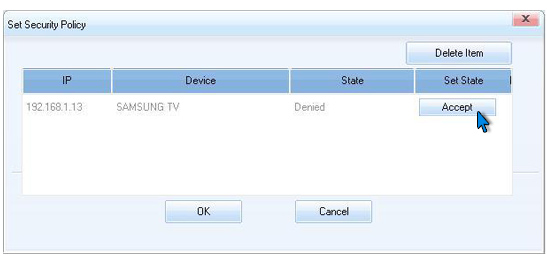
NOTE: The share connection state is set for all devices to Denied by default.
- To allow the connection between your TV and your computer, click Accept. Your TV now has access to any compatible media you have set to be shared in the PC Share Manager.
STEP 4. Changing the computer name In the PC Share Manager on your computer, your TV access is listed as a server. The name of this server is WiseLinkPro PC server by default. In case you use your TV to access more then one computer, it is advisable to rename each one, so you can easily differentiate among them.
To change the name of a computer you want to use, please follow the steps below.
- Open the PC Share Manager.
- Near the upper right corner, the PC Share Manager window displays the server name and a triangle. Click the triangle to open a drop down menu.

- In the drop down menu, click Change Server Name.

- The Change Server Name dialog opens. Type in the new server name and then click OK.
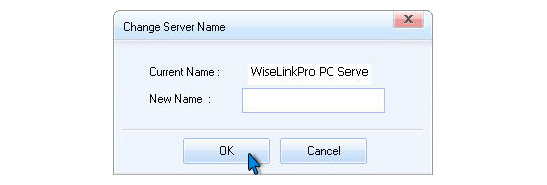
- Your TV will now recognise the new server name.
STEP 5. Problem solving – 'No external storage device found' error message If your TV displays an error message No external storage device found, check the connection status, it means that there is no network connection or your TV can not find the server created by the PC Share Manager on your computer.
To resolve the problem, follow the steps below.
- Make sure your television has a network connection. To run the network test go to the Setupmenu under the Cable Network Setup on your TV.
- Make sure that the PC Share Manager is running and your TV is listed as accepted in the Set Security Policy window.
- Verify that the media (music, pictures, videos) you are trying to access meets the format requirements specified in the user's manual.
- If none of the above helps, disable the firewall software on your computer.
NOTE: Your firewall software may prompt you to allow PC Share Manager to access the network. Click to Allow PC Share Manager access through the firewall.
NOTE: Your firewall may allow you to use Share Manager. Before you disable your firewall, see if you can add Share Manager to the list of programs permitted to breach the firewall.
- In case this still does not help, you may need to uninstall your firewall or antivirus protection software and then reinstall it after PC Share Manager is installed to stop the communication failure.
STEP 6. Problem solving – 'Request cannot be completed' error message When accessing media your TV displays Request cannot be completed. Wiselink Pro will return to the main screen, check the following steps below to resolve the problem.
- Make sure your TV is set to the correct server. Press the Red button and then select the correct server.
- You may not have set any media files to be shared in the PC Share Manager or set only the main folder to be shared. Make sure that you have set up the folders (My Pictures, My Music, My Videos, for example) to be shared in the PC Share Manager instead of just the My Documents folder.
- If the first two options do not resolve the problem, your firewall or antivirus software may be blocking the file sharing and the transfer. Try disabling the software.
STEP 7. Software download If your TV loads only some media, first check the format of the media that will not load and verify if it is compliant with the video, audio or image formats required by PC Share Manager.
If you have installed the PC Share Manager from a CD, upgrade the software to the latest version.
The software can be downloaded from the Downloads section on the Samsung UK website. You can easily get there by following the guidelines below.
Click on Support on the global navigation bar at the top of the page.

Select TV & AV.

Choose your product type, subtype and model number, and click Select.
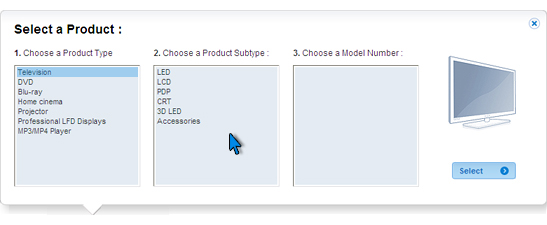
Under Downloads, click on the Software link.

- View Answer at http://skp.samsungcsportal.com/integrated/popup/HtgDetailGuide.jsp?cdsite=uk&seq=7334
- Not the answer you were looking for?
- Click a problem area below for more TV solutions
-
- Not sure where to start, try searching our site
