
Home / Product Selection / TV / Troubleshooting
-
I am experiencing a colour problem on my TV. What should I do?
-
STEP 1. Connection If the colour is wrong or missing when using a connected device, make sure that the cables are connected correctly. Incorrect or loose connections may cause colour problems or a blank screen.
The correct video connection is set up as shown in the diagram below.
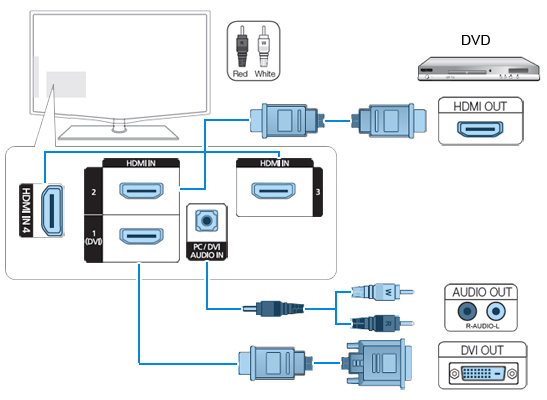
- When using an HDMI / DVI cable connection, you must use the HDMI IN 1 (DVI) jack. For the DVI cable connection, use a DVI to HDMI cable or DVI-HDMI (DVI to HDMI) adaptor for video connection and the PC / DVI AUDIO IN jacks for audio.
- If an external device such as a DVD / Blu-ray player / cable box / STB satellite receiver supporting HDMI older than version 1.3, the TV may show abnormal colours. If you suspect the version is older than 1.3, contact the provider of the device to confirm the HDMI version and request an upgrade.
NOTE: It is recommended you purchase an HDMI-certified cable. Otherwise, the screen may appear blank or a connection error may occur.
NOTE: If the picture is black and white when using an AV composite input, connect the video cable (yellow) to the green input jack (input 1) on the TV.
STEP 2. TV settings If you are experiencing poor colour or brightness, please follow the instructions below.
IMPORTANT: Before adjusting the TV settings, please perform a Picture Test. To confirm that your TV is displaying the test image properly, proceed as follows. Go to Menu > Support >Self Diagnosis > Picture Test > Yes. If the test image is displayed properly, the poor quality may relate to the source or signal.
- To adjust the Picture options on the TV menu, go to the Picture mode and selectColour or Brightness.
- To adjust the Energy Saving options on the TV menu, go to Picture > ECO Solution > Energy Saving.
- Try resetting the picture to view the default picture settings. Go to Picture > Picture Reset.
NOTE: You can also reset your TV to factory settings by pressing the EXIT button on the remote control.
As the colour problem may relate to the TV signal, try the following to solve it.
- Press the MENU button to display the menu.
- Use the
 or
or  buttons to get to the Setup > Plug & Play. Then press the ENTERbutton.
 - Tune the channels until 100%.
If the previous advice does not help, please upgrade your TV to the latest firmware.
STEP 3. Firmware download The firmware upgrade can be downloaded from the Downloads section on the Samsung UK website. You can easily get there by following the guidelines below.
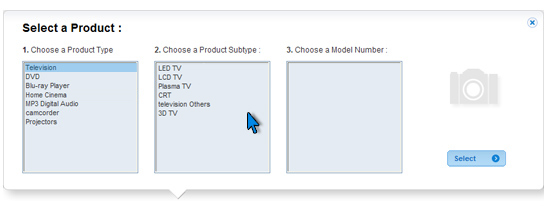
Click on Support on the global navigation bar at the top of the page.

Select TV & AV.
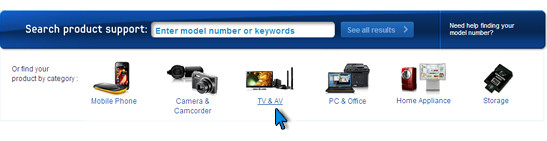
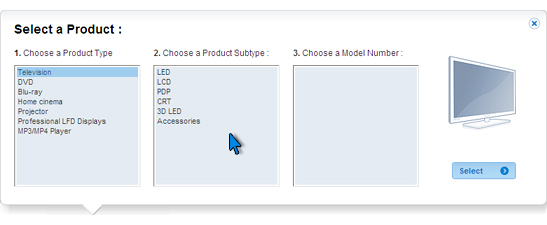
Choose your product type, subtype and model number, and click Select.
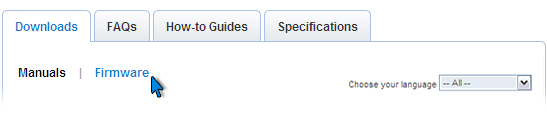
Under Downloads, click on the Firmware link.

- View More: Samsung I am experiencing a colour problem on my TV. What should I do?
- View Answer at http://skp.samsungcsportal.com/integrated/popup/HtgDetailGuide.jsp?cdsite=uk&seq=7373
-
-
What should I do when the sound and the picture on my TV are not clear when watching TV broadcast signal?
-
STEP 1. The Fine Tune function If the sound and the picture are not clear when watching a broadcasting channel (signal), use the Fine Tune function. To fine tune your TV, please follow the steps below.
- Press the Menu button to display the menu.
- Press the
 or
or  buttons on the remote control to select the Channel, then press Enter.
- Press the
 or
or  buttons to select Fine Tune, then press Enter.
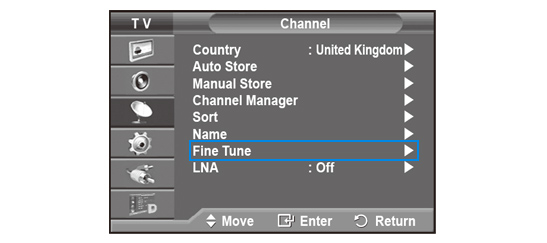
- To get a clearer picture and a better sound quality, press the
 or
or  buttons until you get the optimal settings.
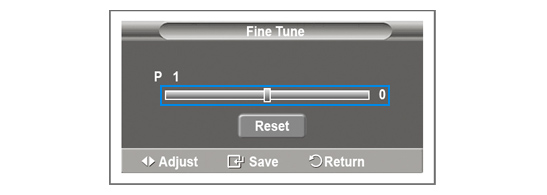
- Press Enter to save your choice and then press Exit to go back.
STEP 2. Digital Noise Filter (Digital NR) To fine tune your TV, you can also use the Digital Noise Filter. To do so, please follow the steps below.
- Press the Menu button to display the menu.
- Press the
 or
or  buttons on the remote control to select Picture.
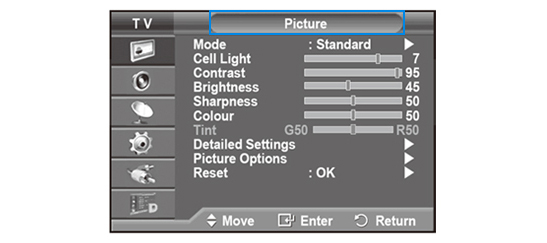
- Press the
 or
or  buttons to select Picture Options, then press Enter.
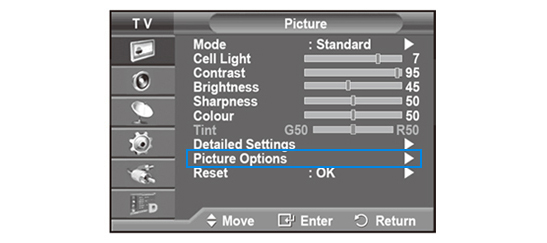
- In the Picture Options menu, select Digital Noise Filter.
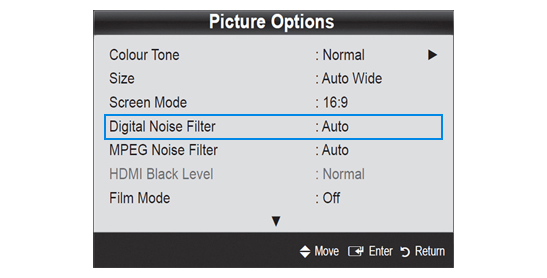
- To get a better picture quality, press the
 or
or  buttons until you get the optimal settings. You can choose from Off / Low / Medium / High / Auto / Auto Visualisation.
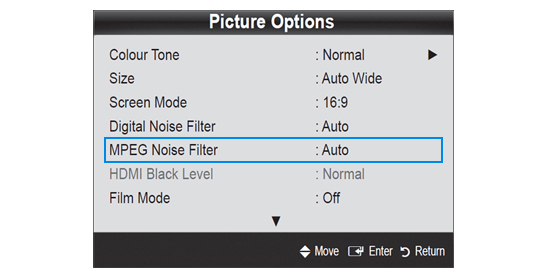
You are able to adjust the MPEG Noise Filter for Samsung Plasma TVs (series 7+, 7, 6+, 6, 5+, 5, 4+).when the input signal is in the MPEG format. Go to OSD Menu > Picture >Picture Options > MPEG Noise Filter.
STEP 3. Firmware update Keep your Samsung TV up-to-date with the latest firmware available. The firmware upgrade can be downloaded from the Downloads section on the Samsung UK website. You can easily get there by following the guidelines below.
Click on Support on the global navigation bar at the top of the page.

Select TV Audio Video.
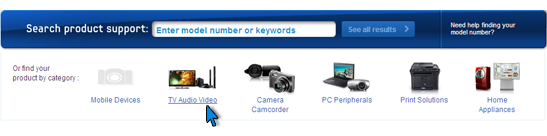
Choose your product type, subtype and model number, and click Select.
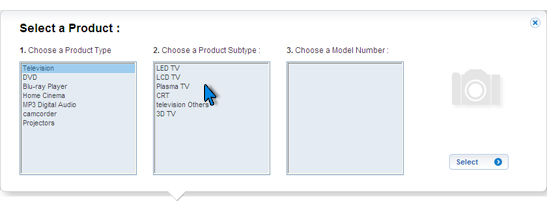
Under Downloads, click on the Firmware link.

IMPORTANT: When the firmware is upgraded, the video and the audio settings will return to default settings.
- View More: Samsung What should I do when the sound and the picture on my TV are not clear when watching TV broadcast signal?
- View Answer at http://skp.samsungcsportal.com/integrated/popup/HtgDetailGuide.jsp?cdsite=uk&seq=7290
-
-
What should I do when one channel receives good picture but has no sound?
-
STEP 1. Overview This problem could be caused by several things. Please try the following to solve it.
- Ensure that the antenna cable and other connectors are connected properly.
- Confirm by pressing the info button if you are viewing an Analogue or Digital TV channel.
- Change the primary Audio Language of your channel.
- Change the Audio Format.
- Change the Sound Mode.
- Retune your TV.
STEP 2. Changing the primary Audio Language of your channel Some TV channels allow you to manually change the primary audio language. On Analogue, this can only be done when receiving a NICAM stereo signal. However, very few programmes come with two or more audio signals with different languages.
To change the Audio Language, please follow the steps below.
- Navigate to the sound menu.
- On the Remote control, press Menu.
- Select Sound and change the Audio Language.
STEP 3. Changing the Audio Format and the Sound Mode If you accidentally select an audio format which is not available on your TV, the sound will be missing (e.g. you select the 5.1 audio format).
To change the Audio Format, press the Tools button on the remote control and change the audio format to MPEG.
Some TV channels may use only MONO sound. If you have the default sound mode set toSTEREO, the sound may be significantly reduced or almost inaudible.
To change the Sound Mode, press the DUAL I-II button on your remote control.
STEP 4. Retuning the TV To automatically search and store all of the available channels, please follow the steps below.
- Navigate to the auto store option.
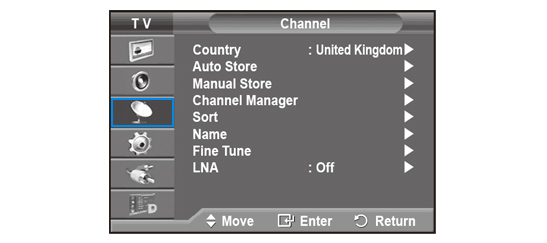
- On the remote control, press Menu > Channel > Auto Store.
- Ensure you select the correct signal source (Antenna) and choose Analogue, Digital or Analogue & Digital.
IMPORTANT: Always keep your TVs firmware updated to achieve optimal performance. The latest firmware upgrade can be downloaded from the Downloads section on the Samsung UK website. You can easily get there by following the guidelines below.
STEP 5. Firmware download and upgrade Click on Support on the global navigation bar at the top of the page.

Select Enter the model number in the search product field or select TV Audio Video.

Choose your product type, subtype and model number, and click Select.
Under Downloads click on the Firmware link.
NOTE: Your TV has to support firmware upgrade via USB (if your TV does not support this feature, then nothing will be available).
To perform the firmware upgrade, please follow these steps.
- Upload the upgrade file to a USB flash drive.
- Plug the USB flash drive into the USB port on the back or the side panel of your TV.
- Press MENU and go to Support > Software Upgrade > By USB.
- View More: Samsung What should I do when one channel receives good picture but has no sound?
- View Answer at http://skp.samsungcsportal.com/integrated/popup/HtgDetailGuide.jsp?cdsite=uk&seq=7236
-
-
Why can’t I increase the sound past a certain point on the TV when using Skype?
- The sound is limited when using Skype to prevent feedback on the camera's microphone.
- View More: Panasonic Why can’t I increase the sound past a certain point on the TV when using Skype?
- View Answer at http://www.panasonic.co.uk/html/en_GB/Support/Ask+a+question/3580816/index.html
-
My Onkyo A/V receiver does not work with my 2009 Panasonic TV via HDMI but other products do, why is this?
- This problem is caused by a software conflict between Onkyo A/V receivers and Panasonic televisions and the way in which the products deal with HDMI signals. Panasonic can log a request for a firmware update to be sent out via SD card for you to resolve this.
- View More: Panasonic My Onkyo A/V receiver does not work with my 2009 Panasonic TV via HDMI but other products do, why is this?
- View Answer at http://www.panasonic.co.uk/html/en_GB/Support/Ask+a+question/3580816/index.html
-
Why can't I Select the AV input on my TV?
- This can be checked in the Input Labels setting in Display settings. You may see that the input you are trying to select has Skip next to it. You can then use the right or left hand arrow to change this so that the AV input will be displayed when the button is pressed.
- View More: Panasonic Why can't I Select the AV input on my TV?
- View Answer at http://www.panasonic.co.uk/html/en_GB/Support/Ask+a+question/3580816/index.html
-
My new TV keeps turning itself off after two hours of it being on. Is this a fault?
- This is not a fault. The AUTO STANDBY function may have been activated. In order to switch off the setting you will need to do the following
Press the MENU button of the TV remote
Scroll down to SETUP and press OK
Scroll down to OTHER SETTINGS and press OK
Scroll down to AUTO STANDBY and press the left or right arrows to set the option to OFF - View More: Panasonic My new TV keeps turning itself off after two hours of it being on. Is this a fault?
- View Answer at http://www.panasonic.co.uk/html/en_GB/Support/Ask+a+question/3580816/index.html
- This is not a fault. The AUTO STANDBY function may have been activated. In order to switch off the setting you will need to do the following
-
The picture quality is good but the TV does not produce any sound when connected to an accessory device with an HDMI to HDMI cable.
-
Follow these steps to check if your device is configured correctly;
- Some accessory devices require you to turn on the HDMI audio output when using an HDMI to HDMI connection.
- Check the on-screen menu of the accessory device to ensure that the HDMI audio output is set to ON.
- In some cases, you may need to set the digital audio format of the accessory device to Pulse-code modulation (PCM) mode. For detailed information, please refer to the user manual of the accessory device.
- If the TV is connected to a PC, make sure that you have installed the latest drivers for the graphics card of your PC.
- View More: Philips The picture quality is good but the TV does not produce any sound when connected to an accessory device with an HDMI to HDMI cable.
- View Answer at http://www.p4c.philips.com/cgi-bin/dcbint/cpindex.pl?scy=GB&mid=Link_FAQs&view=aa12_view_partial.html&session=20111208100916_2.100.96.79&list=aa12_list_partial.html&slg=ENG&ctn=32PFL5522D/05&dct=FAQ&refnr=0055645&faqview=1
-
-
My TV does not respond to the remote control and the letters CF are displayed in the upper right hand corner of the screen.
-
The letters CF appear in the right hand corner of the screen to indicate that the TV is in factory mode.
To exit the factory mode, press the ‘VOLUME -' and 'PROGRAM -' buttons on the TV at the same time for 3 seconds.
- View More: Philips My TV does not respond to the remote control and the letters CF are displayed in the upper right hand corner of the screen.
- View Answer at http://www.p4c.philips.com/cgi-bin/dcbint/cpindex.pl?scy=GB&mid=Link_FAQs&view=aa12_view_partial.html&session=20111208100916_2.100.96.79&list=aa12_list_partial.html&slg=ENG&ctn=32PFL5522D/05&dct=FAQ&refnr=0065723&faqview=1
-
-
My computer stops working or reboots/restarts when I connect it to the TV with an HDMI to HDMI cable.
-
Check your HDMI cable and cable-connection to make sure that all plugs are fitted well into their sockets and test with a different or new HDMI cable.
If the problems persist:
- Check the operating system and the graphics card of your computer system.
- Some combinations of operating systems and graphic cards have been reported to cause conflicts.
- For detailed information, please refer to the website of your PC or graphics card maker.
- View More: Philips My computer stops working or reboots/restarts when I connect it to the TV with an HDMI to HDMI cable.
- View Answer at http://www.p4c.philips.com/cgi-bin/dcbint/cpindex.pl?scy=GB&mid=Link_FAQs&view=aa12_view_partial.html&session=20111208100916_2.100.96.79&list=aa12_list_partial.html&slg=ENG&ctn=32PFL5522D/05&dct=FAQ&refnr=0066731&faqview=1
-