Home / Product Selection / Tablet / Troubleshooting

HomeHelpHub Forum
Sort by Solutions found 49, No of pages 1
  • iOS: Understanding Restrictions

    • Summary

      You can enable Restrictions, also known as Parental Controls, on an iPhone, iPad, or iPod touch to prevent access to specific features. Learn more about the types of Restrictions that are available, as well as how to enable or disable Restrictions on your device.

      Products Affected

      iPad, iPhone, iPod touch

      You can enable and adjust Restrictions or on your device to prevent access to specific features or content on the device. Locate these settings by tapping Settings > General > Restrictions.

      Using Restrictions

      To Enable Restrictions, tap Enable Restrictions and enter a passcode. The passcode will be required to make changes to these settings or to disable restrictions.

      You can choose to restrict access to the following applications and features on the device:

      • Safari
      • YouTube
      • Camera (also disables FaceTime)
      • FaceTime
      • iTunes
      • Ping
      • Installing apps
      • Deleting apps
      • Multiplayer games in Game Center
      • Adding friends in Game Center

      You can choose to prevent changes to the following settings/accounts:

      • Location Services
      • Accounts (disables changes to Mail, Contacts, Calendars, iCloud, and Twitter accounts)

      In addition, you can choose to prevent access to specific content types:

      • Ratings (select the country in the ratings section to automatically apply the appropriate content ratings for that region)
      • Music and podcasts
      • Movies
      • TV shows
      • Apps
      • In-App Purchases

      You can also adjust the time necessary before a password is required to purchase content.

      Additional Information

      If your iOS device is missing a particular application or if a certain feature is not available, ensure that Restrictions are not enabled. Symptoms can include:

      • App missing from the Home screen (Safari, Camera, or YouTube for example)
      • Feature or service unavailable (Siri, Ping, Location Services, and so on)
      • Setting missing or grayed out (such as Mail, Contacts, and Calendar; iCloud; Twitter; FaceTime)

      Important: Restrictions can also be enabled or enforced using a profile (typically installed when using the device for business or education purposes). You can check for installed profiles in Settings > General > Profiles. For additional information, contact the administrator or the person who installed the profile.

      Find information on using Parental Controls for iTunes.


    • View More: Apple iOS: Understanding Restrictions
    •  
    •  
  • Motorola XOOM Wi-Fi - Master Reset / Factory Data Reset

    • Factory Data Reset is a tool used to remove everything that was imported, added or installed on the device.

      WARNING: When using this feature; everything is deleted, including Dungeon Defenders and some pre-loaded music. 

      It is STRONGLY recommended that you backup before performing a reset. Click here for information on how to back up your files. 

      To Perform a Reset

      1. From the home screen, touch Apps
      2. Touch Settings
      3. Touch Privacy
      4. Touch Factory data reset
      5. Check the Erase USB storage box if you would like to erase all content stored.
      6. Touch Reset tablet and follow the onscreen instructions


      External factory reset

      If you are unable to navigate through the menu to perform a factory data reset, you can follow the steps outlined below:

      1. Ensure your tablet is off.
      2. Turn on  the tablet, while the tablet is showing Motorola logo, press the volume down key.
      3. Keep pressing volume down key till "Android recovery text" shows up in top left corner
      4. Press volume up key to place tablet in Android recovery mode
      5. While talbet is showing Android recovery screen, press and hold the power button.
      6. While power button is pressed, press and release volume up key
      7. You should be prompted with: wipe data/factory reset option
      8. Using the volume down button, scroll down to “Wipe data/factory reset”
      9. Press power to select option
      10. Scroll down to select “Yes, delete all user data”.
      11. Use the power button to select.
      12. Press the Power button to reboot.

    • View More: Motorola Motorola XOOM Wi-Fi - Master Reset / Factory Data Reset
    •  
    •  
  • Motorola XOOM Wi-Fi - Forgot your Google Account password?

    • You need your Google Account password to sync Google Mail (Gmail), Calendar, and Google contacts to your device. You also need this password to use Google Talk and download apps from Android Market.
      If you have forgotten your Google Account password, you can try to recover it by going to the Google website.

      1. On your device or computer, open your web browser and go to https://www.google.com/accounts/ForgotPasswd
      2. Enter the email address or username that you use to sign in to your Google Account.
      3. Complete the word verification process. Enter the characters that you see onscreen and click Submit.

      An email will be sent to the alternate email address you provided when you created your Google Account. Follow the instructions in the email to reset your password.

      If you don't have an alternate email address or cannot access the email account you used to create your Google Account, you can reset your Google Account after 24 hours by answering the security question for password recovery.

    • View More: Motorola Motorola XOOM Wi-Fi - Forgot your Google Account password?
    •  
    •  
  • Motorola XOOM Wi-Fi - Troubleshooting tips

    • Forced reboot

      In the unlikely event that your device becomes unresponsive, try a forced reboot: Press and hold both Power/Lock button and the up-volume key for three seconds.

      Note: Data on your tablet will not be deleted.


      Factory Reset

      To reset your tablet to factory settings and erase all the data on your device, from the home screen Apps >Settings > Privacy > Factory data reset.

      Warning: All data on your tablet will be deleted.


      Factory reset using external hard keys

      Click here for information on how to perform a factory reset using external keys.


      Tablet will not turn on or display stops responding

      • Ensure that your tablet is fully charged before troubleshooting. Connect the power adapter to the tablet and a working outlet.  When the device is powered off and the battery is charging, the charging indicator lights white until 100%, and turns green when it is 100% charged. Let the tablet charge for at least 20 minutes before trying to power on.
      • In the unlikely event that your display stops responding, try restarting your tablet by pressing and holding the up volume button and pressing the power button until the tablet  restarts. If the screen is still unresponsive, ensure you have removed the shipping screen-protector and any third-party screen protectors and retry.


      For all other unusual  behavior

      Power cycle your tablet by pressing and holding the power button until you are prompted to shut down.  Once fully powered off, press and hold the power button to power the tablet back up.


      How do I prevent my device from changing orientation?

      Lock the screen orientation by touching the bottom right corner, touching the triangle, then touching “Lock screen orientation.”


      Screen display message "RSD protocol support 0"

      You can accidentally get into "RSD protocol support 0" screen by holding volume up button during power up process. (get out of this screen with Forced reboot: while holding power button, press the volume up).


      Screen display message "Fastboot Protocol Support"

      You can accidentally get into "Fastboot Protocol Support" screen by holding volume down button during power up process. (get out of this screen with Forced reboot: while holding power button, press the volume up).


      Screen display message "Cold Booting Linux"

      If you see message "Cold Booting Linux", you are pressing both volume buttons at the same time. Tablet will still power on and function fully. You do not need to power the tablet off and on.


    • View More: Motorola Motorola XOOM Wi-Fi - Troubleshooting tips
    •  
    •  
  • Motorola XOOM Wi-Fi - Reset Pattern Lock / Pin code

    • "Pattern" lock or a pin code are types of Security lock for your device.

      You will need your Gmail / Google Account credentials to reset pattern lock, if you have set up a pattern lock on your tablet without first setting up a valid Gmail/Google Account you can remember, you will need to perform an external reset to wipe out your tablet's memory and start over.

      You will need to complete 5 attempts of your pattern lock or passcode to be given chance to unlock handset with your Gmail / Google account.

      There will be a button on bottom right that states Forgot pattern. If you forgot your screen unlock pattern, tapForgot pattern.

      You will be prompted to sign in using the Google account you programmed into the tablet during initial start up.

      If successful, you will move to next screen to create a new security lock. You can cancel out of that step and return to homescreen.

      • You must have had a Gmail account setup on the handset before you locked the handset to reset your passcode through Gmail.
      • If Gmail credentials did not work, you never set-up a Gmail account, or you have any other difficulty in using the solution above, you will need to perform an external key reset on your handset. Click here for help with the external key reset.


      Pin code lock

      If you do not remember your pin code, you will need to perform an external reset to wipe out your tablet's memory and start over.


      If you forgot or are unsure about your Google password, but you know your Gmail login or Google account name, you can have Gmail send you a password change request link to your other email address through your computer.

      Summary of process is below:

      • Please use a computer to visit http://www.gmail.com.
      • From the Gmail login page click on the "Can't access your account?" link
      • Follow the steps instructed by Gmail to recover your Gmail login information.
      • Once your login information is recovered, please use that information to unlock the handset using initial steps above. If you recently created your Gmail account or changed its password, allow up to an hour to try the new password.


      Note:

      • Your tablet can still be powered off when locked.

    • View More: Motorola Motorola XOOM Wi-Fi - Reset Pattern Lock / Pin code
    •  
    •  
  • Motorola XOOM Wi-Fi - Memory / RAM

    • To see how much device memory is available for use, perform the following steps:

      1. From the home screen, touch Apps   
      2. Touch Settings
      3. Scroll down the screen, then touch Storage
      4. The available device memory displays in the Internal storage section.


      To view available and used RAM

      1. From the home screen, touch Apps   
      2. Touch Settings
      3. Scroll down the screen, then touch Manage Applications
      4. Touch Running
      5. The available available and used RAM is listed at the bottom under RAM

      Please note that XOOM also uses RAM to run the Honeycomb OS.  As application can not use this memory, it will NOT be included in this menu. Therefore, factoring the RAM used for run Honeycomb, XOOM's RAM is 1GB.Click here to follow our Motorola forum discussion regarding this topic.


    • View More: Motorola Motorola XOOM Wi-Fi - Memory / RAM
    •  
    •  
  • Motorola XOOM Wi-Fi - WMA audio files will not play

    • WMA files are proprietary Windows files and are not currently compatible with the Motorola XOOM Wi-Fi. We recommend you convert your WMA files to MP3 or download third party applications from Android market that will allow you to play WMA files.

      While we do not endorse or guarantee these solutions, or provide support for them, some owners have reported success using a 3rd party Android Application like "PowerAMP".  You can search the Android Market for 3rd party applications that are available that will enable you to play WMA files.

      Convert WMA files using iTunes

      If you have favorite audio files in the WMA format, you might consider converting them into MP3s. WMA files are proprietary Windows files and are not currently compatible with the Motorola XOOM Wi-Fi.But MP3 files are not proprietary and do not have the same constraints. They work with most computers and players. Converting files using Apple's free iTunes software can be accomplished in minutes.


      1. Download the latest version of iTunes if you do not already have it on your computer. This is a free application that can be downloaded from http://www.apple.com/itunes.

      2. Install and set up iTunes by following all the prompts.

      3. Click Edit and select Preferences > Import Settings

      4. Select MP3 Encoder from the Import settings drop down and click OK

      5. Click File Add File to Library and select the WMA File you wish to convert to MP3.

      6. Click Open and Click Convert

      7. Your WMA File will be converted to MP3

      When you convert your file to MP3, iTunes will make a copy of the file and will not replace the file. Therefore, you will have two versions of the file, one that is the original WMA file and the other that is an MP3.

      To transfer files from your computer to your Motorola XOOM Wi-Fi:

      From your iTunes library, ensure the file you converted is highlighted and click File and select Show in windows explorer

      Click herefor information on how to tranfer files to your Motorola XOOM Wi-Fi


    • View More: Motorola Motorola XOOM Wi-Fi - WMA audio files will not play
    •  
    •  
  • Motorola XOOM Wi-Fi - Custom ringtone for notifications

    • The solution below will provide you with information on how to assign personal audio file as notification ringtone.

      • Attach your tablet to your computer using a microUSB cable.
      • Computer will recognize tablet as an external drive.
      • Select and copy, or prepare to copy the audio file you wish to use as a ringtone. (ie: MP3). The tablet will start your ringtone from the beginning of your audio file, so you will need to edit the file on your computer beforehand if you wish to change the beginning (starting point) of the file.
      • Use your computer's file explorer to locate the Motorola XOOM Wi-Fi tablet (If you computer needs drivers for your tablet's USB connectionClick Here)
      • You should see an array of different folders on the Motorola XOOM Wi-Fi root directory.
      • Follow this file path to paste the music file you wish to copy over as your message notification ringtone:\Xoom\Device Storage\Notifications     
      • Paste file you want as a ringtone into notifications folder.
      • Carefully disconnect your USB cable or use computer to disconnect first from Motorola XOOM Wi-Fi USB connection. (Using Safely Remove Hardware icon on PC)
      • From the Motorola XOOM Wi-Fi home screen, touch Apps > Settings > Sound > Notification ringtone
      • Scroll and select the ringtone you just copied over and tap OK.

    • View More: Motorola Motorola XOOM Wi-Fi - Custom ringtone for notifications
    •  
    •  
  • Software Update for the Motorola XOOM™ with Wi-Fi


    • Introduction 

      This is a software update for MOTOROLA XOOM™  with Wi-Fi users who are currently 
      using software versions 6.2.24, 6.2.351 and 6.2.34. This new software package will update 
      MOTOROLA XOOM™ tablets to software version 6.4.20 (6.4.20.1 in Germany) and provides 
      many new features and performance improvements. 
       In addition to the Motorola software that will be updated, the release will also update the 
      Google™ Android™ OS from version 3.0 to version 3.1 of Honeycomb. 
      For optimal performance, we encourage you to download and install this latest software update. 
      For more information on your MOTOROLA  XOOM, visit us at 
      http://www.motorola.com/myxoom. 

      Who Can Use This Release? 

      MOTOROLA XOOM users in Denmark, France, Italy, Netherlands, Norway, Spain, Sweden 
      and the UK. 

      After downloading this release you will have access to the following new features: 

      • Bluetooth® headset support in Google Talk™ (Stereo Bluetooth not supported) 
      • Adobe® Flash® Player 10.3  
      • External SD card support 
      • Bluetooth Keyboard support ( including non-US versions) 
      • Bluetooth Mouse support 
      • Support for Picture Transfer Protocol  (allows digital cameras to upload pictures to the 
      XOOM™ without requiring further software) 
      • Bluetooth navigation shortcuts (Ctrl-tab and shft-ctrl-tab for next/prev tab, Ctrl-W to 
      close a tab) 
      • Proxy support for Wi-Fi network 
      • Google DRM / HDCP (To support Music, Movie services) 
      • Forwarding emails with  attachments, the attachment get lost issue 
      • General improvements to Google apps such as Chrome 
      • Improved memory management 
      • Android OS 3.1 

      Instructions for Installing Software 

      For a successful installation, we recommend installing this update while the battery in your 
      tablet is at least 50% charged and you are connected to a Wi-Fi network. 

      If you have received a notification message for this update: 
      1.    Select "Download" 
      2.   After the software is downloaded, select "Install now" 
      3.   After the software is installed, your tablet will re-start automatically 
      4.   Your tablet is now updated with 6.4.20 software (6.4.20.1 in Germany) 

      If you have not received a notification message for this update: 
      1.   Select the Settings icon in the apps menu 
      2.   Select "About tablet" 
      3.   Select "System Updates" 
      4.   Select "Download" 
      5.   After the software is downloaded, select "Install" 
      6.   After the software is installed, your tablet  will re-start automatically 
      7.   Your tablet  is now updated with 6.4.20 software (6.4.20.1 in Germany) 

      If you have difficulty with this update, visit http://www.motorola.com/myxoom 
      Certain features, services and applications are network dependent and may not be available in all areas; additional terms, conditions 
      and/or charges may apply. All features, functionality and other product specifications are subject to change without notice or 
      obligation.  Contact your service provider for details. 
      This device supports Bluetooth  Class 1.5, Version 2.1 + EDR (support profiles A2DP, AVRCP, HFP, HID, HSP, OPP and PBAP). In 
      order for Bluetooth devices to communicate with one another, they must utilize the same Bluetooth profile. Not all Bluetooth features 
      may be supported by all compatible Bluetooth enabled devices. Visit www.motorola.com/bluetoothconnect for more details 
      MOTOROLA and the stylised M Logo are trademarks or registered trademarks of Motorola Trademark Holdings, LLC. Adobe and 
      Adobe Flash are trademarks of Adobe Systems Incorporated in the United States and other countries.  Google, Android and Google 
      Talk are trademarks of Google, Inc.  All other product and service names are the property of their respective owners. ©2011 Motorola 
      Mobility Inc. All rights reserved

    • View More: Motorola Software Update for the Motorola XOOM™ with Wi-Fi
    •  
    •  
  • MOTOROLA XOOM Connectivity Problems

    • If you are experiencing connection problems, here are a few things you can try:

      1.  Forget and reconnect to the network:

      1.  Touch Apps
      2.  Touch Settings
      3.  Touch Wireless & networks
      4.  Touch Wi-Fi Settings
      5.  Touch the "network name"
      6.  Touch Forget
      7.  Attempt to reconnect to the network.

      2.  Restart your wireless router by unplugging it from the power outlet for about 30 seconds and then plugging it back in.

      3.  If you are using security, please make sure you password/passkey on both router and device are identical.

      4. Make sure your device software is up-to-date

      1. Touch Apps
      2. Touch Settings
      3. Touch About Tablet
      4. Touch System Updates

      If any update is available, please accept and wait for the installation to complete.

      5.  Make sure the firmware of your wireless router is up-to-date.

      Please follow the link to the manufacturer of your wireless router to search for the right firmware that fits to your device

      Apple

      Belkin 

      Cisco 

      Dlink 

      Linksys

      Netgear

      Trendnet

      Note: Please follow the instructions of the wireless router manufacturer. If needed, back up the router configuration before any updates.

      6.  Enable SSID broadcasting on your wireless router (if it was disabled previously)

      7. Turn off the MAC filtering feature on your wireless router


    • View More: Motorola MOTOROLA XOOM Connectivity Problems
    •  
    •  
  • MOTOROLA XOOM Connection Dropping

    • If your connection is dropping here are a few things you can try:

      1. Check the Disconnect Policy

      You have the ability to control how Wi-Fi stays connected.

      To adjust these settings:

      1.  Touch Apps

      2.  Touch Settings

      3.  Touch Wireless & networks

      4.  Touch Wi-Fi Settings

      5.  Touch Wi-Fi disconnect policy

      6.  Choose from one of these options:

      When Screen turns off
      (Note: This will use more mobile data)

      Never when plugged in

      Never
      (Note: Uses more battery power)

      2. Remove and reconnect to the network

      1. Touch Apps

      2. Touch Settings

      3. Touch Wireless & networks

      4. Touch Wi-Fi Settings

      5. Touch the "network name"

      6. Touch Forget

      7. Attempt to reconnect to the network.


    • View More: Motorola MOTOROLA XOOM Connection Dropping
    •  
    •  
  • MOTOROLA XOOM Forgotten Passkey

    • Follow the steps below if you cannot remember the password for your wireless network.

      1. From your computer, select Start.

      2. In the search field, type command.

      3. You should now see a black screen with white writing.
      Type ipconfig.

      Ethernet adapter Wireless Network Connection:

      .........................................................................................................................................

      Connection-specific DNS Suffix . . Routers Name

      ....................IP Address . . . . . . . . . . . . . 192.188.233.49

      ....................Subnet Mask . . . . . . . . . . . 255.255.255.0

      ....................Default Gateway . . . . . . . . 192.188.233.1

      4. Write down the numbers to the right of the words "default gateway" that sits beneath the words"Ethernet adapter Wireless Network Connection."

      5. Open your Internet browser.

      6. Type or enter the numbers you wrote down into the Internet browser.

      7. You should now be at the set up page of your router.

      8. Follow the steps for a forgotten password.


    • View More: Motorola MOTOROLA XOOM Forgotten Passkey
    •  
    •  
  • Motorola XOOMTM Guided Assistant

    • Please choose a topic below for guided help & troubleshooting for your new Motorola XOOMTMTablet?

       Welcome to the Motorola XOOMTM  Guided AssistantPlease choose a topic below for guided help & troubleshooting for your new Motorola XOOMTM Tablet?


    • View More: Motorola Motorola XOOMTM Guided Assistant
    •  
    •  
  • Eee Pad Transformer TF101 - The icons on the desktop of my Eee PC have disappeared. How do I make them re-appear?

  • Eee Pad Transformer TF101 - How to restore (recover) the whole system?

    • Solution

      Enter Settings menu>Privacy settings>Factory data reset

      Moreover, how to operate “Wipe Data”?
      1. Press and hold down “power button” until the system shuts down. 
      2. Remove the SD card from Eee Pad.
      3. Press and hold down “Volume down” button first, and then press and hold down the “Power” button until the below screen appears.  
      hspace=0
      4. Do not press any button until the below screen appears.
      hspace=0
      5. There’s a line “Press to execute, to cancel wiping data. Press Volume Up button to execute the “Wipe Data”.
      6. After the “Wipe Data” process is done, it will reboot automatically. Then Eee Pad should be able to enter the system successfully. 


    • View More: Asus Eee Pad Transformer TF101 - How to restore (recover) the whole system?
    •  
    •  
  • Eee Pad Transformer TF101 - System Recovery on Eee PC products

    • Solution
      • Using the Recovery Partition preinstalled and hidden to easily restore the system 
      • About the Recovery Partition: 

      The Recovery Partition is a space reserved on your hard disk drive used to restore the operating system, drivers and utilities installed on your Eee PC. 
      (Before using the F9 recovery, please ensure to connect your Eee PC to the AC adapter to avoid recovery failure.)

      Step 1: Press repeatedly during boot up to open the screen for “Windows Boot Manager” and select “Windows Setup” to enter the interface of Recovery System. 
      (Please be noticed a single press of the button will not always be recognized.)

      Step 2: Please click the “Recovery” button to start the system recovery. 


      Step 3: Please click the “Recovery” button to start the system recovery. 

      Using the Support DVD to restore system recovery.
      • About the Support DVD:
      The Support DVD includes an image of the operating system, installed on your system at the factory. The Support DVD provides a comprehensive recovery solution that quickly restores your system to its original working state, provided that your system drive is in good working order. Before using the Support DVD, copy your data files to floppy disks or to a network drive and make a note of any customized configuration settings (such as network settings).
      1. Step 1: Generally, you need to disable the Boot Booster function in the BIOS settings.
        About the Boot Booster
        The Boot Booster function in BIOS setup helps shorten your Eee PC boot-up time. However, you MUST disable this BIOS item before you change any Eee PC components or perform system recovery from the external optical drive. 
      2. Step 1.1: Start the Eee PC and press "F2" repeatedly during boot-up to show the POST screen to enter the BIOS setup.
      3. Step 1.2: Move cursor to choose "Boot" and disable the "Boot Booster".

      4. Step 1.3: Press "F10" to save your changes and exit.


      5. Step 2: Connect an external optical drive to your Eee PC and insert the Support DVD into the optical drive
        (System needs to be powered ON).
      6. Step 3: Press on boot-up and the “Please select boot device” screen appears. Select USB:XXXXXX (may be labeled as the ODD brand name) to boot from the optical drive.
         

      7. Step 4 : Press any key to boot from the optical drive.


      8. Step 5: After the Asus Recovery CD/DVD window appears, please select where to install a new system:
      9. Step 5.1:Recover system to a partition
        This option will delete only the partition you select from below, allowing you to keep other partitions. Please select a partition and click NEXT.
      10. Step 5.2:Recover system to entire HD
        This option will delete all partitions from your hard disk drive and restore the pure OS. Please select and click YES. 
         
        (If you select Recover system to entire HD, the entire hard disk drive will be a partition with the pure OS and the F9 recovery function will no longer exist. Therefore, we highly recommend that you use the F9 recovery to restore the system.)

      11. Step 6: Follow the onscreen instructions to complete the recovery process.
        (You will lose all your data during the system recovery. Ensure that you back up your important data before recovering your system.)

      12. Step 7: After the system recovery is completed, eject the Support DVD from the optical drive and click OK to restart the Eee PC.


      13. Step 8: Setup your language, time zone, keyboard, computer name, and user name to enter the Windows® OS.

    • View More: Asus Eee Pad Transformer TF101 - System Recovery on Eee PC products
    •  
    •  
    • Solution

      1. Set the volume to an appropriate level. You may adjust the volume by using the Fn key combinations.
      Fn 12.jpg+ F1113.jpg: Decreases speaker volume.
      Fn 12.jpg+ F12 14.jpg: Increases speaker volume.
      Fn 12.jpg+ F10 15.jpg: Mutes the speaker. 
      2. Verify that the Microsoft Windows volume is properly set and is not muted in the Taskbar Volume Control and in the applicable output controls in the Playback Master Volume Control.
      Click the speaker icon 16.jpg on the Microsoft Windows system tray to open the Volume control.

      Double-click the speaker icon 16.jpg on the Windows system tray to open the Master volume control.
      17.jpg
      3. Connect external speakers or headphones/microphones to the audio jacks to verify audio.
      Microphone Jack18.jpg: The microphone jack is designed to connect the microphone used for Skype, voice narrations, or simple audio recordings.
      Headphone Output Jack19.jpg: The 1/8”stereo headphone jack (3.5mm) connects the Eee PC audio out signal to amplified speakers or headphones. Using this jack automatically disables the built-in speakers.
      4. Verify that the most recent driver for the audio is installed. After the driver is installed successfully, you will see under Device Manager:
      20.jpg
      5. Verify that the most recent BIOS for your Eee PC is installed. You may run ASUS Update Utility which is preinstalled on your unit to perform the BIOS update. For the details, please refer to the user manual.
      20.jpg

      • You can download the drivers/BIOS from the following page:

      http://support.asus.com/download/download.aspx?SLanguage=en-us
      6. Try performing a system recovery to verify if it fixes the issue. (You will lose all your data during the system recovery. Ensure to back up your important data before recovering your system.)

      • Press during boot up (requires a Recovery Partition)
      • Click the check mark button to start the system recovery.
      The system starts system recovery automatically and follows the onscreen instructions to complete the recovery process.

    • View More: Asus Eee Pad Transformer TF101 - Audio related problems
    •  
    •  
    • Solution
      1. Please verify that the Scroll Lock, Num Lock, and Caps Lockare in the proper settings for the applications.
      Please press Fn+ NumLK/ScrLK/Caps Lock key to change the settings. 

      2. Please verify that the external USB keyboard is connected properly to the Eee PC's USB port. (Please notice that Eee PCs don't have PS/2 ports, here is an image of a USB port) 

      3. Please verify that your Eee PC has been upgraded to the latest BIOS. You may run ASUS Update Utility which is preinstalled on your unit to perform the BIOS update. For the details, please refer to the user manual. 
       

      4. Please verify that your Eee PC has been installed with the ATK driver. Please refer to the following site: 
      http://support.asus.com/download/download.aspx?SLanguage=en-us 
       

      5. Please go to Control Panel-->Regional and Language Options-->Languages--> Details, and verify the language selection in the operating system is correct. 
       

      6. If the problem is hardware related, please contact your local service center for further diagnostics and repairs. You can find a service center on the following site: 
      http://support.asus.com/contact/contact.aspx?SLanguage=en-us 

    • View More: Asus Eee Pad Transformer TF101 - Keyboard Related Problems
    •  
    •  
    • Solution
      1. Verify that the touchpad key  is enabled (If it is available). You can also turn on/off the function by pressing  +  / . (The keyboard differs depending on models) 

      2. Verify that the most recent driver for the touchpad is installed.
      • You can download the driver from the following site: 
      http://support.asus.com/download/download.aspx?SLanguage=en-us
      • If the driver is installed successfully, then the device should appear under Microsoft Windows Device Manager as “Synaptics PS/2 Port Touchpad”.


      3. Please go to Control Panel--> Mouse-->Device Settings-->Settings, and verify that all the features are set properly and are not disabled. (Such as Tapping, Scrolling and etc.) 


      4. If you are using an external USB mouse, verify that it is connected properly to the USB port. (Please notice that Eee PCs don't have PS/2 ports; here is an image of a USB port) 

      5. Verify that the external USB mouse is working properly. (You can connect the external mouse to another computer to test it) 

      6. Some external USB mice, it may require separate driver installations. Please verify that the driver from the manufacturer is installed. Otherwise, please contact the mouse vendor for further technical support. 

    • View More: Asus Eee Pad Transformer TF101 - Touchpad/ External mouse Related Problems
    •  
    •  
  • Eee Pad Transformer TF101 - Common Reasons to reset your Eee PC

    • Solution
      • Eee PC locks up or general system halts 
      • Webcam is not responding or functioning properly 
      • Wireless is not operating properly 

      How to reset the unit with the Reset Hole:
      Step 1: Make sure your Eee PC is powered off.
      Step 2: Remove the AC Power adapter (if connected).
      Step 3: Flip the unit over and remove the battery. 


      (Ensure that the battery and AC Power Adapter have been removed successfully) Step 4: Locate the Reset Hole on the bottom of the Eee PC; press down into the reset hole for approximately 10 seconds (A small paperclip or other fine pointed device should fit in the reset hole). After the 10 seconds are up, reconnect the battery and AC Power Adapter (if necessary) and turn on your Eee PC

      How to reset the unit without the Rest Hole
      Step 1: Repeat steps 1-2 of resetting the unit with the hole.
      Step 2: Press and hold your power button for 15 - 25 seconds. Release the power button. Put the battery back in place and try to start.


    • View More: Asus Eee Pad Transformer TF101 - Common Reasons to reset your Eee PC
    •  
    •  
  • Eee Pad Transformer TF101 - How to update BIOS

    • Solution

      Linux:
      1. Please click the Add/Remove software icon under the Setting Tab and follow the instructions to update BIOS.
      2. Download AFUDOS from the support site, and then follow the steps below:
      2.1 Creating an USB boot device
      2.2 Copy afudos.exe and the file of BIOS to USB device, and then plug it to Eee PC
      2.3 Input: afudos /i(file name of BIOS)
      3. Contact the local service center and ask for help.

      XP:
      1. Updating the BIOS through the Internet
      Launch the ASUS Update utility from the Windows® desktop by clicking Start > All Programs > ASUS > ASUSUpdate for Eee PC> ASUSUpdate. The ASUS Update main window appears.
      1.1 Select Update BIOS from Internet from the drop down menu, then click Next.
      1.2 Select the ASUS FTP site nearest you to avoid network traffic, or click Auto Select. Click Next.
      1.3 From the FTP site, select the desired BIOS version and click Next.
      1.4 Follow the screen instructions to complete the update process.
      2. Updating the BIOS through a BIOS file
      Launch the ASUS Update utility from the Windows® desktop by clicking Start > Programs > ASUS > ASUSUpdate for EeePC> ASUSUpdate. The ASUS Update main window appears.
      2.1 Select Update BIOS from file from the drop down menu, then click Next.
      2.2 Locate the BIOS file from the Open window, then click Open.
      2.3 Follow the screen instructions to complete the update process.
      3. Download AFUDOS from the support site, and then follow the steps below:
      3.1 Creating an USB boot device
      3.2 Copy afudos.exe and the file of BIOS to USB device, and then plug it to Eee PC
      3.3 Input: afudos /i(file name of BIOS)


    • View More: Asus Eee Pad Transformer TF101 - How to update BIOS
    •  
    •  
  • Eee Pad Transformer TF101 - My Eee PC has a camera, but the camera device can not be found in the device manager of Windows XP

    • SolutionMy Eee PC has a camera, but the camera device can not be found in the device manager of Windows XP. I also can't find the camera driver in the support DVD. How can I solve the problem?

      The camera device is disabled as default in BIOS. 

      To make the camera work, the user should set the camera as "enable" in BIOS in the following steps: 

      Upon booting, press "F2" to enter BIOS setting==>[Advanced]==>set "OS Installation" as "finished"==>[Onboard Device]==>Set "Camera" as "enable"==>press "F10" to save the setting.

      By the way, the camera driver for Windows XP is contained in the Windows XP SP2, so it is not available in the support DVD.


    • View More: Asus Eee Pad Transformer TF101 - My Eee PC has a camera, but the camera device can not be found in the device manager of Windows XP
    •  
    •  
  • Asus Repair Information

    •  Make a move before calling

      1 Self-diagnosis

      To save your time in online discussion and repair, we recommend use the below self-diagnosis tools and recovery resources to fix your problem first.


      2 Other Online Resource

      Software Checking | FAQ & Troubleshooting | Search Engine | Forum


       Before apply for repair

      1 Check Warranty Card

      Check your warranty card content to confirm the warranty term and warranty period. (If you do not have them beside you, we will use the ASUS product’s original shipping date as your purchase date).


      2 Check the Asus Service Center

      Check the Asus service center to find the closest service site near you. Call the service site Tel. No. for obtaining details of site address and name of site technician.


      3 Backup Data

      Please backup your data to an external device or media (i.e. flash drive, SD card) before sending your product for service or before performing any troubleshooting procedure. (ASUS is not liable for any data loss incurred during the service).ASUS is solely responsible for service and examination. We apologize for not providing any forms of data recovery or back-up solution in the process of servicing.


      4 Write Down Service and RMA Number

      Please write down your Service and RMA number (Acquisition Method: Contact us /Repair Center provide it) Please provide your Service/ RMA No for any inquiry.


    • View More: Asus Asus Repair Information
    •  
    •  
  • Resetting your Iconia Tab A500

    • How do I fully reset my Iconia Tab A500?

      If your Iconia Tab A500 completely fails to respond when you press buttons or tap the screen, you may need to reset the hardware and software to factory default settings.

      PRECAUTION

      During the process, all data stored on your system will be overwritten. This means all your files, such as email and photos, will be erased. Therefore, we recommend making a backup of all personal data before starting the recovery process.

      NOTE

      You should perform a hard reset only when all other options have failed to restore your tablet to an operational state.

      SOLUTION

      To reset the tablet, use a small thin object, such as a paperclip, to press the recessed reset button. This button is located on the bottom side of the tablet, next to the USB connector, as shown in Figure 1.


      Reset button location


      Figure 1 - Bottom side of the tablet


    • View More: Acer Resetting your Iconia Tab A500
    •  
    •  
  • Required information for service and support

    • Which information does Acer need to answer my questions?

      In order for Acer to provide the most efficient support service, some useful reference information will be needed during communications.

      SOLUTION

      Acer support always needs your serial number or SNID number. These identify your product uniquely, including the product type, model and its core specifications.

      To find your serial number or SNID code, please visit our knowledge base article Locating the serial number.

      During a first contact, you will be asked for your name, address and phone number for registration. This registration is required to arrange shipment of the unit for repair, or other cases where Acer may need to send items to you.

      In case your system needs repair, you will be required to attach a copy of the product proof of purchase, for example the invoice. This may be needed also for other requests based on the warranty coverage for the product. If your system is covered by the Acer Advantage Program, please make sure the extended warranty is activated.

      MORE INFORMATION

      Acer will not share your personal information with any outside organization for its use in marketing or solicitation without your consent. Your information may be shared with agents or contractors of Acer for the purpose of performing services for a Acer company.
      Our full privacy policy can be found on the privacy section of Acer website.


    • View More: Acer Required information for service and support
    •  
    •  
  • Troubleshooting Home Sharing

    • Symptoms

      Learn what you can do if, after setting up Home Sharing, you cannot access your shared iTunes library over your home network from another computer, Apple TV, or iOS device.

      Note: For general information on Home Sharing, see Understanding Home Sharing.

      Products Affected

      Apple TV (2nd generation), Remote app, iPod touch, iTunes, iPhone, iPad

      Resolution

      Collapse All Sections | Expand All Sections


      1. Set up Home Sharing on all devices

      If you need help setting up Home Sharing, use the articles below. Read the articles for the devices or computers you are trying to use with Home Sharing:

      2. Verify system requirements

      Home Sharing requires a computer using the latest version of iTunes,* and one or more of the following devices on the same home network:

      3. Check your Apple ID

      Home Sharing requires all computers, iOS devices, and Apple TVs (2nd generation) to use the same Apple ID.

      To verify your intended Apple ID is enabeled on all of your devices:

      1. On Apple TV, navigate to Settings > Computers and look in the bottom left.
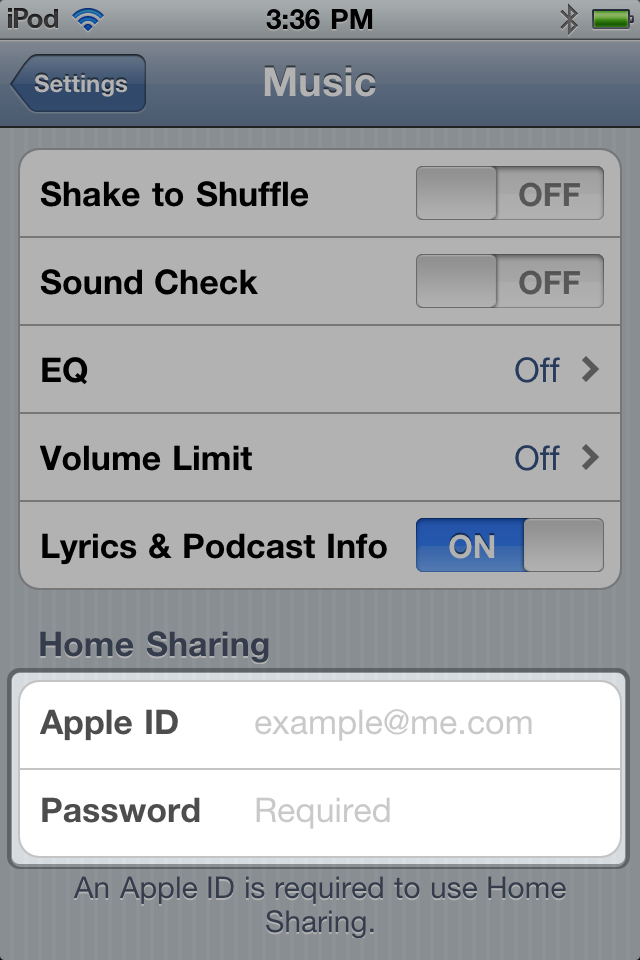
      2. On your iPhone or iPad, navigate to Settings > iPod. (On your iPod touch, navigate to Settings >Music).
        Settings > Music on iPod touch running iOS 4.3.x
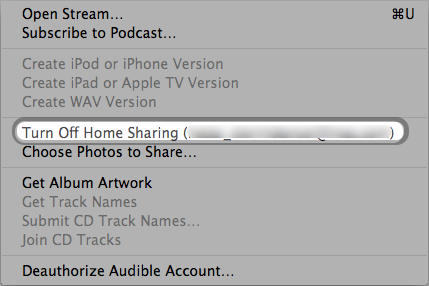
      3. On your computer, open iTunes. Choose the Advanced menu and scroll down to the option to Turn off Home Sharing (Apple ID)
        Advanced > Turn off Home Sharing (Apple ID) in iTunes 10.1 or later
      4. If you don't have the option to "Turn off Home Sharing (Apple ID):"
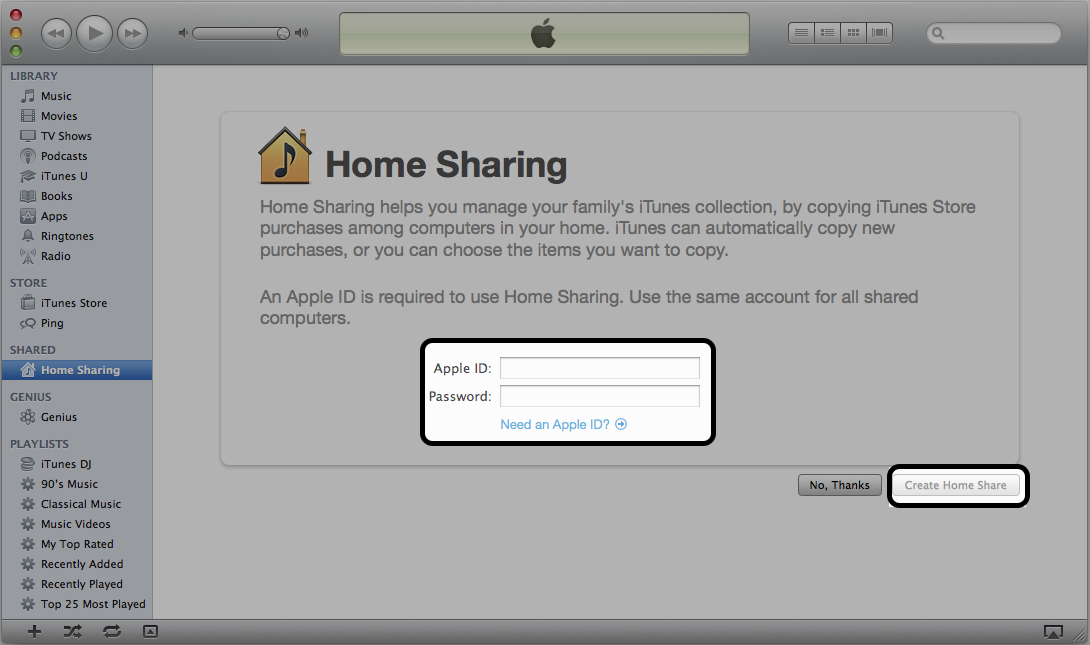
        1. Choose Advanced > Turn on Home Sharing in iTunes.
        2. When prompted, enter the Apple ID you'd lke to use.
        3. Click Create Home Share.
          Where to enter your Apple ID and the Create Home Share button in iTunes

      A maximum of five computers can use Home Sharing at one time. If this limit has been reached and you want to add a new Home Share, deauthorize one or more computers by choosing Deauthorize Computer from the Store menu in iTunes. For more information about authorization and deauthorization, see About iTunes Store authorization and deauthorization.

      4. Check your network connection

      Home Sharing requires a home network with an active Internet connection. All the devices you want to use with Home Sharing need to be connected to your home network.

      In addition, verify that:
      • All your devices are connected to the same router, if you have multiple routers. Using multiple routers may prevent discovery between these devices.
      • Your devices are not using a Virtual Private Network (VPN), or that they are all on the same VPN. A VPN may isolate the device and cause connectivity disruptions.
      • If you have a router set up with a guest network, make sure all devices are either connected to the guest network and devices on the guest network are allowed to communicate with each other, or switch all devices to the primary network on your router.
      • If your computer is asleep or shutdown, or iTunes is closed, there's no access to the shared iTunes library. Wake up or start the computer and open iTunes to regain access to that library.
      • Your router needs to be up-to-date. If you are using an AirPort or Time Capsule, read this article to find out more about firmware updates. If you are using a router from another manufacturer, contact the manufacturer to inquire about available updates.

      5. Check Firewall Settings

      If you have a firewall enabled in your router or computer, make sure that the firewall is not blocking communication between your computers. Home Sharing uses TCP port 3689 and UDP port 5353 to communicate with shared iTunes libraries.

      In addition, Apple TV and Mac computers will use port 123 to set the time automatically. Incorrect date and time on either the computer or Apple TV can cause errors for Home Sharing and connections in general.

      If you are unsure whether your router has a firewall or the required ports open, test additional devices or another network to help isolate the issue. If the devices tested work on another home network, it is your router or network configuration.

      For Mac OS X, you don't have to edit the port addresses, but make sure the firewall in Apple () menu > System Preferences > Security > Firewall are not set to:

      • Block all incoming connections
      • Allow only essential services

      If you use another security/firewall software on your computer or router, follow this article or contact the manufactureror check the documentation on how to open TCP ports 123 and 3689 as well as UDP ports 123 and 5353.

      6. Quit and reopen apps and iTunes

      If connectivity issues persist, quit and reopen iTunes on your computer. Then quit and reopen the apps on your iOS device.

      7. Restart your network router

      Restart your home network router using the method recommended in documentation from the manufacturer. This may include disconnecting the power cord for thirty seconds or more.

      Note: During this period, Internet services such as a VoIP-based phone will not work, and any additional routers may need to be reset in sequence.


      Additional Information

      Home Sharing cannot transfer or stream audiobook content purchased from Audible.com. See Audible.com for information on using their content with multiple devices.

      For help understanding Home Sharing, see Understanding Home Sharing.

      For more information on ports used by Apple products, see Well known TCP and UDP ports used by Apple software products.

      Important: Mention of third-party websites and products is for informational purposes only and constitutes neither an endorsement nor a recommendation. Apple assumes no responsibility with regard to the selection, performance or use of information or products found at third-party websites. Apple provides this only as a convenience to our users. Apple has not tested the information found on these sites and makes no representations regarding its accuracy or reliability. There are risks inherent in the use of any information or products found on the Internet, and Apple assumes no responsibility in this regard. Please understand that a third-party site is independent from Apple and that Apple has no control over the content on that website. Please contact the vendor for additional information.

    • View More: Apple Troubleshooting Home Sharing
    •  
    •  
  • Troubleshooting Wi-Fi networks and connections

    • Symptoms

      When using a Wi-Fi network with your iPhone, iPad, or iPod touch, you may occasionally encounter the following issues:

      • Unable to locate or join a nearby Wi-Fi network
      • Weak or low Wi-Fi signal strength
      • Connected to Wi-Fi network, but unable to access the Internet

      This article outlines basic troubleshooting tips and techniques for Wi-Fi on your iOS device. For information on enabling or configuring a Wi-Fi connection, see the User Guide for your product.

      Note: iOS devices sold in China may use the term Wireless LAN (WLAN) instead of Wi-Fi. Not all China iPhone models support WLAN; see this article for more information.

      Products Affected

      iPhone, iPad, iPod touch

      Resolution

      Many Wi-Fi issues can be resolved by doing the following:

      Basic troubleshooting

      • Tap Settings > Wi-Fi and turn Wi-Fi off and then on again.
      • Verify that you are in range of your Wi-Fi router or base station.
      • Confirm that your Wi-Fi router and Cable/DSL modem are connected to power and turned on.
      • Check whether other devices (portable computers, for example) are able to connect to the Wi-Fi network and access the Internet.
      • Update your Wi-Fi router to the latest firmware.
        • For AirPort Base Stations, refer to this article for information about firmware updates. For third-party Wi-Fi routers, check the manufacturer's website for details on updating your firmware.
      • Restart your iOS device
        • Hold the On/Off button until "slide to power off" appears. Slide to power off your device. When it is off, press the On/Off button to turn it back on.

      If you are still experiencing a Wi-Fi issue after trying the above, choose the symptom below that closely matches your issue:

      If you're unable to locate or join a nearby Wi-Fi network

      • Check to see if the network is available by tapping Settings > Wi-Fi and choose from the available networks listed there. Note: It may take a few seconds for the Wi-Fi network name to appear.
      • Wi-Fi networks configured as closed or private do not broadcast the network name to Wi-Fi devices.
        • Join a closed or private network by tapping Settings > Wi-Fi > Other and entering the Wi-Fi network name, security, and password.
      • Try restarting your Wi-Fi router by turning it off and then on again.
        • Note: If your ISP also provides cable or phone service, check with them before attempting this step to avoid interruption of service.
      • When joining an 802.11n Wi-Fi network, ensure your router is properly configured. See this article for more information.
      • Reset network settings by tapping Settings > General > Reset > Reset Network Settings.
        • Note: This will reset all network settings, including passwords, VPN, and APN settings.

      After joining a Wi-Fi network, you notice the signal strength is weak or fluctuates

      • Try moving closer to the Wi-Fi router or base station to see if the Wi-Fi signal improves.
      • Check for sources of potential interference.
      • Remove your iOS device from any case, stand, or other attachment to see if the Wi-Fi signal improves.
      • Open Safari and try to load a webpage to see if the Wi-Fi signal improves.

      If you are unable to access the Internet while connected to a Wi-Fi network

      • If you are using a public or commercial network that requires a login or subscription, see this article for more information.
      • Verify that you are selecting the correct network if you are in a location with multiple Wi-Fi networks.
      • Verify that the Wi-Fi network settings are correct. You can view and configure Wi-Fi settings using the following steps:
        • Tap Settings > Wi-Fi.
        • Locate the Wi-Fi network you are currently using and tap The right arrow button.
      • If you've verified that your settings are correct and the issue persists, try the following:
        • Tap "Forget this Network" to reset settings for this Wi-Fi network, including the password. Then try connecting to the network again. 
          Note: This can be useful if you identify a network issue and want to prevent the device from automatically using this network in the future.
        • Reset network settings by tapping Settings > General > Reset > Reset Network SettingsNote: This will reset all network settings, including passwords, VPN, and APN settings.

      Note: If the Wi-Fi network uses MAC address filtering, you will need to add the MAC address to the access list for the Wi-Fi router. The MAC address for your device is listed as the Wi-Fi address in Settings > General > About.

      Additional Information

      If you are using a Wi-Fi router at home, refer to your user manual/documentation to assist you with some of these suggestions.

      • Check the manufacturer's website for firmware or software updates for your Wi-Fi router.
      • Check the wireless security option of your Wi-Fi router:
        • If you are using WEP security and have multiple WEP keys on your Wi-Fi router, try configuring your Wi-Fi router to use only a single WEP key in key index 1.
        • Consider using WPA or WPA2 instead. WPA and WPA2 encryption protocols are newer, more effective security options for wireless networks than the older WEP protocol.
      • Temporarily disable wireless encryption or security on the Wi-Fi router to rule out encryption issues.
      • Disable 40MHz in the 2.4GHz settings on the Wi-Fi router. Mac computers, iPhone, iPad, and iPod touch do not support this mode. Disabling it may reduce interference issues.
      • Supported Wi-Fi networks vary by iPhone, iPad, iPod touch model (Example: Does my device support 802.11n?). Refer to Tech Specs for detailed information on which standards your device supports.

      Find additional information on configuring your Wi-Fi router for use with iOS devices.


    • View More: Apple Troubleshooting Wi-Fi networks and connections
    •  
    •  
  • iPad: Basic troubleshooting

    • Symptoms

      This article provides basic iPad troubleshooting tips.

      Products Affected

      iPad

      Resolution

      First steps: Make sure you're up to date

      1. Verify you have installed the latest version of iTunes.
      2. Verify that you are connecting iPad to your computer using a USB 2.0 port.
      3. Make sure your iPad software is up to date: With your iPad connected to your computer, click “Check for Update” in the Summary section of iTunes.
      4. Charge your battery: Using the 10W USB power adapter that came with iPad, charge iPad for at least 20 minutes before further troubleshooting. If necessary, refer to "Charging the Battery" in the iPad User Guide.

      If iPad won't turn on, or the display stops responding

      Follow these steps, testing after each:

      1. Turn the iPad off and turn it on again. Press and hold the Sleep/Wake button on top of iPad for a few seconds, until a red slider appears. Then slide the slider. Then press and hold the Sleep/Wake button until the Apple logo appears.
      2. Reset iPad. Press and hold the Sleep/Wake button and the Home button at the same time for at least ten seconds, until the Apple logo appears.

      If iPad doesn't appear in iTunes or you can't sync iPad

      Follow these steps, testing after each:

      1. Disconnect other USB devices from your computer and connect iPad to a different USB 2.0 port on your computer (not on your keyboard).
      2. Turn iPad off and turn it on again. Press and hold the Sleep/Wake button on top of iPad for a few seconds, until a red slider appears. Then slide the slider. Then press and hold the Sleep/Wake button until the Apple logo appears.
      3. Restart your computer. Then reconnect iPad to your computer.
      4. Download and install (or reinstall) the latest version of iTunes.

      For additional troubleshooting steps, refer to:

      If you can't access email or the web using a Wi-Fi network

      1. Check the Wi-Fi signal strength using the icon in the status bar.
      2. If possible, move closer to the Wi-Fi router or hotspot.
      3. If you are not currently connected to a Wi-Fi network, locate and join a nearby network using Settings > Wi-Fi.
      4. If the issue persists, see this article for additional troubleshooting steps.

      iPad Wi-Fi + 3G only: If you can't access email or the web using the 3G network

      Follow these steps, testing after each:

      1. Check the cell signal indicator in the status bar at the top of the screen. If there are no bars, or if it says "No service," try moving to a different location. If you're indoors, try going outdoors or moving closer to a window.
      2. Check to make sure you’re in an area with network coverage. Go to your carrier's website to see network coverage areas.
      3. Make sure airplane mode isn't on. From the Home screen choose Settings, then turn Airplane mode off.
      4. Turn iPad off and turn it on again. Press and hold the Sleep/Wake button on top of iPad for a few seconds, until a red slider appears. Then slide the slider. Then press and hold the Sleep/Wake button until the Apple logo appears.
      5. There may be an issue with your wireless service. Call your carrier or go to your carrier's website.
      6. Restore the iPad software. See Backing up, updating, and restoring your iPad software or see "Updating and Restoring iPad Software" in the iPad User Guide.

      If iPad still won't respond after you restore it

      Follow these steps, testing after each:

      1. If you receive an alert in iTunes while restoring your iPad, refer to this article for instructions on how to resolve common issues with updating and restoring.
      2. If you cannot restore your iPad in iTunes, or if iTunes does not recognize the device, refer to this article for instructions on restoring using recovery mode.

    • View More: Apple iPad: Basic troubleshooting
    •  
    •  
  • iPad: How to find the serial number, UDID, IMEI, ICCID, and Cellular Data Number

    • Summary

      Learn how to find your iPad serial number and the Identifier (UDID)—Wi-Fi and Wi-Fi + 3G models—as well as the International Mobile Equipment Identity (IMEI) number, Cellular Data Number (CDN), and Integrated Circuit Card ID (ICCID) number (Wi-Fi + 3G model only).

      Products Affected

      iPad

      Using iTunes

      When iPad is connected to your computer

      Locating the serial number:

      1. Open iTunes.
      2. Select the iPad when it appears in the left column.
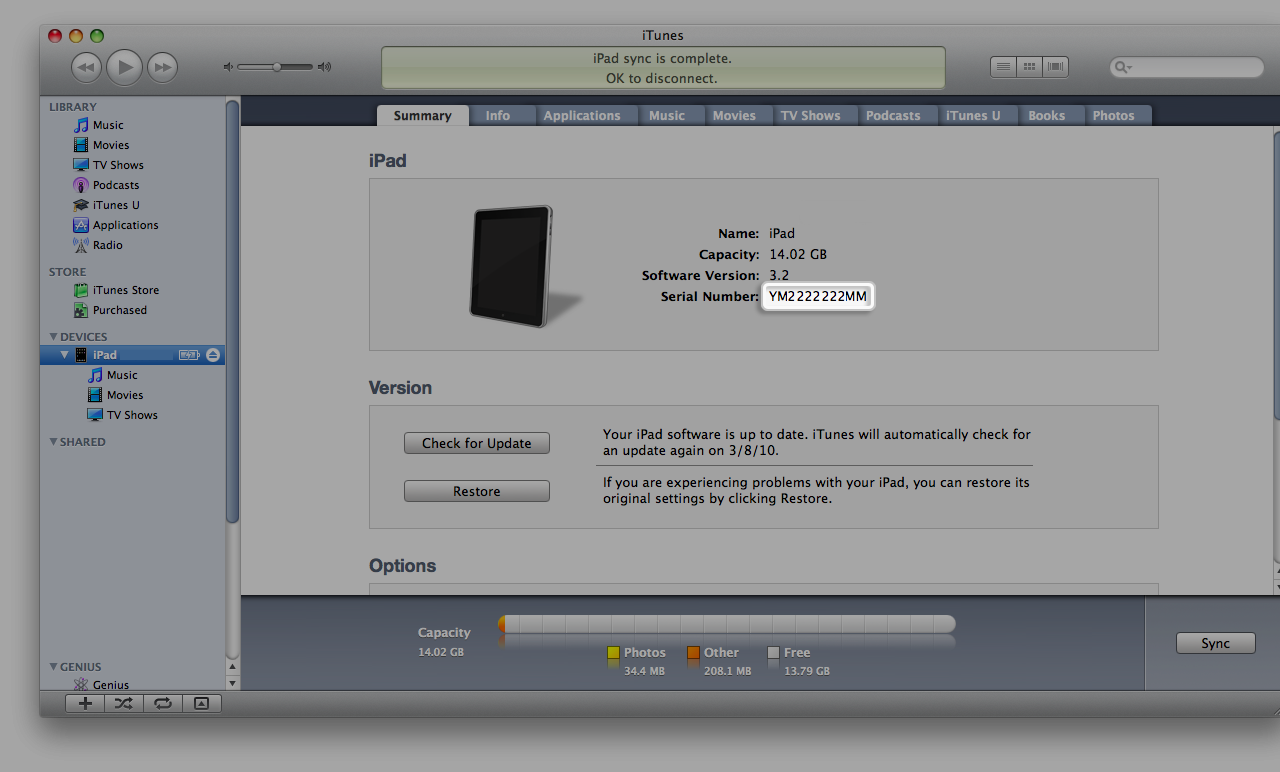
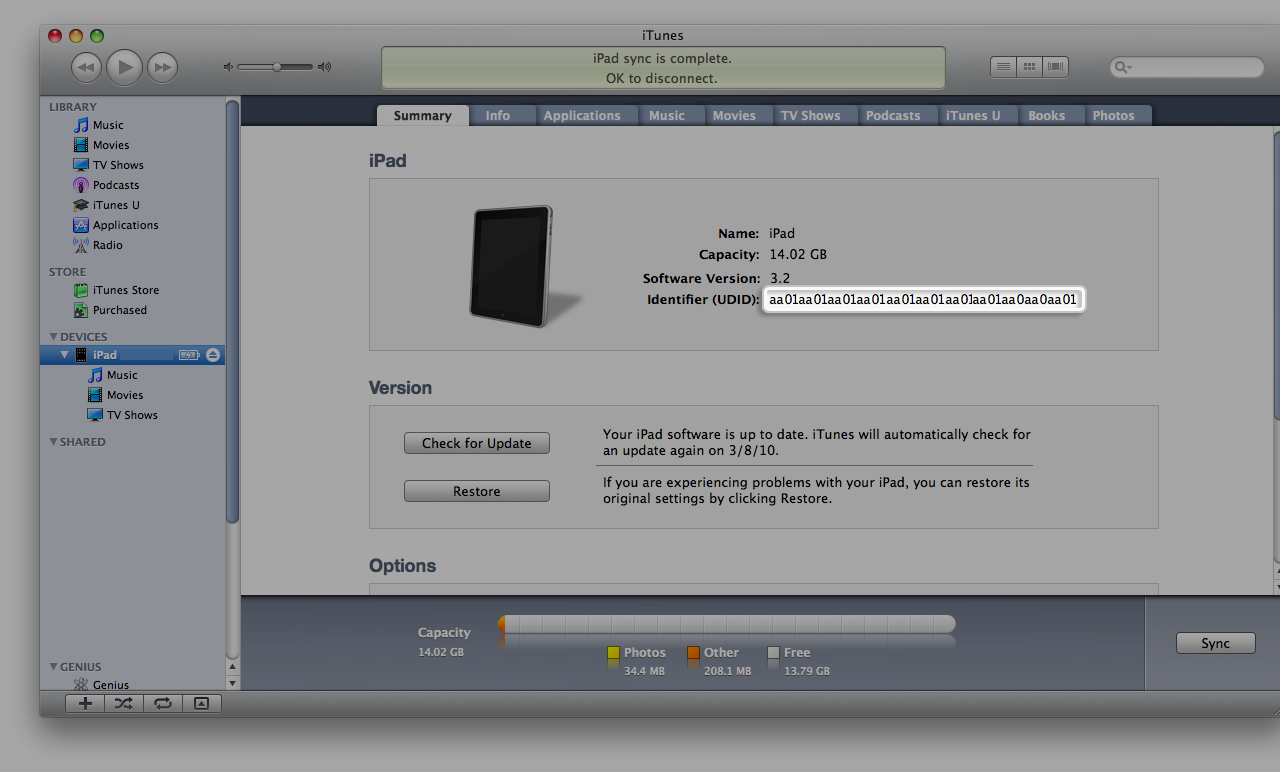
      3. Click the Summary tab. The serial number will display as shown: 
        iTunes Summary tab
      4. Click Serial Number, and the Identifier (UDID) will appear:
        iPad UDID

      Note: You can choose Edit > Copy to put the serial number on the Clipboard. You can then paste the serial number into an email or webpage (for example, for service or registration).

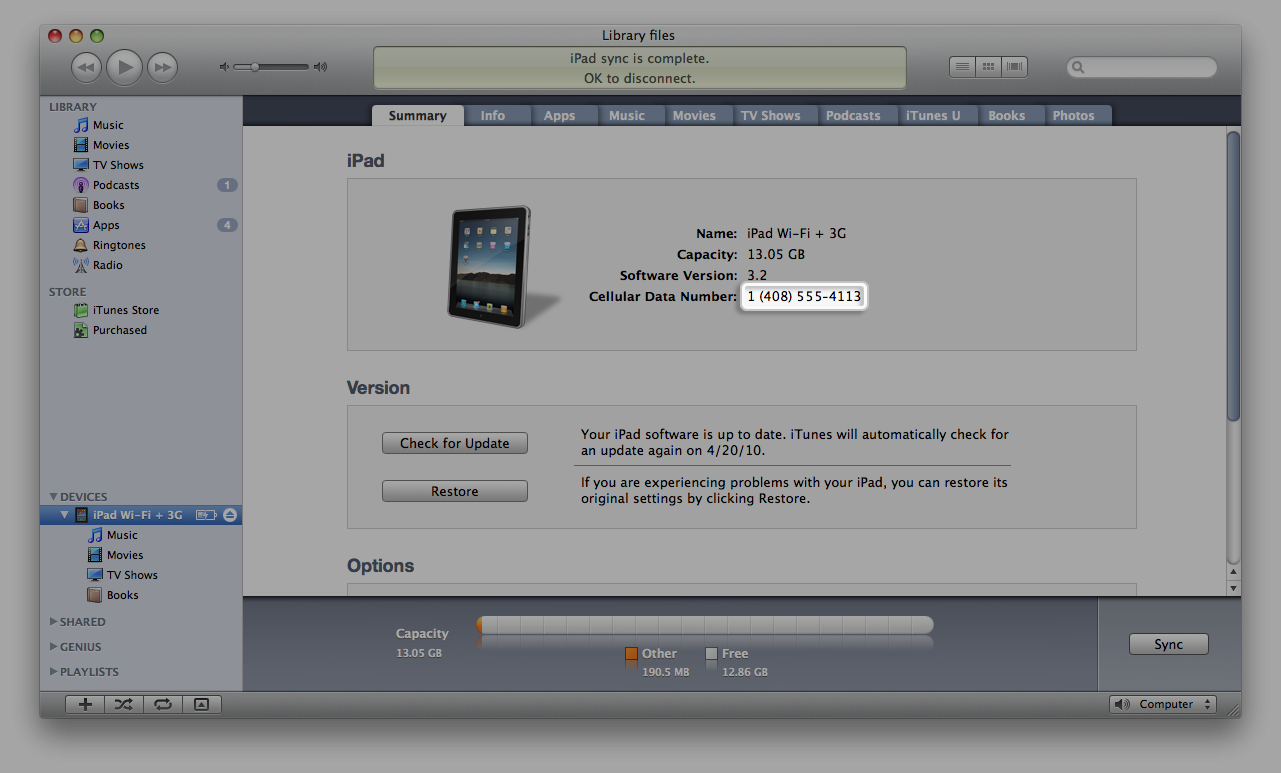
      iPad Wi-Fi + 3G only: Locating the CDN, IMEI, and ICCID:

      1. Click Serial Number, and then Identifier (UDID). iTunes will display the CDN of your iPad: 
        iTunes Summary tab displaying CDN
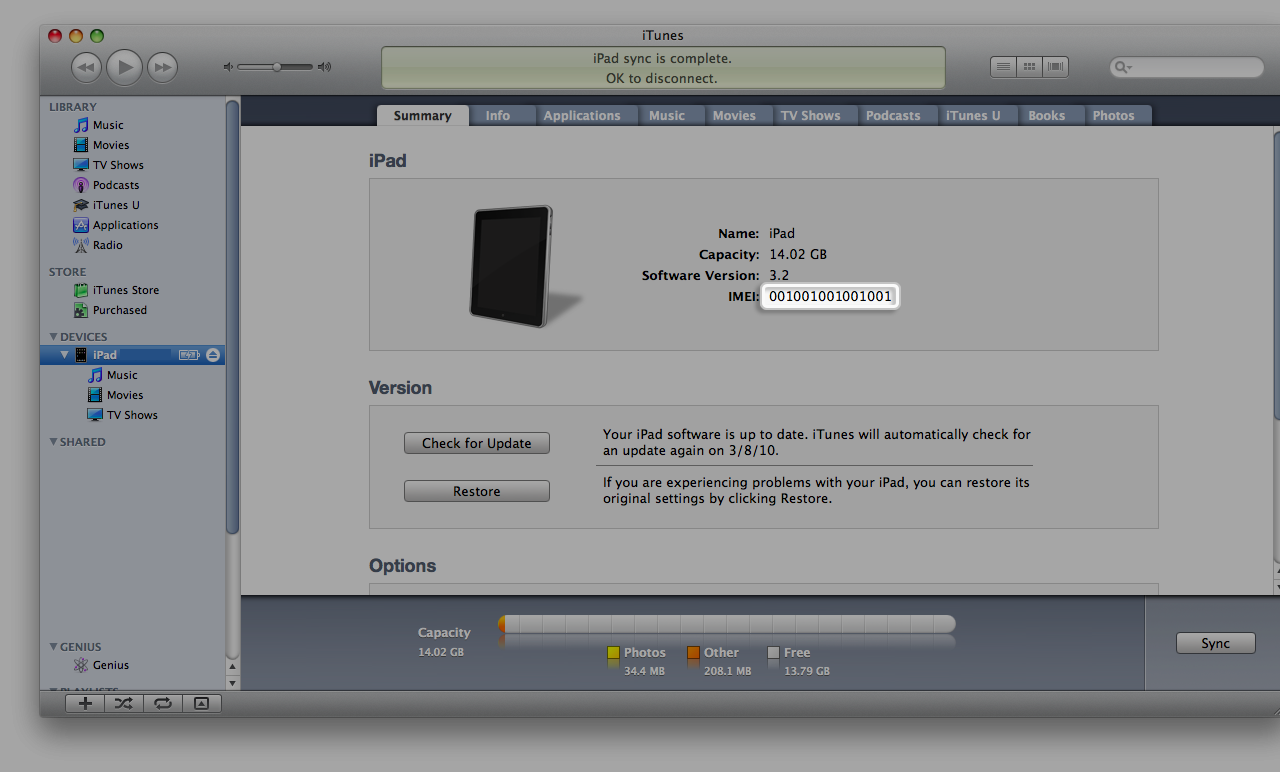
      2. Click the Cellular Data Number, and iTunes will display the IMEI of your iPad: 
        IMEI number
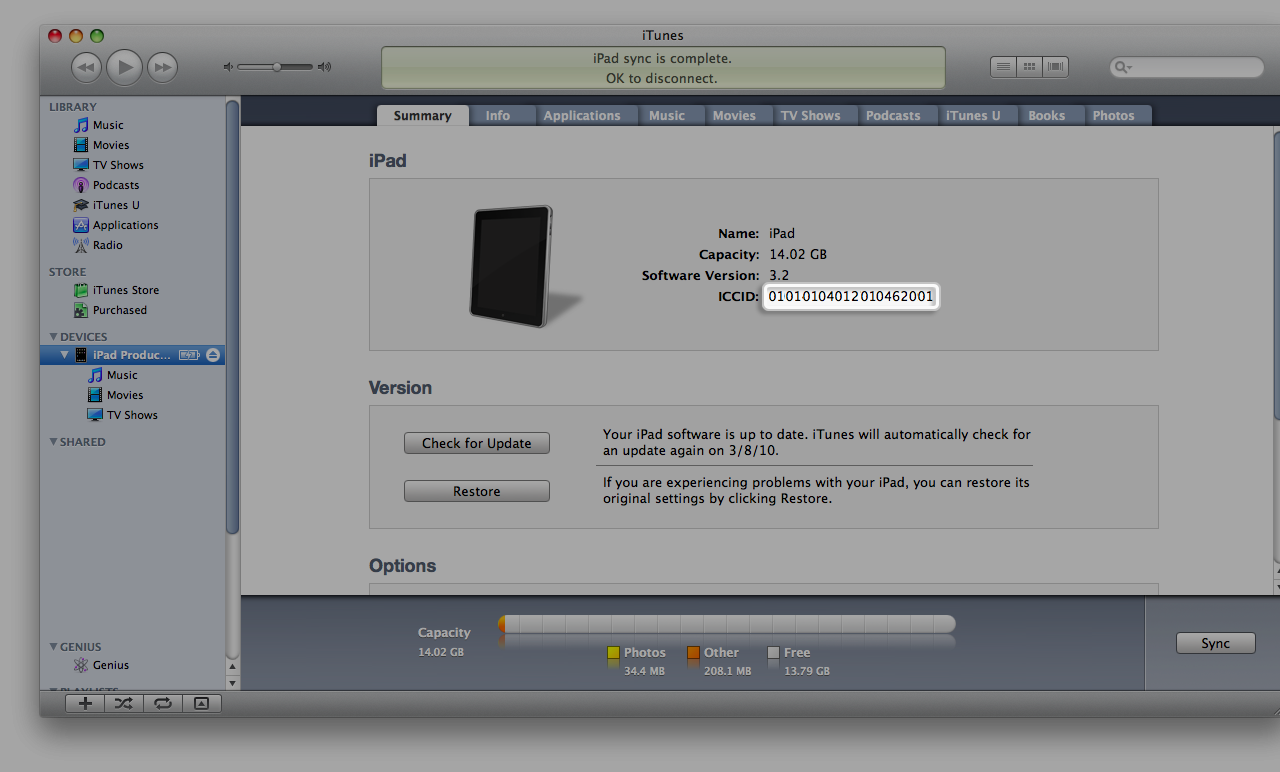
      3. Click IMEI to see the ICCID:
        ICCID

      When iPad is not connected to your computer

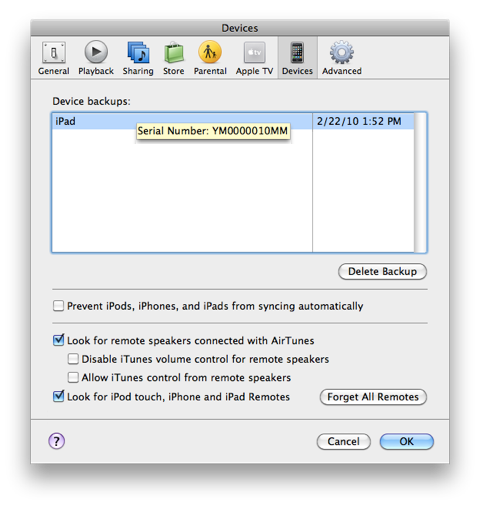
      Devices tab:
      1. Open iTunes.
      2. Open Preferences. (In Mac OS X, choose iTunes > Preferences. In Windows, choose Edit > Preferences.)
      3. Click the Devices tab.
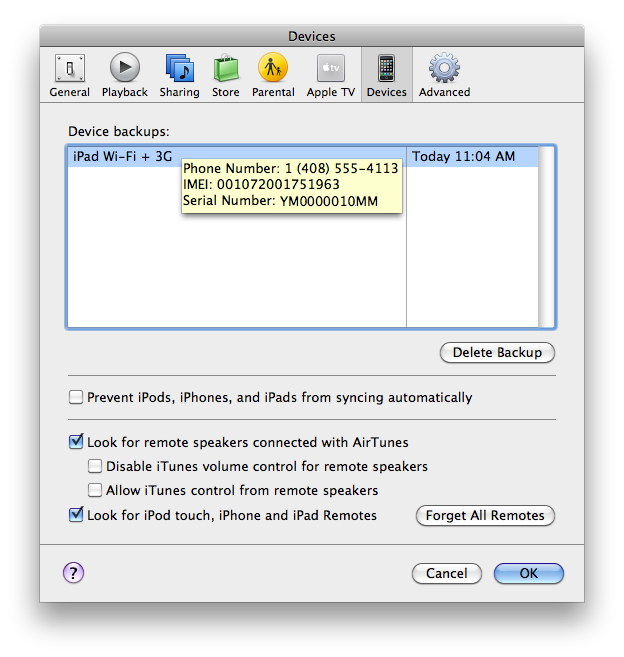
      4. Position the mouse over a backup to display the serial number of the backed-up iPad.
        Device backups
        iPad Wi-Fi + 3G models also display the IMEI and Cellular Data Number:
        iTunes Devices showing iPad Wi-Fi + 3G info
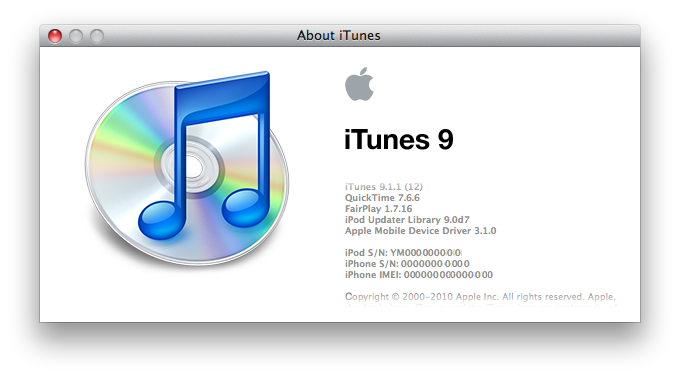
      5. You can also hold down the Control key and choose iTunes > About iTunes (Mac) or Help > About iTunes (Windows).
      6. Release the Control key.
      7. As the iTunes and QuickTime version information scrolls, you will see the serial number and IMEI of the last-connected iPad:
        itunes About screen

      About iTunes window tips

      • Hold down the Option key (Shift key in Windows) to reverse the scrolling.
      • Press the Space bar to pause the scrolling.
      • You can copy this information onto the Clipboard and paste it into a document:
        • In Mac OS X, choose Edit > Copy (or Command-C).
        • In Windows, press Control-C.

      On the the back of the iPad

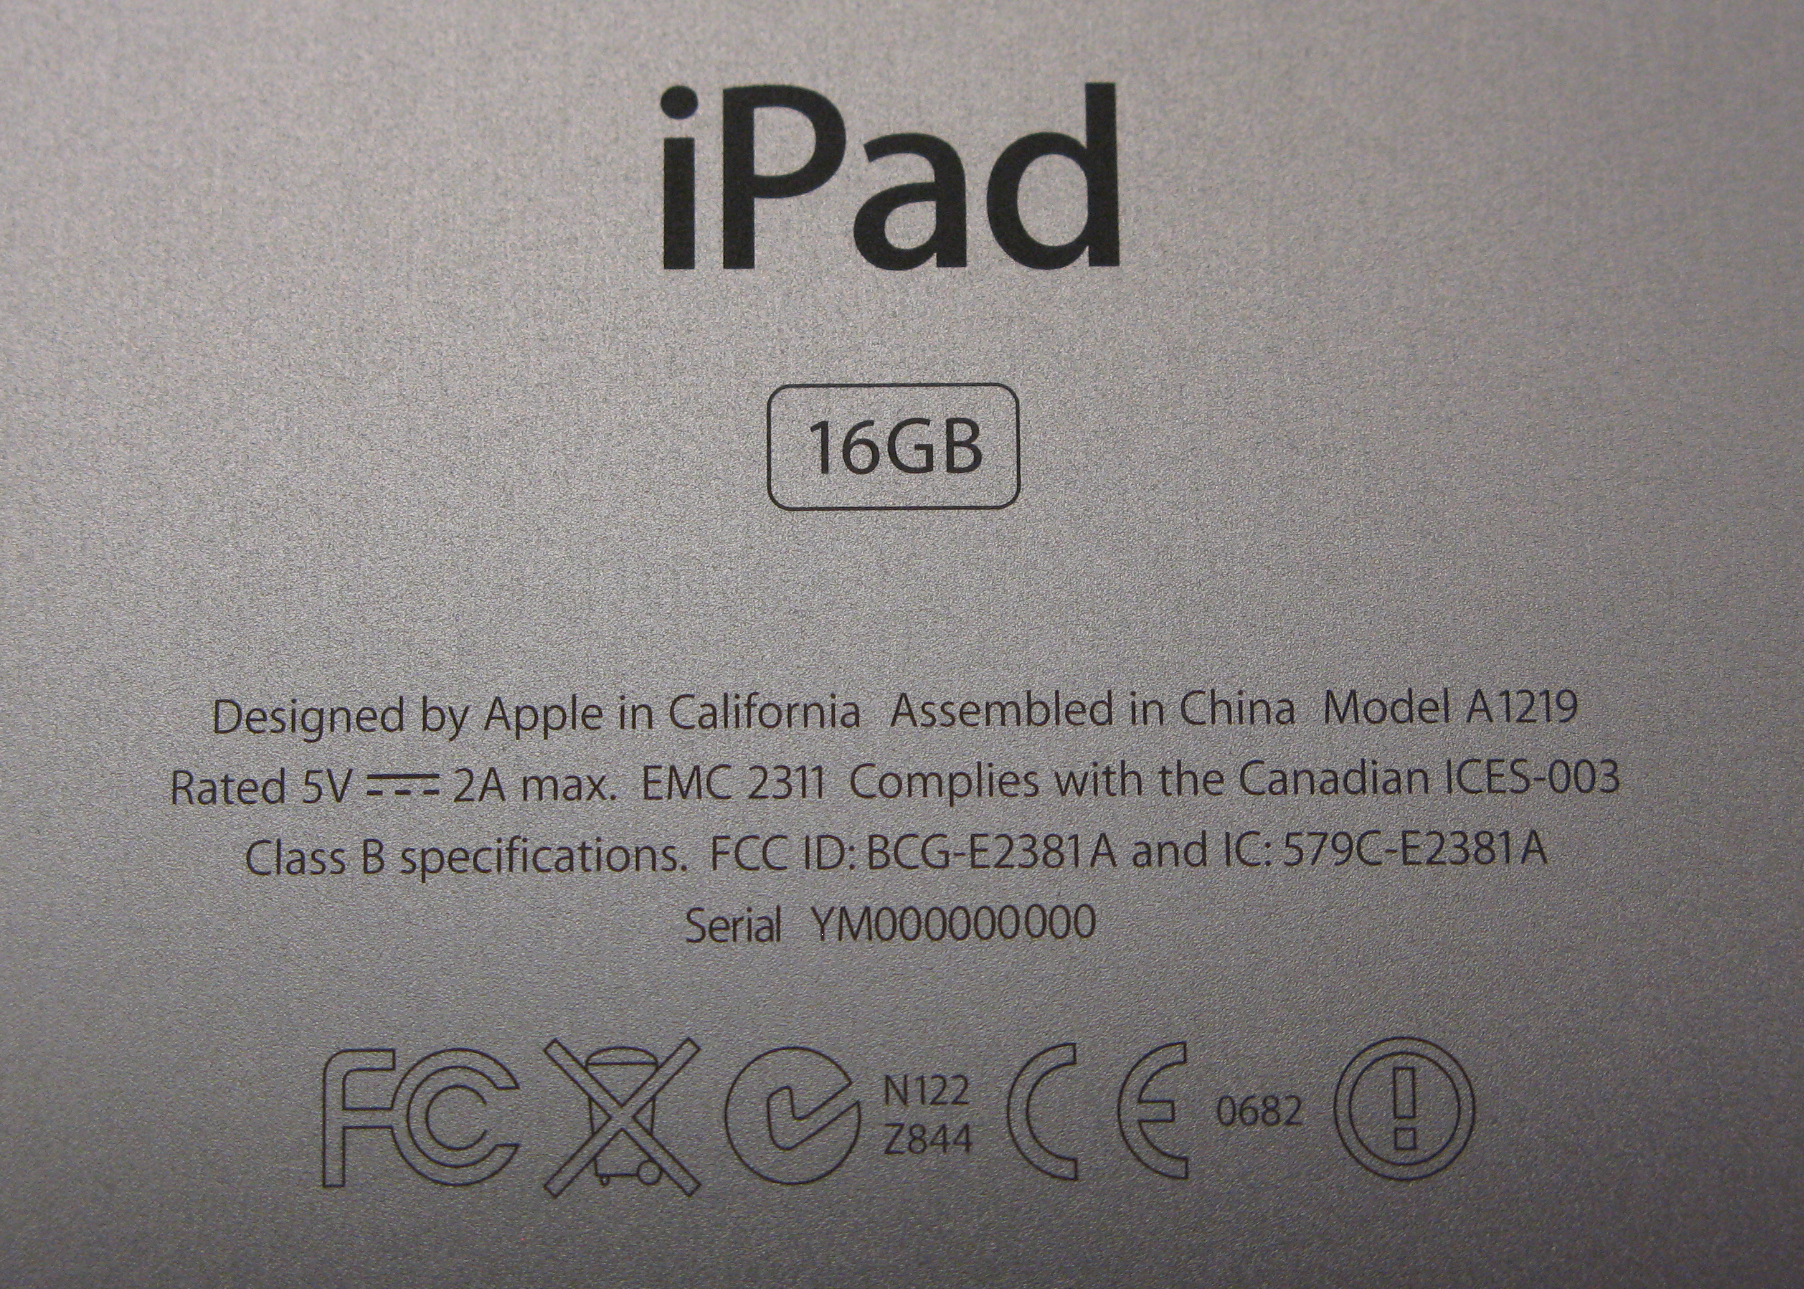
      Your iPad serial number is engraved on the back metal case as shown below:

      Back of iPad

      The serial number and the IMEI number are engraved on the back of the iPad Wi-Fi + 3G:

      iPad Wi-Fi + 3G

      iPad About screen

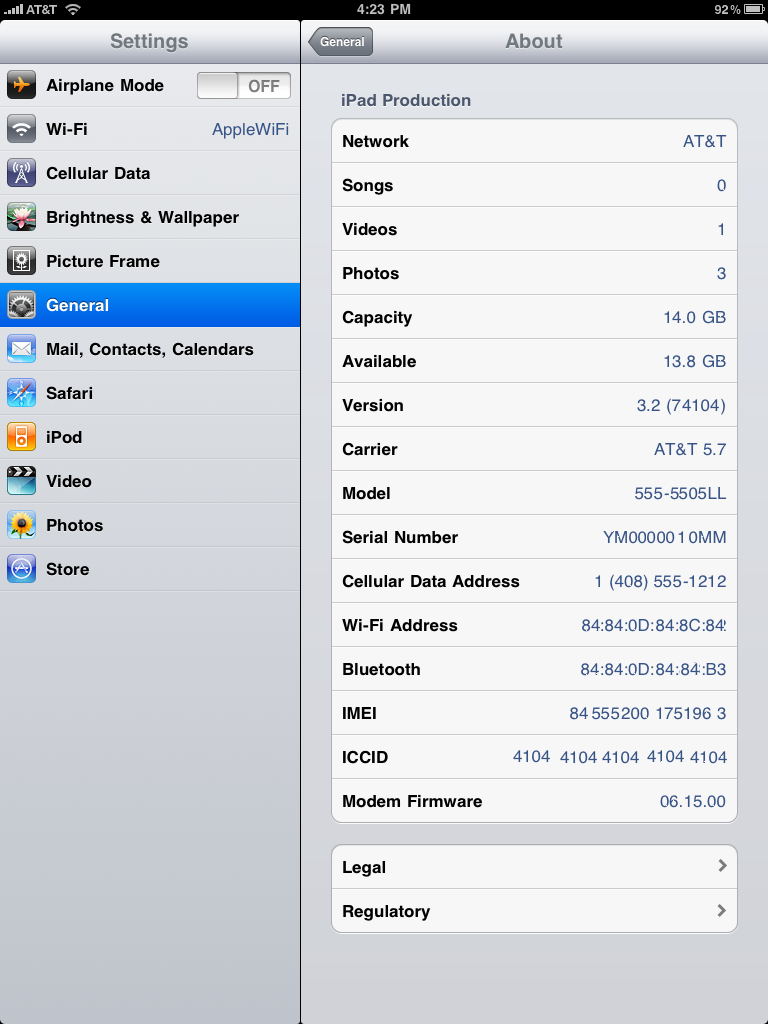
      You can find your iPad serial number, Cellular Data Address, IMEI, and ICCID in the About screen on your iPad. From the Home screen, tap Settings > General > About and scroll down.

      iPad settings

      iPad packaging

      If you still have the original packaging that your iPad came in, you can find your iPad serial number and IMEI on the barcode label that is affixed to the packaging.

      My Support Profile

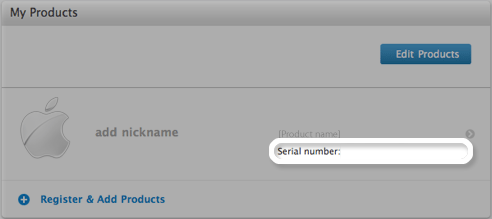
      If you used your Apple ID to register or purchase your iPad, you may find the serial number listed in My Support Profile (available in the United States and Canada). Log in with your Apple ID and find your iPad in the My Products box on the main page:

      Serial number in My Support Profile

      Note: You may have more than one Apple ID and not realize it. For more information, visit My Apple ID and click "Find out."

      Additional Information

      Learn how to report a lost or stolen Apple product.


    • View More: Apple iPad: How to find the serial number, UDID, IMEI, ICCID, and Cellular Data Number
    •  
    •  
  • MobileMe: Troubleshooting Push with MobileMe Mail on an iPhone, iPad, or iPod touch

    • Symptoms

      With MobileMe Mail, your iPhone, iPad, or iPod touch receives alerts in real-time when you have a new me.com or mac.com email message in your Inbox.  

      If your device does not update with an alert when you expect to receive a message, try the troubleshooting steps in this article.

      Products Affected

      iPhone, iPod touch, MobileMe Mail, iPad

      Resolution

      1. Make sure you have access to the Internet: Open Safari on your iPhone, iPad, or iPod touch, and make sure you can load a webpage, such as www.apple.com.
      2. Verify that you can receive email for your MobileMe account on your Mac or PC; for example, in Mac OS X open Mail and make sure you are able to receive messages as expected.
      3. Make sure that your MobileMe mail account is enabled, Push is enabled on your device, and Push is enabled for your account:

      Collapse All Sections | Expand All Sections

      Ensure mail is enabled for your account

      Ensure Push is enabled on your iPhone, iPad, or iPod touch

      Ensure Push is selected for your MobileMe account's mail


      1. Turn your device off and on, and then try again.
      2. If the issue persists, turn off all the sliders mentioned about in step 3, then turn them back on again and try again.
      3. If you have multiple MobileMe accounts set up on your device, Push will only work for one account.  If you want to switch which account uses Push, you will need to turn on contact, calendars, or bookmark syncing for that account, then enable Push.
      4. If you have iOS 4.1, confirm your device is successfully connected to MobileMe by using Find My iPhone to see if your device is online. If it isn't online, there may be a broader MobileMe notifications service disruption. Check the System Status on the MobileMe Support web site.
      5. If the other steps do not help, delete the account from your device.  From the Home screen, tap Settings > Mail, Contacts, and Calendars, and then tap your MobileMe account (if syncing Contacts, Calendar, or Bookmark data with MobileMe, choose to keep the data on your iPhone/iPad/iPod touch when prompted). Tap Delete Account. On the Mail, Contacts, and Calendars screen, tap Add Account > MobileMe, and set up your account again. If you are syncing data with MobileMe on your device, choose to Merge data on your device when prompted to do so after adding your account.

    • View More: Apple MobileMe: Troubleshooting Push with MobileMe Mail on an iPhone, iPad, or iPod touch
    •  
    •  
  • Unable to display the BlackBerry ID Agreement.

    • During the BlackBerry® PlayBook™ tablet setup, a prompt is displayed to select a country for the BlackBerry® ID agreement. When a country is selected, the following error is displayed:

      Unable to display the BlackBerry ID Agreement.  Please select your country and language, then try again.

      Collapse
      • BlackBerry® PlayBook™ tablet
      • Wi-Fi® network
      Collapse

      Depending on the type of Wi-Fi® network the BlackBerry PlayBook is configured to connect to, there may be multiple causes for this issue. See the resolution section.

      Collapse

      Cause 1

      If attempting to connect the BlackBerry PlayBook to a Wi-Fi Hotspot, the username and password must be entered to obtain Internet connectivity.

      Resolution 1

      When the BlackBerry PlayBook tablet has successfully connected to a Wi-Fi HotSpot, the followingHotspot Setup button appears at the bottom left:

      Click on the Hotspot Setup button, and this will open a window to enter the username and password.

      Cause 2

      If attempting to connect the BlackBerry PlayBook to an enterprise Wi-Fi environment, the connection may use a Proxy to access the Internet.

      Resolution 2

      Verify that the Proxy information has been entered correctly in the Wi-Fi setup on the BlackBerry PlayBook.

      1. On the Connect to Wi-Fi screen, Click Manually Connect to Network.
      2. Select the Security Type and settings for the enterprise Wi-Fi network
      3. Ensure Use HTTP Proxy is checked
      4. Enter the correct Proxy information (Proxy Server, Proxy Port, Username, and Password).


      For additional information on Wi-Fi setup, please refer to the following:

      KB26228 - Getting started with BlackBerry PlayBook tablet initial setup

      KB26096 - Troubleshooting Wi-Fi and networking on the BlackBerry PlayBook tablet


    • View More: Blackberry Unable to display the BlackBerry ID Agreement.
    •  
    •  
  • Iconia Tab A501 Auto reboot when network state changing

  • Iconia Tab A500 - Solve WiFi function failed when FOTA upgrade to Android 3.1

  • Acer Iconia Tab W500 - How to start the eRecovery process

  • Iconia Tab A500 - Perform a Clean Boot

  • Asus UK Twitter Page

  • Samsung UK Twitter Page

  • Blackberry Twitter Page

  • Blackberry Blog

    • About

      Welcome to Inside BlackBerry® Help Blog, Research In Motion’s BlackBerry smartphone support blog and the newest edition to the Inside BlackBerry blog family!

      You’ve probably seen us (or our work) around in spaces such as the BlackBerry Support Community Forums@BlackBerryHelp on Twitter, and the Official BlackBerry® Channel on YouTube™. We’ve loved being engaged with the community through these channels (and will continue to do so!) and hope we have helped many of you out along way.

      Through this support blog we feel we can add a little extra to the community by sharing knowledge and tips… before you even have to ask!

      What this blog is about

      We’ve assembled some of our best technical support experts to provide tips and tricks, go in depth on features and show you how it all works.

      But we know this blog isn’t just about us and our perspectives – it’s about YOU and what you need to know to get the most out of your BlackBerry smartphone. Be sure to join in the conversation and get connected with the great information being shared online!

      What this blog isn’t about

      We’re excited to continue to contribute to the conversation, but that said, this isn’t the place to discuss topics like unreleased products, financial and forward-looking statements, service outages or carrier matters. Besides, these are matters where our topic experts aren’t, well, the experts.

      Let us know what’s working and what’s not. See our Comments Policy, and you can also suggest a topicyou’d like to see discussed.


    • View More: Blackberry Blackberry Blog
    •  
    •  
  • Motorola Facebook Page

  • Asus UK Facebook Page

    • Welcome to the Official ASUS Facebook page. Stay up to date with the latest news and announcements surrounding ASUS and its products. As always, we’d love to hear from you, so feel free to leave a message on our wall.
    • View More: Asus Asus UK Facebook Page
    •  
    •  
  • Samsung UK Facebook Page

    • To assist our customer support team, please have your model number, serial number and date of purchase ready when calling.


      UNITED KINGDOM
      Samsung mobile: 0845 MSAMSUNG (67267864)
      Monday - Saturday: 9am - 6pm
      Sunday: CLOSED

      All other Samsung products: 0330 SAMSUNG (7267864)
      Monday - Saturday: 9am - 6pm
      Sunday: CLOSED

      Samsung memory cards: 00 800 8010 8011
      Monday - Friday: 8am - 4pm
      Saturday - Sunday: CLOSED

    • View More: Samsung Samsung UK Facebook Page
    •  
    •  
  • Acer Facebook Page

  • Blackberry Facebook Page

    • Research In Motion (the makers of BlackBerry) is a leading designer, manufacturer and marketer of innovative wireless solutions for the worldwide mobile communications market.
    • View More: Blackberry Blackberry Facebook Page
    •  
    •  
  • Motorola Customer Support telephone number

  • Asus Hotline Telephone Number

    • Hotline Information

      LocationPhone NumberOpen Hour
      AsiaAustralia1300-2787-88 09:00-18:00 Mon. ~ Fri.
      New Zealand0800-278-788 09:00-18:00 Mon. ~ Fri.
      Japan0800-123-2787(free)09:00~18:00 Mon.~ Fri. ; 9:00~17:00 Sat.
      047-390-5630 (charge)09:00~18:00 Mon.~ Fri. ; 9:00~17:00 Sat.
      Korea+82-2-1566-686809:30-17:00 Mon. ~ Fri.
      Thailand+66-2-401-171709:00-18:00 Mon. ~ Fri.
      001-800-852-5201
      Singapore+65 6622176611:00-19:00 Mon. ~ Fri.
      +65-6720-3835(Check Repair Detail Status Only)11:00-19:00 Mon. ~ Fri. ; 11:00-13:00 Sat.
      Malaysia+60-3-6279-507710:00-19:00 Mon. ~ Fri.
      PhilippineToll Free:18001441057309:00-17:00 Mon. ~ Fri.
      Local No:+632 636 8504
      India1800-2090-36509:00-18:00 Mon.~ Sat.
      India(WL/NW)
      Indonesia+6221 612 282509:30-17:00 Mon. ~ Fri.
      Vietnam1900 55 55 8108:00-17:30 Mon.~ Sat. / break time: 12:00 ~ 13:30
      Taiwanclick here
      Chinaclick here
      Hong Kong852-35824770 10:00-19:00 Mon.~ Sat.
      Middle East + AfricaSaudi Arabia800-121-278709:00-18:00 Sat. ~ Wed.
      UAE+971-4-2958941  09:00-18:00 Sun. ~ Thu.
      Turkey+90-216-524-300009:00-18:00 Mon. ~ Fri.
      South Africa 0861 27877208:00-17:00 Mon. ~ Fri.
      Balkan CountriesRomania0040-213310067
      0040-213310068
      0040-213310069
      09:30-18:00 Mon. ~ Fri.
      Bosnia Herzegovina00387-3377316309:00-17:00 Mon. ~ Fri.
      Bulgaria00359-7001441109:30-18:30 Mon. ~ Fri.
      Croatia00385-1640111109:00-17:00 Mon. ~ Fri.
      Estonia00372-667179609:00-18:00 Mon. ~ Fri.
      Latvia3716740883809:00-18:00 Mon. ~ Fri.
      Lithuania-Kaunas00370-3732900009:00-18:00 Mon. ~ Fri. (Sat 10:00-15:00 only reception)
      Lithuania-Vilnius00370-52210116009:00-18:00 Mon. ~ Fri.
      Montenegro00382-2060825109:00-17:00 Mon. ~ Fri.
      Serbia00381-11207067709:00-17:00 Mon. ~ Fri.
      Slovenia00368-59045400
      00368-59045401
      08:00-16:00 Mon. ~ Fri.
      EuropeCyprus800 9536309:00 - 13:00 ; 14:00 - 18:00 Mon. ~ Fri.
      France0033-17094940009:00-18:00 Mon. ~ Fri.
      Germany0049-180501092009:00-18:00 Mon. ~ Fri.
      0049-1805010923 (component support)10:00-17:00 Mon. ~ Fri.
      0049-2102959911 (Fax)09:00-18:00 Mon. ~ Fri.
      Hungary0036-1505456109:00-17:30 Mon. ~ Fri.
      Italy199 400 089 (Asus Italia)
      0039-0800122791 (Asus Telecom)
      0039-022023101 (Asus Commerciale)
      0039-09416785411 (Asus Point)
      0039-09416785511 (Asus Retail)
      09:00 - 13:00 ; 14:00 - 18:00 Mon. ~ Fri.
      Greece00800 4414204409:00 - 13:00 ; 14:00 - 18:00 Mon. ~ Fri.
      Austria0043-82024051309:00-18:00 Mon. ~ Fri.
      Netherlands / Luxembourg 0031-591-57029009:00-17:00 Mon. ~ Fri.
      Belgium0032-7815023109:00-17:00 Mon. ~ Fri.
      Norway0047-2316-268209:00-17:00 Mon. ~ Fri.
      Sweden0046-85876940709:00-17:00 Mon. ~ Fri.
      Finland00358-96937969010:00-18:00 Mon. ~ Fri.
      Denmark0045-3832294309:00-17:00 Mon. ~ Fri.
      Poland0048-22571804008:30-17:30 Mon. ~ Fri.
      Spain0034-90288968809:00-18:00 Mon. ~ Fri.
      Portugal00351-70750031009:00-18:30 Mon. ~ Fri.
      Slovak Republic00421-23216262108:00-17:00 Mon. ~ Fri.
      Czech Republic00420-59676688808:00-17:00 Mon. ~ Fri.
      Switzerland-German0041-84811101009:00-18:00 Mon. ~ Fri.
      Switzerland-French0041-84811101409:00-18:00 Mon. ~ Fri.
      Switzerland-Italian0041-84811101209:00-18:00 Mon. ~ Fri.
      United Kingdom0044-870120834009:00-17:00 Mon. ~ Fri.
      UK(Ireland)0035-3189071991809:00-17:00 Mon. ~ Fri.
      Russia008-800-100-ASUS09:00-18:00 Mon. ~ Fri.(except Nat.Hol.)
      Ukraine0038-044-545772709:00-18:00 Mon. ~ Fri.(except Nat.Hol.)
      AmericaCanadaclick here
      USA


    • View More: Asus Asus Hotline Telephone Number
    •  
    •  
  • Samsung Contact Telephone Number

    • To assist our customer support team, please have your model number, serial number and date of purchase ready when calling.


      UNITED KINGDOM
      Samsung mobile: 0845 MSAMSUNG (67267864)
      Monday - Saturday: 9am - 6pm
      Sunday: CLOSED

      All other Samsung products: 0330 SAMSUNG (7267864)
      Monday - Saturday: 9am - 6pm
      Sunday: CLOSED

      Samsung memory cards: 00 800 8010 8011
      Monday - Friday: 8am - 4pm
      Saturday - Sunday: CLOSED

    • View More: Samsung Samsung Contact Telephone Number
    •  
    •  
  • Acer Support Telephone Number

    • Service and Support

      To report a fault with your Acer product, please use the following numbers:
      Opening hours: Monday - Friday; 9.00am - 6.00pm (excl. Bank Holidays).

      If calling from UK :
       •  0871 760 1000*
      If calling from Southern Ireland :
       •  0818 202 210
      If you require assistance with a server product. Please Call
       •  0871 760 1006*

      If you need technical support please access our online support section. 

      Calls may be recorded for training purposes. Please have your Acer product serial number or current Case reference number (ending with letter "n") to ensure calls are dealt with efficiently.
      * Calls Cost 10p per minute from BT Landline. Calls from mobiles and other networks may cost more.


      Technical Support

      For Technical Support, or for customers with products outside of the warranty period, please call
      0906 706 8000 (Mon-Fri 8.30am - 6pm)
      Calls to this line are charged at 50 pence per minute. Calls from a mobile may vary.
      Please note that all Acer products purchased from PC World, Dixons or Curry's are supported via the store from which the product was purchased.

      Repair Centre:
      Infoteam International Services (Acer repairs)
      Unit M Eagle Road
      Plympton Devon
      UK PL7 5JY

      Authorised Service Centres:
      Malta Klikk Computer Store
      B´kara By Pass B´kara (near Mater Dei Hospital)

      Isle of Man Waltons Digital World
      The Milesone Peel Road Isle of Man IM1 5ED

      As an alternative: The product registration number. This number will be enough to identify you and your product. To get this number, click here


    • View More: Acer Acer Support Telephone Number
    •  
    •  
  • Apple Support Contact Details

ad_holder


1