Home / Product Selection / Internet / Wireless
-
What is my wireless network name and wireless password?
-
If you have forgotten your wireless name or password, there are a couple of ways you can find it.
Check your sticker
Most routers have a sticker on it showing the details you need.
On the sticker, your wireless network name could be called:
- Wireless network name
- SSID
- WLAN
- WLAN SSID
Your wireless password could be called:
- Wireless password
- WPA
- WEP
Note: If you have changed your network name/password manually it will be different to your sticker
Check your router
If you do not have a sticker on your router, or you have changed it yourself, you can check the settings on your router. Simply select your router and follow the wireless setup guide to reset the password.
Note: If you have changed your login details to access your router settings and do not know them, you will need to hard reset your router and re-enter the settings.
- View More: TalkTalk What is my wireless network name and wireless password?
-
-
I need help connecting using wireless
-
Wi-Fi, or wireless, is simply broadband without the wires. If you're new to BT Broadband, we suggest you follow the instructions in your Getting Started Guide and Installation CD.
If you've already set up your broadband connection and now want to connect wirelessly, the links below will help.
 Ever wanted to go wireless but not sure how to do it? Why not use our wireless wizard to help you set it up? (Windows Operating System only)
Choose from the links below for your BT Home Hub (or other device)


(includes black version)


 How do I connect my BT Wireless Hub 1800HG to my computer wirelessly?
Further Help & Information
 Desktop Help is our free tool that helps you fix broadband and email problems, keeping you connected when you most need to be. Desktop Help will:
- Help you get back online if you're disconnected;
- Set up your email account and fix issues if it stops working;
- Work in the background, fixing the problems it finds;
- Help you set up your home network so you can share folders and printers; and
- Update automatically, giving you the latest solutions.
Find out more about BT Broadband Desktop Help
- View More: BT I need help connecting using wireless
-
-
Wireless - safety and security
-
You might wonder what's to stop other people tuning into your wireless network. After all, your personal data is being sent on radio waves in the same way as a radio station sends a signal.
The answer is that your Hub has an in-built security system that scrambles the signal it sends. It does this with an encryption code, so the signal doesn't make any sense to other computers. We then give you a unique code - called a wireless key - to enter into your computer. This means you're the only one who can pick up your Hub's signal. This keeps your data safe at all times.
What do WEP and WPA mean?
Your BT Home Hub can use one of two security levels:
- WEP (Wired Equivalent Privacy) – Strong. Used by most computers and wireless routers.
- WPA (Wi-Fi Protected Access) – Extra Strong. Used by new computers and the BT Home Hub 2.0.
We recommend using WPA as it's the most secure way of protecting your network. All BT Home Hubs can use WPA, but remember that your computer (and everything else you're connecting to your Hub wirelessly) has to be able to use it too.
How do I change from WEP to WPA on a wireless connection to my BT Home Hub? How can I ensure that my wireless connection is secure? Use the link below for information on how to change the WEP key for a wireless connection to your BT Home Hub when using the following:
- Windows 7
- Windows Vista
- Windows XP Zero Configuration Service
- BT Wireless Connection manager
- Apple Mac OS-X
- BT HTC S620
How do I change the WEP key for a wireless connection to my BT Home Hub?
- View More: BT Wireless - safety and security
-
-
Set up a wireless connection
-
To set up a wireless connection with Sky Broadband you will need the Sky wireless router and a wireless-enabled computer. If you want to set up a connection using wires, please read our instructions on
how to set up a wired connection with Sky Broadband.
Your SSID (a unique identifier for your wireless network) and Network Key (a password which keeps your wireless connection secure) are printed on a label on your router.First you will need to unpack and start up your Sky Broadband Wireless router. You can find help and advice on doing this in our Setting up your Sky Broadband router guide.
Don't forget to check your Sky Broadband activation date - you will not be able to set up your wireless connection if your Sky Broadband has not been activated yet. You should have received this in a letter from Sky or you can check online.
Once you have set up your router, watch the relevant instructional video or follow the step-by-step guide below. Please note that the router in the videos may be different from your router at home, but the principle of connecting to the internet is exactly the same.
 STEP 1
Firstly, ensure you can see a wireless symbol on your computer similar to one of the examples in the picture.
If you can't see a symbol like this, or you know that your computer is not wireless-enabled, you can buy an adaptor from Sky Customer Services. See our Contact Us page to find out how to get in touch.
STEP 2
You'll need your SSID and Network Key codes. These ensure that only you can access your internet connection. They are printed on the bottom of your Sky wireless router.STEP 3
Different versions of Windows may have slightly different ways of accessing your wireless network settings. There may be a sticker telling you which operating system you're using, but if you're not sure, use the Start key or menu button, select Run, type'winver' in the text field and select OK.
A pop-up window will display information about your operating system, including the version of Windows you are using. If you are using Linux, Mac OSX or another operating system, you should find that while the menus and buttons may have different names, the process is similar.STEP 4
Right-click the wireless network icon. The exact icon may vary, depending on your brand of computer, but this will commonly feature the connectivity bars, as shown in our examples from Windows XP and Vista and may appear in the lower right corner of your screen.STEP 5You need to see a list of the wireless networks that are in range of your computer, so look for an option that will give you this. If you're using Windows XP, for example, select View Available Wireless Networks. If you're using Windows Vista, choose Connect to a Network. Other operating systems may have different wording.STEP 6When the Wireless Network Connection window appears, select the connection labelled with your Sky SSID and choose Connect. The SSID will appear as written on the bottom of your router and on the 'Keep me handy' card.
If you don't see your network at first, try refreshing network list. The list of available networks looks similar in Windows XP (top image) and Windows Vista (bottom image).
STEP 7
Enter your network key when prompted. It's case sensitive and doesn’t contain any numbers, so there are no zeros, only Os.STEP 8Once you've followed these steps, you should be able to connect to the internet wirelessly. If the yellow ethernet cable is still connected to your computer, remove it. You'll notice that the ethernet lights on your router will go out when you do this. Wait a minute to give your wireless connection time to connect, then open your web browser and start enjoying the web without wires.
- View More: Sky Set up a wireless connection
-
-
Set up a Netgear Wireless Network Adaptor purchased from Sky
-
Insert the install CD supplied with your Netgear Wireless Network Adaptor and follow the instructions on screen. Don't plug the adapter into your computer until you're prompted to do so by the instructions.
During installation you will be asked to select your wireless network (SSID) from a list of options and enter your Network Key (the password that keeps your wireless connection secure). These are both printed on a label on the Sky wireless router.
Your SSID and Network Key will be unique to your Sky Broadband router and use the format:
SSID – SKY12345.
Network Key – ABCDEFGH
- View More: Sky Set up a Netgear Wireless Network Adaptor purchased from Sky
-
-
Have you tried a different wireless channel?
-
Using the same wireless channel as your neighbours can slow your connection or cause it to drop. Try changing the channel your router uses to fix this problem.
How to change the channel of your router- First connect your computer to your Sky wireless router using the yellow Ethernet cable.
- Open your web browser, type 192.168.0.1 in the address bar and press Enter.
- In the login box, enter the username admin and the password sky.
- Select Wireless Settings from the menu.
- You'll see a list of numbers in the Channel drop-down menu. Change it to a different channel number. The recommended channels are 1, 6 or 11.
- Click Apply when you've chosen one.
- Try each of the three numbers to see which gives you the best signal. The best option for you will depend on which channels your neighbours are using.
- View More: Sky Have you tried a different wireless channel?
-
-
What is a home network?
-
When two or more computers are connected, they become a network. If you connect them at home, they're known as a home network. And you can add games consoles, media centres and storage equipment.
When you connect your computers, you can do more with them:
- Share a single internet connection.
- Share printers.
- Work on one computer and save the files to another. This is a simple way to back up your files – if one computer goes wrong, you have a copy of all your work on another.
- Share photos, music and video.
- Share games for multiplayer challenges.
How do I set up a home network?With O2 Home Broadband, it's easy to set up a home network. You don't need any special computer skills.
Make sure that all your computers or other equipment can connect to a network. They need to have an Ethernet socket or a wireless connection. You'll find your Ethernet socket at the back of your computer. (It looks like a phone socket, but a bit bigger.) Most newer PCs and consoles have wireless as standard. Just look at the specification. If you're not sure, there's probably a section on 'networking' in the manual.
Connect your equipment. You should be able to do this using your O2 Home Broadband setup CD. Pop the CD into each computer in turn and follow the on-screen instructions. If your O2 Home Broadband is already working, you'll have to choose the option Add an extra computer to my O2 Home Broadband connection.
Your O2 Home Broadband setup CD won't work on consoles or other devices. If you can't find the instructions in your manual, call the O2 Techies. They'll help you add them to your network.
- View More: O2 What is a home network?
-
-
What’s the difference between a wireless network and a wired one?
-
In a word, wires. With wireless, you don’t need them. So you can get online anywhere in your house – from your loft to your back garden.
A wired connection is faster, though. So if you’re downloading or sharing really large files, it might be worth plugging your computer straight into your wireless box, using the yellow Ethernet cable.
Also, wireless signals are open to interference – from cordless phones, or even your neighbour’s Wi-Fi. So if you’re not getting a strong signal by wireless, try plugging in.
View our interactive guide to get more support setting up and going wireless
- View More: O2 What’s the difference between a wireless network and a wired one?
-
-
How far will my wireless signal reach?
-
It depends. In an open space, it should reach about 100 metres (or if you have the O2 Wireless box Pro, about 200 metres).
Things like the thickness of your walls, floors and cordless phones can all affect your signal. But it should be strong enough to reach most parts of an average family house and garden.
View our interactive guide to get more support setting up and going wireless
- View More: O2 How far will my wireless signal reach?
-
-
Why doesn’t my wireless speed ever reach 54Mb?
-
Your O2 wireless box has the power to hit speeds of 54Mb or higher. But your broadband line can only ever get to 20Mb at most. If your on our more recent packages (The Basics, The All Rounder and The Works) we’ll always give you the fastest speed we can on your line. But depending on your package, we also slow down video streaming or Peer to Peer at certain times.
Also, your speed depends on things like the strength of your signal, and how far away you are from the box.
View our interactive guide to get more support setting up and going wireless
- View More: O2 Why doesn’t my wireless speed ever reach 54Mb?
-
-
How do I change the name of my wireless network?
-
You can change the name of your wireless network to make it more secure. If you do this, you'll have to change the settings on your computers, mobiles or anything else that's connected to your network.
To change the name of your wireless network, simply follow the steps below:
- Open up your internet browser and type the following address into the address bar:http://o2wirelessbox.lan or http://192.168.1.254
- Once the page has loaded, click on "Home Network" on the left hand side of the page.
- Click on the name of your wireless network. This will be located towards the top of the page.
- Click on "Configure" in the top-right of the page.
- Change the network name you something you will remember.
- Once you've changed the network name (SSID), click 'Apply' at the bottom of the page.
You've now changed the name of your wireless network.
View our interactive guide to get more support setting up and going wireless
Check out our O2 Guru TV video below:
Help VideosHow to change the network name and password on O2 Home Broadband

- Open up your internet browser and type the following address into the address bar:http://o2wirelessbox.lan or http://192.168.1.254
- View More: O2 How do I change the name of my wireless network?
-
-
How do I get Wi-Fi on my Mac?
-
To use Wi-Fi on a Mac, you just need to have AirPort. Most Macs have it already. But if yours doesn’t, you can buy an AirPort Card from Apple.
To connect to Wi-Fi:
- Click on the AirPort icon on your Mac, at the top right of the screen.
- Choose ‘Turn AirPort on’ (if it says ‘Turn AirPort off’, it’s already on).
- Click on the AirPort icon again.
- Choose ‘Other’ (a new window will open).
- Where it says ‘Network name’, type in the long SSID number that’s printed on the bottom of your wireless box (or the name of the network you want to connect to).
- Where it says ‘Wireless Security’, choose ‘WEP 40/128-bit Hex’.
- Where it says ‘Encryption key’, type in the long WEP number on the bottom of the box (for some versions of Mac, you need to type a $ in at the start of the WEP key – if it won’t let you, you don’t need to).
- Click ‘OK’.
That’s it. Your Mac should now be connected. Check the AirPort icon to see the strength of your connection (the more dark bars, the stronger the signal).
Staying connected
To make sure your Mac automatically connects to your network again next time:
- Go to the Apple menu, on your Mac.
- Choose 'System preferences'.
- Choose 'Network'.
- From the ‘Show’ menu, choose ‘AirPort’.
- Where it says 'By default, join:’, choose 'Preferred networks'.
- Find the long SSID number that’s printed on the bottom of your box, and drag it to the top of the list.
- Click 'Apply Now'.
Now your Mac will automatically connect when you’re in range of your wireless box, and AirPort is switched on.
Problems?
Call us on 0800 230 0202 free from a landline (drop the first '0' to call free from an O2 mobile). We’ll do our best to help, but you might have to contact Apple if the problem’s with your Mac.
View our interactive guide to get more support setting up and going wireless
- View More: O2 How do I get Wi-Fi on my Mac?
-
-
How to secure your wireless network
- The O2 wireless box comes with security features turned on as standard. This means your connection's secure from the minute you switch it on. People shouldn't be able to use your broadband without entering a password first, and everything you send over the network is hidden from prying eyes.
But if you're using your own router, or you just want some extra reassurance, here's what you need to do to keep your wireless network secure:Use encryptionYou should use encryption to stop unauthorised use of your network. The O2 wireless box has encryption switched on as standard.Check for updatesYour wireless equipment needs updating regularly, just like the software on your PC. Hardware manufacturers regularly release updates. You should check for them on the manufacturer's website.
The O2 wireless box checks for and installs updates automatically.Change the passwordYou can change the username and password on your router from the standard so that people can't guess it.Hide your networkYou can tell your wireless network to hide itself. If you do this, only people who know what network name to look for can connect.
For this to be effective you should also change the name of your network to something that's hard to guess.
As well as taking these precautions, you should have security software on every computer you use to access the Internet. McAfee Security for O2 Home Broadband, which comes with O2 Home Broadband, gives you all you need.View our interactive guide to get more support setting up and going wireless
- View More: O2 How to secure your wireless network
- The O2 wireless box comes with security features turned on as standard. This means your connection's secure from the minute you switch it on. People shouldn't be able to use your broadband without entering a password first, and everything you send over the network is hidden from prying eyes.
-
How do I change my encryption from WEP to WPA?
-
Your O2 wireless box comes with WEP encryption. It means that you need a key or code to connect to your network. To make it even more secure, you can change it to WPA. This is the latest way of encrypting wireless networks. It's very secure, but it's worth noting that it won't work on some versions of Windows Vista. You also have to make sure all your devices that are on network are WPA compatible.
To change from WEP to WPA, simply follow the steps below:
- Open up your internet browser and type the following address into the address bar:http://o2wirelessbox.lan or http://192.168.1.254
- Once the page has loaded, click on "Home Network" on the left hand side of the page.
- Click on the name of your wireless network. This will be located towards the top of the page.
- Click on "Configure" in the top-right of the page.
- Select the "Use WPA-PSK Encryption" option and click 'Apply'.
- You can check it has changed to WPA-PSK by looking at the 'Security Mode' under the 'Security' heading.
View our interactive guide to get more support setting up and going wireless
Check out our O2 Guru TV video below:
Help VideosHow to change the security settings to WPA on O2 Home Broadband
- Open up your internet browser and type the following address into the address bar:http://o2wirelessbox.lan or http://192.168.1.254
- View More: O2 How do I change my encryption from WEP to WPA?
-
-
How do I change the name of my wireless network?
-
You can change the name of your wireless network to make it more secure. If you do this, you'll have to change the settings on your computers, mobiles or anything else that's connected to your network.
To change the name of your wireless network, simply follow the steps below:
- Open up your internet browser and type the following address into the address bar:http://o2wirelessbox.lan or http://192.168.1.254
- Once the page has loaded, click on "Home Network" on the left hand side of the page.
- Click on the name of your wireless network. This will be located towards the top of the page.
- Click on "Configure" in the top-right of the page.
- Change the network name you something you will remember.
- Once you've changed the network name (SSID), click 'Apply' at the bottom of the page.
You've now changed the name of your wireless network.
View our interactive guide to get more support setting up and going wireless
Check out our O2 Guru TV video below:
Help VideosHow to change the network name and password on O2 Home Broadband
- Open up your internet browser and type the following address into the address bar:http://o2wirelessbox.lan or http://192.168.1.254
- View More: O2 How do I change the name of my wireless network?
-
-
How do I switch my O2 wireless box to another channel?
-
If your wireless signal isn’t great, it could be interference from another wireless gadget in your home. Like a cordless phone, or even your neighbour’s Wi-Fi. Changing channel could improve your connection.
Here’s how:
- Plug one end of the yellow Ethernet cable into your computer, and the other end into your wireless box.
- Open your internet browser (like Internet Explorer or Firefox).
- Go to http://o2wirelessbox.lan or 192.168.1.254.
- You might be asked for a username and password. Use ‘Administrator’ (with a capital A) as the username, and the serial number on the bottom of your wireless box as the password. (If it doesn’t work, try ‘SuperUser’ for the username, and ‘O2Broadb64nd’ as the password.)
- Click on ‘Home Networking’, then ‘Interfaces’, then ‘wlan’.
- You should see three buttons – ‘Overview’, ‘Configure’, ‘Help’. Choose ‘Configure’.
- Where it says ‘Channel selection’, choose ‘Manual’.
- Choose any channel, from 1 to 13.
- Unplug your yellow Ethernet cable and test the connection. Try a few channels, to find the best one.
View our interactive guide to get more support setting up and going wireless
- View More: O2 How do I switch my O2 wireless box to another channel?
-
-
Why can’t I connect to my Wi-Fi? I’ve done it before.
-
- First, unplug your wireless box. Wait 30 seconds. Then plug it back in and wait for it to restart fully. (You’d be surprised how often this works).
- If you still can’t connect, try to connect from another computer or wireless gadget (like a smart phone, games console or O2 Joggler). If it works, you’ll know the problem is with your equipment, not the connection or wireless box.
- Check to make sure the computer or wireless gadget you’re trying to use has Wi-Fi switched on.
- If you’ve changed the username and password for your O2 wireless box, changing them back to the original settings might help.
- Try changing the wireless channel (see the link below).
View our interactive guide to get more support setting up and going wireless
- First, unplug your wireless box. Wait 30 seconds. Then plug it back in and wait for it to restart fully. (You’d be surprised how often this works).
- View More: O2 Why can’t I connect to my Wi-Fi? I’ve done it before.
-
-
How do I manually set up my wireless router for cable in Windows?
-
Note: if you use the new Virgin Media Hub or Super Hub – our combined modem and wireless routers for cable customers – you can find the appropriate guides here:
How do I set up the Virgin Media Hub? or How do I set up the Virgin Media Super Hub?
Connecting wirelessly to the Virgin Media Hub/Super Hub on Windows XP
Connecting wirelessly to the Virgin Media Hub/Super Hub on Windows Vista
Connecting wirelessly to the Virgin Media Hub/Super Hub on Windows 7
The setup CD that came with your wireless router pack should let you set up your wireless router to work with your modem. If you’ve had any trouble running through the setup, or if you’d like to set up your wireless connection manually, follow the steps in this guide.
Before you begin
Here’s a list of all the things you need before you get started:
- Wireless router
- Yellow Ethernet cable
- Power supply
- Router stand (optional)
- Wireless setup CD and setup guide
- USB wireless adapter for desktops (optional, only provided if ordered)
- Wireless card for laptops (optional, only provided if ordered)
Your cable modem should’ve been installed separately, so you won’t find it in your router pack.
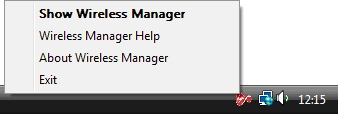
Uninstalling Wireless Manager (for Netgear 'G' series wireless routers only)
To set up your wireless connection manually, you’ll need to uninstall the Wireless Manager software, if it’s installed. This is because Windows' built-in wireless networking software can’t control your connection while Wireless Manager is working. Remember, Wireless Manager is only installed with our Netgear 'G' series of wireless routers.
First, if Wireless Manager is running, exit it. To do this, right-click the Virgin Media icon in the system tray (usually in the bottom-right of the screen, near the clock) and click Exit.
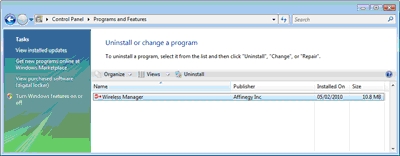
Now go to Start > Control Panel and double-click Add-Remove Programs(for Windows XP) or Programs and Features (for Windows Vista). Click once to select Wireless Manager from the list of installed programs and then click Remove or Uninstall.
Once the Wireless Manager software has been removed, restart your PC before you move onto the next stage.
Setting up your wireless router
Ready? Great. Just make sure you follow each step in the right order and you’ll be up and running in no time.
Step 1: First, disconnect the power cable from the modem.
Step 2: If your modem is connected to your PC, disconnect it. You shouldn’t need this cable any more, so just stash it somewhere safe.
Step 3: Put your wireless router close to your cable modem and near a power socket. You might want to put it in the router stand, but that’s up to you.
Remember, where you put your wireless router can make a big difference to how well it works. To find the best place to put it, read our article, Where should I put my wireless router?
Step 4: Plug in your modem's power cable but don’t switch on the power yet!
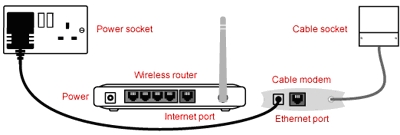
Step 5: Connect one end of the yellow Ethernet cable to the internet port on your wireless router and connect the other end to your modem.
Now switch the power on and the modem will start up.

Wait for most of the lights on the cable modem to turn solid, which means there’s a connection to the internet. This should take around 60 seconds. One or two of the lights might flicker – this just means the modem’s doing its job.
Step 6: Now connect your wireless router's power cable and switch on the power.
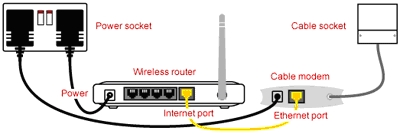
Wait 60 seconds for the lights on the front of the router to settle down. The Power and Internet lights should both be solid. Again, there might be some flickering of the lights, but this is normal.
Step 7: Now that everything’s powered up and ready to go, you can try connecting your PC to the wireless router.
If you’ve installed a wireless USB adapter, you might need to use its own software to connect to your wireless router. Either way, the connection process is similar to the one below.
Windows XP users
The quickest way to connect to a wireless network is to use the icon in the system tray. If you can see the broadcast symbol, right-click it and selectView Available Wireless Networks.
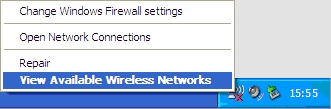
You can also go to Start > Control Panel > Network Connections, right-click the Wireless Network Connection icon and click View Available Wireless Networks.
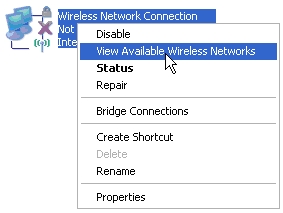
Whichever way you do it, Windows will now show you all the available wireless networks, along with information about their security and signal strength.
Your wireless router should appear in the list as Virgin Broadband. Click it and then click Connect.
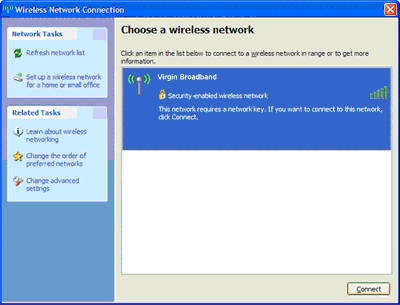
Next, you’ll be asked for your wireless router's WPA passphrase. The default passphrase is preinstall. Type it into both boxes and click Connect.
Once your passphrase has been accepted, you’ll be connected to your wireless network. Skip the next bit and move straight onto Step 8.
Windows Vista users
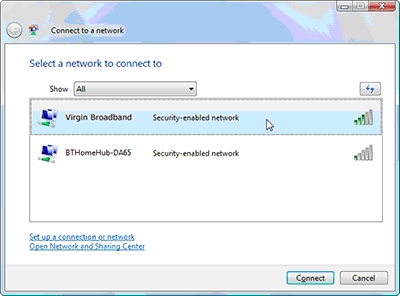
The quickest way to connect to a wireless network is to use the icon in the system tray. If you can see the network symbol, right-click it and selectConnect to a network.
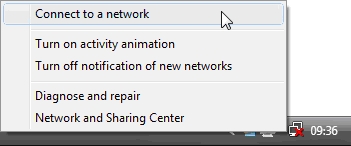
Alternatively, go to Start > Connect To.
Windows will now show you all the available wireless networks, along with information about their security and signal strength. If you don't see any wireless networks listed, make sure that the Show dropdown menu is set either to All or Wireless.
Your wireless router should appear in the list as Virgin Broadband. Click it and then click Connect.
You’ll then be asked for your wireless router's WPA passphrase. The default passphrase is preinstall. To see the passphrase on the screen as you type it, tick the Display characters box.
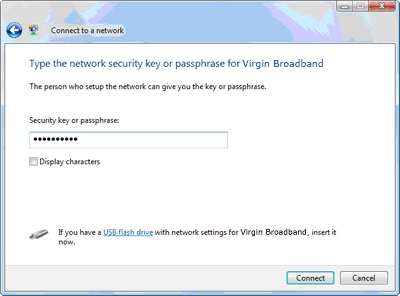
Once your passphrase has been accepted, you’ll be connected to your wireless network. When it prompts you, choose to save the network settings and choose Home as the type of connection.
Step 8: Next, start up your web browser.
If you haven’t configured your wireless router before, you should see a Wireless Setup page in your browser. This will take you through the final step of setting up your wireless connection.
To enhance the security of your connection, you can use the Wireless Setup page to change some key information that defines how you connect to the wireless router, as shown below:
Name (SSID): This is the name of the wireless network that you see when you do a scan for available wireless networks. You can set this to just about any name you'd like instead of the default name, Virgin Broadband. Try not to use a name that might give away your identity or address, though.
Security Passphrase (WPA-PSK): This is basically a password that people need to log onto your wireless network. Choose a strong password to stop unauthorised users from connecting to your wireless network, preferably with a few numbers in it. You'll need to remember this passphrase if you ever want to connect another computer to your wireless network.
Channel: This is the frequency that the wireless router operates at. You can choose any of the available channels, although some might give you a poor performance, depending on which ones are being used by other nearby networks. We recommend using channel 1, 6 (the default option) or 11.
After you’ve made your changes, click Apply. The page should refresh and you might then be asked to enter the username and password for the router.
Remember, if you're setting up your cable modem for the very first time, you'll need to activate your broadband account before you can using the internet. Once you've gone through the steps above, just start up a web browser and go to this address:
http://activation.virginmedia.com/
And you’re done! Your PC should now be connected to the internet through your wireless router.
Want to connect another computer wirelessly?
No problem. Once you've gone through the initial setup, connecting another computer to the wireless network is very easy.
Just repeat Step 7 above to connect another PC to your wireless network. You'll be asked for your WPA passphrase, which you should’ve changed during the initial setup. As soon as that’s accepted, you’ll be connected. Simple!
- View More: Virgin Media How do I manually set up my wireless router for cable in Windows?
-
-
Where should I position my wireless router?
-
To work, your wireless router needs to be placed within reach of:
- A power socket.
- Your cable modem (for fibre optic broadband customers) or your main telephone socket (for National broadband customers).
Note: if you use the new Virgin Media Hub or Super Hub – our combined modem and wireless routers for cable customers – your positioning options are limited by the location of the coaxial cable that comes into your home. Try to move possible sources of interference away from the Hub/Super Hub rather than moving the Hub/Super Hub itself.
Got National broadband? It's important to connect to the main telephone socket (usually the one closest to your front door) instead of any other extension sockets in the house. This will give you the best broadband speed possible in your home.
What affects wireless broadband performance?
- The position of the wireless router and its antenna (if it has one – some modern wireless routers and the Virgin Media Hub do not have an external antenna)
- The thickness and composition of any walls between the router and your computer(s)
- Other electrical equipment, e.g. mobile phones, fax machines and microwaves, close to the router
- Other wireless networks nearby, particularly those that use the same or a similar channel to that of your wireless router.
The strength of the wireless signal is usually at its weakest on the edge of the range of the router. In a nutshell, the further away your computer is from the router, the weaker the wireless signal is likely to be.
Getting the best wireless performance
For the best wireless performance, make sure that there’s enough space around the wireless router and that it’s not too close to other electrical devices. And try to keep your computer and other wireless devices as close to the wireless router as you can.
You could even experiment with different positions, to find the best place to keep your wireless router. Remember to keep the wireless router in a dry, well ventilated place to stop it from overheating.
The strength and range of the wireless signal will be improved by using wireless 'N' technology instead of wireless 'G' version. To use wireless ‘N’ your computer, wireless card/adapter and wireless router need to compatible with the wireless 'N' standard. For more information, please see the Related Articles section.
- View More: Virgin Media Where should I position my wireless router?
-
-
Network problems during wireless setup on cable
-
If you’ve installed the Wireless Manager software, you might see this error message when you’re trying to set up your wireless router:
Please make sure your wireless router's power, wireless and internet lights are on. If they are, try moving your computer and wireless router closer together then click NEXT to try again.

To make sure you’ve got the best possible signal strength, move your computer and wireless router as close together as possible. If that doesn’t fix the problem, switch off the router, wait for 10 seconds and then switch the router on again. You shouldn’t need to switch off your modem, so leave that running.
Alternatively, uninstall the Wireless Manager software and then set up yourwireless connection manually.
- View More: Virgin Media Network problems during wireless setup on cable
-
-
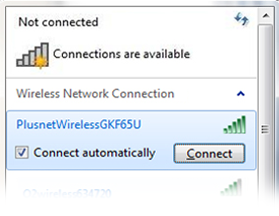
How to connect to your wireless network
-
These guides are aimed at customers using Plusnet supplied wireless routers. You should be able to use them with other routers as long as you know the Wireless Name (SSID) and password.
To get started, click on your operating system logo.
Windows 7 Mac OS X Windows Vista Windows XP 


- View More: Plusnet How to connect to your wireless network
-
-
Wireless (Wi-Fi) Security Tips
- With a few changes to your settings you can make your home wireless network more secure. Here we'll show you 5 of our most recommended tips. Most of these only take a minute or two to do. Using all, or a combination of them, you'll give your home network the best possible protection.1. Use the latest Wireless encryption and strong passwords
Wireless encryption
Wireless encryption scrambles the signal of a wireless network, so it can only be read with the correct key (password). Over time, newer encryption standards have been introduced to improve security and combat the threat of hacking. As a rule of thumb, older encryption standards are more susceptible to attack.
Since September 2008, all Plusnet routers are set up with WPA-PSK encryption and a strong password. This should be enough to prevent intruders gaining access to your network. Our routers also support WPA2-PSK. If your computers and devices are compatible with it, we recommend switching your network to this when you can.
If you received your router before September 2008, from another ISP, or you bought it yourself, you should check the settings as you may be using WEP encryption. WEP does offer a modest level of protection, but known weaknesses make it fairly easy for a hacker to bypass.
Your wireless password
Even with the very best encryption, your network security is only as strong as the password it uses. Using a weak password could allow a hacker to gain access to your network within a few minutes. Since September 2008 Plusnet routers use a strong wireless password as standard which is unlikely to need changing. Even so, you should be aware that the password is printed on the bottom of your router and the setup sticker (if included).
Your router password
Changing router settings is as easy as using a web browser to access your router's internal setup page. Anyone who is connected to your network can do this if they know the IP address of your router and the router username and password. The default login details for most routers are basic and publically known, so it's a good idea to change the default password to something stronger.
Plusnet routers are set up with a strong password that shouldn't need changing, but you should be aware that the password is printed on the bottom of your router and the setup sticker (if included). Please see How to change the password on our Thomson routers if you'd like to change your Plusnet router password.
2. Consider changing your wireless network name (SSID)Guidelines for choosing a new password
If you need to change your wireless password for any reason, follow the steps below to make sure your password is strong:
- Choose something you'll be able to remember!
- Use a mixture of letters and numbers
- Avoid using single words that you can find in a dictionary
- Don't use personal details e.g. names, addresses or dates of birth
See this Microsoft guide to strong password creation for more tips.
The Wireless network name (or SSID) is the name you look for when scanning for available networks.
You should consider changing it to put a potential hacker off. This is because they'll see you've made some effort to secure your wireless network.
While it seems obvious to call your network My Home Network, or something similar to identify it as your own, this can make it easy for a hacker to identify where your network is.
- View More: Plusnet Wireless (Wi-Fi) Security Tips
- With a few changes to your settings you can make your home wireless network more secure. Here we'll show you 5 of our most recommended tips. Most of these only take a minute or two to do. Using all, or a combination of them, you'll give your home network the best possible protection.
-
How to improve your wireless signal
- If you're having problems with your wireless network, here's a few tips to help you improve the signal. Depending on your setup and circumstances, you might not be able to try everything we mention here. Don't worry if so, these are only recommendations so just do what you can.1. Where does your router live?
Finding the best position for your router can sometimes be tricky. There are two factors to consider:
- The best place for your broadband signal
- The best place for your wireless signal
The best place for your broadband signal
It's a good idea to connect your router to the master telephone socket (it's usually the one closest to where the telephone line enters your property). This becomes more important if you have a poor quality or long line. While you don't have to use the master socket, it's where you'll get the best broadband performance.
The best place for your wireless signal
For a strong wireless network with a clear signal, you'd ideally place your wireless router:
- Out in the open and away from the floor
- Close to where you'll be using your computer(s) (preferably in the centre of your property)
- Away from walls, metal objects and other electrical appliances (see Interference for more on this)
It's rare to be able to meet all of the above criteria, so you'll need to find the best compromise for your setup.
Remember that you don't have to use the master socket, so if your broadband works well in the other sockets in your house then feel free to use them instead.
2. Interference
Your router broadcasts using high frequency (2.4Ghz) radio signals. Like all radio signals it's possible for them to pick up interference.
Microwave ovens, security cameras, Bluetooth devices, cordless phones and baby monitors are common causes of interference so if you can't place your router away from these, be aware that you may have temporary problems when using them.
If you notice problems while using a cordless phone, a phone that broadcasts on a higher frequency, (such as 5.8 GHz, ask a retailer about this) should stop this from happening.
3. Your wireless channel
Interference can also be caused by other wireless networks. In the UK there are 13 'channels' (with each representing a slightly different frequency) available for use. Most modern routers will automatically detect the least busy channel and use that.
If you're having problems, it's worth checking that your router has chosen a clear channel to broadcast on.
Tools such as Wifi Stumbler or inSSIDer will show you how many routers are broadcasting in your area and the channel they use. Please note these are third party applications which we do not offer support for.
If you can see that your router is broadcasting on a busy channel, then it might be worth changing to a less common one. Generally you'll find the best performance on channels 1, 6, and 11.
Thomson 585 users can find out how to change the wireless channel (and other settings) in our Thomson 585 Wireless settings guide.
- View More: Plusnet How to improve your wireless signal
- If you're having problems with your wireless network, here's a few tips to help you improve the signal. Depending on your setup and circumstances, you might not be able to try everything we mention here. Don't worry if so, these are only recommendations so just do what you can.
-
How to Connect a Windows 7 computer to your wireless network
-
If you use a laptop or notebook with built-in wireless connectivity, ensure that the wireless switch and/or wireless button is switched on before you begin the steps to set up your Windows Vista computer. If your wireless is disabled you can usually re-enable it with a simple button combination (for example, by pressing Fn and F2 on your keyboard). For instructions on how to do this on your computer, please refer to the documentation that came with it.
If you do not have built-in wireless, and you don't have a wireless adapter or card, you can Buy one in our devices shop.
Before you can connect a computer to your wireless router you need to know your wireless network name and wireless password. If you don't know what your wireless network name and wireless password is, see What is my wireless network name and wireless password? and follow the instructions for your router.
If you know your wireless network name and wireless password you can connect your Microsoft Windows 7 computer to your network by carrying out the following steps:
- Click the Start globe and select Control Panel.
- Select Small icons in the View by drop-down list in the top right corner.
- Select Network and Sharing Center.
- Click the Connect to a network link.
- Select your wireless network name and click Connect.
- If your network has wireless security set up you will be prompted to enter a security key. This is your wireless password. Enter it and click OK.
You should now be successfully connected to your wireless network. To test this connection, open a web browser, such as Internet Explorer, and try to access a website such aswww.talktalk.co.uk.
I've tried the steps listed above but I still cannot connect
If this didn't work, try again but make sure you are entering the wireless password exactly as it should be. It is case sensitive.
If it still doesn't work, try connecting to your router via an ethernet cable. This will tell you if the problem is with your wireless or with the connection in general:
- If you can connect with the cable connected, but not wirelessly, see I'm unable to connect wirelessly.
- If you cannot connect with an ethernet cable, see Unable to connect to the internet.
- View More: TalkTalk How to Connect a Windows 7 computer to your wireless network
-
-
How to Connect a Windows Vista computer to your wireless network
-
If you use a laptop or notebook with built-in wireless connectivity, ensure that the wireless switch and/or wireless button is switched on before you begin the steps to set up your Windows Vista computer. If your wireless is disabled you can usually re-enable it with a simple button combination (for example, by pressing Fn and F2 on your keyboard). For instructions on how to do this on your computer, please refer to the documentation that came with it.
If you do not have built-in wireless, and you don't have a wireless adapter or card, you can Buy one in our devices shop.
Before you can connect a computer to your wireless router you need to know your wireless network name and wireless password. If you don't know what your wireless network name and wireless password is, see What is my wireless network name and wireless password? and follow the instructions for your router.
If you know your wireless network name and wireless password you can connect your Microsoft Windows Vista computer to your network by carrying out the following steps:
- Click the Windows Vista Start globe and select Control Panel.
- If available, click Classic View in the panel on the left.
- Double-click Network and Sharing Centre.
- Select Manage Wireless Networks.
- Click Add, and then click Add a network that is in range of this computer.
- When the list of available wireless networks is displayed, double-click the network to which you want to connect.
- Enter the network key or passphrase and click Connect. This is your wireless password. Take care when entering this, as it must exactly match the wireless password and is case sensitive.
- Ensure both boxes are ticked and click Close.
Your computer should now be connected to the internet wirelessly. To test your connection, open a web browser, such as Internet Explorer, and try to access a website, such aswww.talktalk.co.uk.
I've tried the steps listed above but I still cannot connect
If this didn't work, try again but make sure you are entering the wireless password exactly as it should be. It is case sensitive.
If it still doesn't work, try connecting to your router via an ethernet cable. This will tell you if the problem is with your wireless or with the connection in general:
- If you can connect with the cable connected, but not wirelessly, see I'm unable to connect wirelessly.
- If you cannot connect with an ethernet cable, see Unable to connect to the internet.
- View More: TalkTalk How to Connect a Windows Vista computer to your wireless network
-
-
How to Connect a Windows XP computer to your wireless network
-
If you use a laptop or notebook with built-in wireless connectivity, ensure that the wireless switch and/or wireless button is switched on before you begin the steps to set up your Microsoft Windows XP computer. If your wireless is disabled you can usually re-enable it with a simple button combination (for example, by pressing Fn and F2 on your keyboard). For instructions on how to do this on your computer, please refer to the documentation that came with it.
If you do not have built-in wireless, and you don't have a wireless adapter or card, you can Buy one in our devices shop.
Before you can connect a computer to your wireless router you need to know your wireless network name and wireless password. If you don't know what your wireless network name and wireless password is, see What is my wireless network name and wireless password? and follow the instructions for your router.
If you know your wireless network name and wireless password you can connect your Windows XP computer to your network by carrying out the following steps:
- Click Start and select Control Panel.
- If available, click Switch to Classic View in the panel on the left.
- Double-click Network Connections.
- Right-click the Wireless Network Connection icon and select View available wireless networks.
- When the list of available wireless networks is displayed, double-click the network that you want to connect to.
- Enter the network key or passphrase for your wireless network and click Connect. Take care when entering the network key, as it must exactly match the key that you entered into the modem router.
- A message will appear in the bottom right-hand corner of your screen to confirm that the connection was made successfully.
I've tried the steps listed above but I still cannot connect
If this didn't work, try again but make sure you are entering the wireless password exactly as it should be. It is case sensitive.
If it still doesn't work, try connecting to your router via an ethernet cable. This will tell you if the problem is with your wireless or with the connection in general:
- If you can connect with the cable connected, but not wirelessly, see I'm unable to connect wirelessly.
- If you cannot connect with an ethernet cable, see Unable to connect to the internet.
You can also get further help on this topic on the TalkTalk Absolute Beginners Forum.
- View More: TalkTalk How to Connect a Windows XP computer to your wireless network
-
-
How do I connect a Mac OS X computer to my wireless network?
-
Before you can connect a Mac to your wireless network, you need to know your wireless network name and wireless password. If you do not know what these details are, see What is my wireless network name and wireless password?
If you know your wireless network name and wireless password, you can connect a Mac OS X computer to your wireless network by following the steps below:
- In the top-right corner of your Mac's screen, click the AirPort icon and select Turn AirPort On, if available.
The AirPort icon is a wireless symbol.
- From the list of available networks that are within range, select your wireless network name.
- Tick the box labelled Show password. Also, tick the box that says Remember Password.
- Enter the wireless password and click OK.
Note: This is case sensitive and must exactly match the wireless password set up on your wireless router. - Click the AirPort icon again to see if a successful connection has been made to the wireless network.
Your Mac should now be connected to the internet wirelessly. To test your connection open a web browser, such as Internet Explorer, and try to access a website, such aswww.talktalk.co.uk.
- In the top-right corner of your Mac's screen, click the AirPort icon and select Turn AirPort On, if available.
- View More: TalkTalk How do I connect a Mac OS X computer to my wireless network?
-
-
How do I connect an iPad to my wireless network?
-
To connect an Apple iPad to your home network you need to have a working broadband connection, a wireless router and you need to know your wireless network name and wireless password.
If you have not set up a broadband connection before attempting these steps, or if you are having problems with your broadband connection apart from connecting your iPad, please resolve these issues first.
Before you can connect an iPad to your wireless router you need to know your wireless network name and wireless password. If you don't know what your wireless network name and wireless password is, see What is my wireless network name and wireless password? and follow the instructions for your router.
If you know your wireless network name and wireless password you can connect your iPad by carrying out the following steps:
- Turn on your iPad and wireless router.
- From the iPad home page, select the Settings icon.
- Select Wi-Fi.
- Touch the on/off selector switch at the top of the screen until it reads On.
- Select your wireless network name under Choose a Network. It may take a few seconds for any networks to appear if you have just switched on the wireless feature.
- Enter the wireless password and select Join.
All you need from TalkTalk to connect your iPad to your wireless network is your wireless network name and wireless password. If you have completed the steps above, and you still cannot connect, we suggest you visit the Apple's iPad support site for further help.
- View More: TalkTalk How do I connect an iPad to my wireless network?
-
-
How do I connect my iPod touch to my wireless network?
-
Before you can connect an Apple iPod Touch to your wireless network, you need to know your wireless network name and wireless password. If you do not know what these details are, seeWhat is my wireless network name and wireless password?
If you know your wireless network name and wireless password, you can connect an iPod Touch to your wireless network by carrying out the following steps:
- From the home screen, select the Settings icon.
- Select Wi-Fi and turn the slider ON if it is off.
- Select your wireless network name.
- Enter the wireless password and press Join
- View More: TalkTalk How do I connect my iPod touch to my wireless network?
-
-
How do I connect my iPhone to my wireless router?
-
To connect an Apple iPhone to your home network you need to have a working broadband connection, a wireless router and you need to know your wireless network name and wireless password.
If you have not set up a broadband connection before attempting these steps, or if you are having problems with your broadband connection apart from connecting your iPhone, please resolve these issues first.
Before you can connect an iPhone to your wireless router you need to know your wireless network name and wireless password. If you don't know what your wireless network name and wireless password is, see What is my wireless network name and wireless password? and follow the instructions for your router.
Note: The instructions below apply to the following iPhone models:
- iPhone 4
- iPhone 3GS
- iPhone 3G
- iPhone 2G
If you know your wireless network name and wireless password you can connect your iPhone by carrying out the steps below.
- Ensure that your iPhone and wireless router are turned on.
- On your iPhone home screen, select the Settings icon.
- Select Wi-Fi.
- If Wi-Fi is set to OFF, touch the on/off slider to turn it ON.
- Select your network name under the Choose a Network... section.
- Enter the wireless password and select Join.
All you need from TalkTalk to connect your iPhone to your wireless network is your wireless network name and wireless password. If you have completed the steps above, and you still cannot connect, we suggest that you contact Apple for further support.
- View More: TalkTalk How do I connect my iPhone to my wireless router?
-
-
How can I connect an Android device to my wireless network?
-
Many smart phones, tablets and other wireless devices use the Android operating system. Before you can connect an Android device to your wireless network, you need to know your wireless network name and wireless password. If you do not know what these details are, seeWhat is my wireless network name and wireless password?
If you know your wireless network name and wireless password, you can connect an Android 1.6 device to your wireless network by carrying out the following steps:
- Click the Settings icon.
- Select Wireless controls.
- Select Wi-Fi settings.
- Ensure Wi-Fi is ticked.
- Select your wireless network name.
- Enter the wireless password in the box provided and click Connect.
- View More: TalkTalk How can I connect an Android device to my wireless network?
-
-
How do I connect my Windows phone to my wireless network?
-
Many phones have the Windows Phone operating system on them. Before you can connect a Windows phone to your wireless network, you need to know your wireless network name and wireless password. If you do not know what these details are, see What is my wireless network name and wireless password?
If you know your wireless network name and wireless password, you can connect a Windows phone to your wireless network by carrying out the following steps:
- From Start, flick left to the Applications list and then press the Settings icon and select WiFi.
- Make sure that WiFi networking is set to On.
- Select your wireless network name and enter your wireless password.
- View More: TalkTalk How do I connect my Windows phone to my wireless network?
-
-
How do I connect my Symbian device to my wireless network?
-
Many phones have the Symbian operating system on them. Before you can connect a Symbian phone to your wireless network, you need to know your wireless network name and wireless password. If you do not know what these details are, see What is my wireless network name and wireless password?
If you know your wireless network name and wireless password, you can connect a Symbian phone to your wireless network by carrying out the following steps:
- Select Menu and then Tools.
- Select Connectivity.
- Select WLAN wizard.
- Select your wireless network name.
- Enter your wireless password and click OK.
- View More: TalkTalk How do I connect my Symbian device to my wireless network?
-
-
How do I connect my BlackBerry to my wireless network?
-
To connect a BlackBerry to your home network you need to have a working broadband connection, a wireless router and you need to know your wireless network name and wireless password.
If you have not set up a broadband connection before attempting these steps, or if you are having problems with your broadband connection apart from connecting your BlackBerry, please resolve these issues first.
If you don't know what your wireless network name and wireless password is, see What is my wireless network name and wireless password? and follow the instructions for your router.
If you know your wireless network name and wireless password, you can connect your Blackberry to your network by carrying out the following steps:
- Ensure both your BlackBerry and wireless router are switched on.
- On the home screen, click the Manage Connections icon.
- Click Set Up Wi-Fi Network.
- Click Scan for Networks.
- If prompted, click Turn Wi-Fi on.
- Select your wireless network name.
- Follow the on-screen instructions and enter your wireless password when prompted.
- When you are prompted to save a profile for the wireless network, click Next so that your BlackBerry connects to the wireless network automatically next time.
- To complete the setup, click Finish.
To change your wireless network options later, on the home screen, click the Manage Connections icon and select Wi-Fi Options.
- View More: TalkTalk How do I connect my BlackBerry to my wireless network?
-
-
How do I connect a Kindle to my wireless network?
-
To connect an Amazon Kindle to your home network you need to have a working broadband connection, a wireless router and you need to know your wireless network name and wireless password.
If you have not set up a broadband connection before attempting these steps, or if you are having problems with your broadband connection apart from connecting your Kindle, please resolve these issues first.
Before you can connect a Kindle to your wireless router you need to know your wireless network name and wireless password. If you don't know what your wireless network name and wireless password is, see What is my wireless network name and wireless password? and follow the instructions for your router.
If you know your wireless network name and wireless password you can connect your Kindle by carrying out the following steps:
- Press the Home button and then press the Menu button.
- Go to Settings by moving the 5-way controller down, then pressing the 5-way controller to select.
- Select Wi-Fi Settings to show available Wi-Fi networks.
- Select your wireless network name.
- Enter your wireless password.
All you need from us to connect your Kindle to your wireless network is your wireless network name and wireless password. If you have completed the steps above, and you still cannot connect, you can refer to the Kindle quick start guide or Full user guide for further help.
- View More: TalkTalk How do I connect a Kindle to my wireless network?
-
-
how do I set up a wireless connection to my Netgear wireless router when using Vista?
-
Follow these steps to set up a wireless connection between your computer and Netgear router:
- Click Start, and select Connect To:
- Locate, and click to 'select a network to connect to' – in the example below our network is called Orange123456.
You may have chosen the network name (SSID) when setting up the router for the first time or you'll find the name printed on a sticker on the base of the router. If you see the network name 'NETGEAR', we suggest you set up a wired connection and set up WiFi security first.
If you can't see your network name, click the Refresh button.
- Click Connect:
- You'll be prompted to type the network security key for your network.
If you're prompted to 'Type the PIN for the Netgear router', we suggest you select the option 'I want to enter the network key or passphrase instead'. Alternatively, enter the PIN which is printed on the bottom of the router under SECURITY PIN.
- Enter the 'Security key or passphrase' for your router.
- Click Connect:
- The computer will connect to the router:
- And confirm that it has 'successfully connected to the router':
- Click Close.
- You may also be asked to select a location for the Network - we selected Home.
- Click Start, and select Connect To:
- View More: Orange how do I set up a wireless connection to my Netgear wireless router when using Vista?
-
-
how to resolve issues connecting a mobile phone to the Netgear DGN1000 router
-
If you're having problems connecting a mobile phone to your Netgear DGN1000 router, you'll need to update the firmware of your Netgear DGN1000 to the newest version.
Please note: If you're having problems with the signal boosting (UMA) service then updating to the latest firmware should resolve the issues.
The new Pre-configured Netgear DGN 1000 router has the latest firmware version - V2.1.00.39_ww. You don't need to upgrade this firmware as it fully supports UMA and Wi-Fi connectivity. They can be identified by the presence of a wireless settings sticker at bottom of the router.
Check which version of firmware is installed on the router:
- Log into the routers pages http://192.168.0.1 (192.168.0.1).
- The Firmware Upgrade Assist will open:
- If your firmware is out of date, you’ll be advised of your ‘current firmware version’, the ‘new version available’, and given the opportunity to upgrade to the new version by selecting Yes:
If the firmware is up-to-date, you’ll be redirected to the ‘Basic Settings’ page.
- The router will download the new firmware:
- The router will ‘Upgrade Firmware’:
Do not unplug the router while the firmware is updating!
The ‘Power’ light on the router will blink while the router firmware is updated.
- Once the router has been updated with the new firmware and rebooted, you’ll be prompted to check the LEDs to see if the Router is ready – click OK:
- Enter the router’s username and password:
- username: admin
- password: password - The Firmware Upgrade Assist will open and check that the firmware has updated:
- View More: Orange how to resolve issues connecting a mobile phone to the Netgear DGN1000 router
-
-
How do I set up a wireless connection to my Netgear wireless router using WPS on Windows 7
-
There are 2 methods for setting up a wireless connection using the WiFi Protected Set up functionality on the Netgear DGN1000 router:
Push button
WPS PIN
WPS push button method
The WPS push button method allows you to set up a secure wireless connection between your computer and Netgear router, without needing to type the security key. This functionality will only work with Windows 7 and with compatible “wireless N” type software on your computer or wireless adapter.
It’s advisable to firstly set up a wired connection, ensure the security is set to WPA + WPA2 and you’ve made a note of the name you’ve chosen for the router. Then follow the steps below:
Note: WiFi security is enabled by default on a Pre-Configured Netgear DGN 1000 router - the default mode is Mixed WPA/WPA2 . Wireless network name (SSID) and security key are located at the bottom of the router.
- Click on the 'Network' icon in your computers notification area:
- An Ethernet
icon will display, if not a wireless
icon will be shown.
- 'View Available Networks' (VAN) will open - a list of available 'wireless network connections' will display.
- Locate your router in the list of wireless network connections using the name you’ve set up in the wired connection steps - in the example below the SSID of the router is
- Select your router from the list and click Connect:
- Windows will get information from the router and detect if it can support WPS:
- The option to push the (WPS) button on the router should be presented:
- Press and hold the WPS button on the router for 4 seconds:
- Windows will get the settings from the router:
- Your computer will connect to the router:
- The wireless connection will turn white as below if the router is connected to the Internet, or connection white with a yellow exclamation mark if the router isn’t connected to
If the computer doesn’t connect to the router, try restarting the computer and router – you’ll usually find that the connection then works.
If this doesn’t help, set up the connection again however this time enter the security key manually.
PIN method
You can also set up a connection to the with Netgear WPS using the PIN method.
The WPS PIN method for first time set up allows you to enable security on your wireless router, create a security code and connect to the router by entering your router’s security PIN.
If the router has already been set up using the installation CD, using manual wireless instructions, or the adapter doesn’t support WPS, then you will not be presented with the options detailed below.
- From your Windows 7 desktop, locate the wireless icon in the ‘Notification Area’ and click to open ‘View Available Networks’:
- Locate the network connection ‘NETGEAR’, and click to open.
- Click Connect:
- The wireless software will connect to the router:
If the wireless adapter is compatible with WPS, the software will ask if you want to set up your network – click OK:
- You’ll be prompted to enter the router’s PIN:
You’ll find this printed on the sticker on the base of the wireless router or listed in the ‘Advanced’ menu on the ‘Wireless Settings’ page from the router’s admin pages.
- Type a name for your network – by default this is entered as computer-name_network however this can be changed to anything provided it’s under 25 characters:
- To make the security level more compatible with older operating systems, or to change the security key click the change passphrase… drop down menu.
- To change the security key, click on the security key field and enter a new key.
Characters from a-z and number 0-9 are recommended. The key is case sensitive.
- To change the Security setting, open the Security level menu, and select an appropriate level.
Only WPA2 settings provide the advantage of up to 150Mbps speed on the internal network, therefore it’s suggested that older operating systems are updated http://update.windows.com.
- Click Next:
- Windows will set up the network:
- Apply new settings to the router:
And confirm that the router is successfully set up – the security key will be displayed, which you can print, or copy to a USB memory stick if you’d like to set up additional Windows 7 computers.
- View More: Orange How do I set up a wireless connection to my Netgear wireless router using WPS on Windows 7
-
-
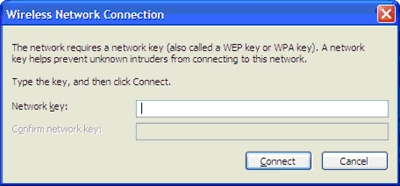
how do I set up a wireless connection to my Netgear wireless router when using XP (Service Pack 2/3)
-
To set up a wireless connection to the Netgear DGN1000 router, firstly ensure that you have set up a wired connection and that you have your wireless security details (the router name and security key) to hand. These are the details that you chose when you set up the wired connection.
If you have the Pre-configured Netgear DGN 1000 router you will see a wireless settings sticker at bottom of the router. WiFi security key and SSID is printed on this sticker. WiFi security on this router is enabled by default and the mode is Mixed WPA/WPA2.
- Click Start, select Connect to and click Wireless Network Connection.
- Locate the Netgear router using the details you have set up during a wired connection
If you can't see your network name, click Refresh network list.
- Click on the 'Network key' field, and type the security key that you chose during initial set up into the field.
- Click on the 'Confirm Network key' field, and type the security key into the field.
- Click Connect:
- The computer will 'acquire a network address' from the router, and display 'Connected'
- Click Start, select Connect to and click Wireless Network Connection.
- View More: Orange how do I set up a wireless connection to my Netgear wireless router when using XP (Service Pack 2/3)
-
-
troubleshoot an intermittent wireless connection
- There are several possible causes of intermittent connection problems. We've listed a number of known causes below, and provided some potential solutions for you to discuss with the customer.range - ie the computer is too far away from the routerobstructions - eg thick stone walls, glass orinterference - other equipment in the house using 2.4GHzrefresh the connectionpower cycleupdate wireless driversthird party wireless software conflictsupdate your operating systemrangeIn general, the further your computer is from your wireless router, the lower the signal strength will be. When the signal strength is low, there's a higher chance that you'll experience dropping connections, and the speed of the wireless connection will decrease. The range is affected by obstructions and interference.obstructionsObstructions between your computer and wireless router make for lower signal strength; different materials have different effects. We've listed a number of obstacles you may have in your house, and suggest that you try and relocate your router where possible to see if the situation improves:very high - metalhigh - concretemedium - marblemedium - bricksmedium - stone wallsmedium - water - (i.e. enclosed in a fish tank)low - glasslow - plasterlow - woodinterferenceThe following items can cause problems with wireless interference:other wireless routers, eg a neighbour'scordless phonesbaby monitorsmicrowave ovenscomputers - if obstructing wireless cardswireless keyboards or miceBluetooth devicesany other items using the 2.4GHz frequency rangeThe further away the source of interference is from the wireless router, the less chance there is that it will cause an issue.Changing the channel of your wireless router can often help. You'll find more help with this in one of the articles below:Livebox 1.1Livebox 1.2 (Mini)Siemens wireless routerNetgear DGN1000refresh the connectionIf the connection drops, you may need to refresh the connection.Messages like 'limited or no connectivity' may be received, or AirPort icons will blink between grey and black.The tips below may help:internal cards on laptopsTry turning the wireless switch on the laptop off for a few seconds, then back on.USB wireless adaptorsUnplug the wireless adaptor for 20 seconds, then plug it back in.Apple AirPortClick the wireless fan, and select turn AirPort off, wait a few seconds, then click turn AirPort on.power cycleTurning your router and computer back on again will fix all sorts of intermittent connection problems. Follow the steps in one of the articles below:Livebox 1.1Livebox 1.2 (Mini)Siemens wireless routerNetgear DGN1000update wireless driversIf you're using an inbuilt wireless adaptor, it may help to contact the manufacturer to see if any driver updates are available, which may improve wireless connectivity.There are no driver updates for any of our wireless adaptors.third party wireless software conflictsIf you're using third party wireless software, (ie not Windows wireless manager, or Apple AirPort) this may be causing the intermittent connection problem. We strongly advise that you use Windows to manage your wireless connection, and disable the third party wireless software. The manufacturer of your computer should be able to assist with this, if you're unable to locate an option to disable the software.update your operating systemWe strongly recommend that you update your operating system with the latest service packs. This is not only for security reasons, but also because many wireless connectivity issues are fed back to Microsoft and Apple, and then improved with new releases. If you're using service pack 1 or haven't installed a service pack on Windows XP, we strongly suggest you update.
- View More: Orange troubleshoot an intermittent wireless connection
-
-
Livebox (Windows Vista) - the network security key provided does not match the network security key for this network
-
If you get the error ' The network security key provided does not match the network security key for this network' the 'security code' has been entered incorrectly.
Did you log into the Livebox admin pages, and copy your 'Security Code' to the Windows clipboard?
- Return the Livebox to factory settings
- Once the Livebox has restarted, click Cancel
- Log onto the Livebox's home page again, and copy the security key
- Try to connect again
The error occurs when the security key has been entered incorrectly.
Return to Notepad, and carefully check the following:
- it only contains letters from A-F and numbers 0-9
- 0 is zero and not the letter O
- spaces should not be included
- letters should be entered in capital letters
If you find any of the above are incorrect:
- Update the security key
- Copy the new security key to your Windows clipboard
- Right-click over the 'Security key or passphrase field'
- Click Paste
Does Windows connect to the Livebox?
- View More: Orange Livebox (Windows Vista) - the network security key provided does not match the network security key for this network
-
-
Netgear wireless usb adapter
- To install the Netgear wireless USB adapter, we suggest that you follow the instructions in the letter that we sent with the adaptor. If you've lost these instructions, you'll find all the steps here. If you encountered problems, the steps below will get you back on track.
If you continue to encounter problems, follow the steps below to check if your adaptor is installed correctly and then connect it to your Livebox or Siemens wireless router:
step 1 - check your adaptor is installed
The best way to check if your wireless adaptor is installed is to look in 'Device Manager' on your computer. You'll find step-by-step instructions on how to do this, as well as instructions to fix any problems you may have, in one of the articles below:
step 3 - check that you've selected for Windows to manage the wireless connection
step 3 - manually connect to your router
Once you know your adaptor's installed correctly on your computer, you can use Windows software to connect to your router:
step 4 - troubleshoot a Windows error
If you receive an error while trying to connect to your router, you'll find a list of potential problems with links to solutions in one of the articles below:
- View More: Orange Netgear wireless usb adapter
- To install the Netgear wireless USB adapter, we suggest that you follow the instructions in the letter that we sent with the adaptor. If you've lost these instructions, you'll find all the steps here. If you encountered problems, the steps below will get you back on track.
-
Vista - how to check if the WLAN service is started
-
To check if WLAN is started, follow the instructions below:
- click on Start
- right-click on Computer, and select Manage
- click Continue if Windows prompts that it needs your permission
- click on Services and Applications
- click on Services
- scroll to the bottom of the list of services
- double-click on WLAN AutoConfig
Check that the Service is started (as below)
If it's stopped:
- click on Start
- click OK to close 'WLAN properties'
- click the red cross, to close 'Computer Management'
- View More: Orange Vista - how to check if the WLAN service is started
-
-
Tips on improving wireless (Wi-Fi) performance
-
There are several simple steps you can take to improve your wireless performance:
- Most wireless problems are due to interference from other networks or appliances. You can try to avoid interference by changing the wireless channel used by your router.
- Start by trying channels 1, 6 or 11, then try all channels in between if necessary.
- Wait for 60 seconds each time after changing the channel to check whether the signal has improved.
- Because conditions vary, there is no easy way to find the best channel other than trial and error. How do I change the wireless channel on my BT Home Hub?
- If there's an antenna on your router and wireless adapter, make sure it's pointing upwards.
- Put the router in a central place in the house (where telephone sockets allow).
- Place the router on a table, shelf, or other surface, not on the floor.
- If you can, use cables or an antenna extension so your computer's wireless adapter is away from the computer and other interference.
- Move all wireless devices away from possible sources of interference such as microwave ovens, metal sheets, cordless phones, cordless keyboards and mice, video senders, etc. Switch them off or move them away to identify which ones cause interference.
Some devices, such as video senders, let you change their operation channel. If they're causing problems, try switching them to a different channel.
Interference might happen at different times (for example, if a video sender is only used in the evening, or when a microwave oven is being used). This means you might need to check electrical devices that are only used at certain times.
- Some laptops with a built-in wireless adapter have a lower wireless performance than an external wireless adapter such as a USB dongle. If you're worried about this you can upgrade to a USB wireless adapter or borrow one for testing. You can buy a USB dongle from the BT Shop.
- Most wireless problems are due to interference from other networks or appliances. You can try to avoid interference by changing the wireless channel used by your router.
- View More: BT Tips on improving wireless (Wi-Fi) performance
-
-
How do I change the WEP key for a wireless connection to my BT Home Hub?
-
Your wireless security key (WEP key) is the password for your wireless connection. If someone knows the password they can access your wireless data. So changing your wireless security key regularly is important to make sure your data is secure.
Choose from the links below:
Please check the instructions that came with your equipment if it's not listed above.
- View More: BT How do I change the WEP key for a wireless connection to my BT Home Hub?
-
-
How do I change from WEP to WPA on a wireless connection to my BT Home Hub?
-
Changing the type of wireless security you use can improve the security of your home network. A connection using WPA is generally more secure than WEP, although some older devices may not be able to use WPA security.
Choose from the links below:
 Change from WEP to WPA on a wireless connection to a BT Home Hub using Vista
 Change from WEP to WPA on a wireless connection to a BT Home Hub using Mac OS-X Change the wireless security on a BT Home Hub to WPA
Please Note: The BT Home Hub 2.0 uses a WPA wireless connection as its default setting.
Change the wireless security to WPA on a BT Voyager Wireless routerPlease check the instructions that came with your equipment if it's not listed above.
Further Help & Information
Desktop Help is our free tool that helps you fix broadband and email problems, keeping you connected when you most need to be. Desktop Help will:- Help you get back online if you're disconnected;
- Set up your email account and fix issues if it stops working;
- Work in the background, fixing the problems it finds;
- Help you set up your home network so you can share folders and printers; and
- Update automatically, giving you the latest solutions.
Find out more about BT Broadband Desktop Help
- View More: BT How do I change from WEP to WPA on a wireless connection to my BT Home Hub?
-
-
How To...... Set Up Wireless Broadband
-
Improve wireless performance
-
Change the channel on your BT Home Hub 2.0
-
Connecting a PC to your wireless network
-
Connecting a Mac to your wireless network
-
Connecting Apple devices to your wireless network
-
How to change the security settings to WPA on O2 Home Broadband
-
How to change the network name and password on O2 Home Broadband
-
How to change the wireless channel on O2 Home Broadband
-
How to find your wireless password on O2 Home Broadband
-
How to set up a wireless connection using O2 Home Broadband on a PC
-
TalkTalkCare
- Top tips from TalkTalk to help you make the most of the web. For support, please follow
- View More: TalkTalk TalkTalkCare
- Top tips from TalkTalk to help you make the most of the web. For support, please follow
-
BT Twitter Page
- Have a question? Follow us and let us help!
- View More: BT BT Twitter Page
- Have a question? Follow us and let us help!
-
O2 on Twitter
- The official home of O2 UK on Twitter. Run by the social media team. We’re helping wherever we can.
- View More: O2 O2 on Twitter
- The official home of O2 UK on Twitter. Run by the social media team. We’re helping wherever we can.
-
Plusnet Twitter Page
- @plusnet Sheffield
- View More: Plusnet Plusnet Twitter Page
-
-
Virgin Media Twitter Page
- Follow Virgin Media on Twitter
- View More: Virgin Media Virgin Media Twitter Page
- Follow Virgin Media on Twitter
-
Orange Twitter Page
- @OrangeHelpers
- View More: Orange Orange Twitter Page
-
-
The TalkTalk Blog
-
Welcome to the TalkTalk blog. Here you'll find regular entries from our Chairman Charles Dunstone, our CEO Dido Harding and members of the TalkTalk team.
From the launch of free broadband in 2006 to the release of our innovative new myTalkTalk package, we're always thinking of ways to change the phone and broadband market for the better. Through the blog you'll be the first to hear any news.
If you have any general comments or questions about TalkTalk, or would like to get the latest service updates, then feel free to visit TalkTalk Members
- View More: TalkTalk The TalkTalk Blog
-
-
BT Life Blog
-
Welcome to the BT Life blog
BT Life is the technology and lifestyle blog from BT, with the latest on entertainment, communications, online safety and more.
- View More: BT BT Life Blog
-
-
O2 Blog
- Welcome to O2's Blog, where you can pick up news from O2 and subscribe to updates.
- View More: O2 O2 Blog
- Welcome to O2's Blog, where you can pick up news from O2 and subscribe to updates.
-
Plusnet Blog
- Latest News from Plusnet
- View More: Plusnet Plusnet Blog
- Latest News from Plusnet
-
TalkTalk Facebook Page
- Welcome to the official TalkTalk Facebook page. Here you can find out all...
- View More: TalkTalk TalkTalk Facebook Page
- Welcome to the official TalkTalk Facebook page. Here you can find out all...
-
BT Facebook Page
- Hello! Thanks for visiting. We're here to help you connect, chat, play, watch great digital TV and more.
- View More: BT BT Facebook Page
- Hello! Thanks for visiting. We're here to help you connect, chat, play, watch great digital TV and more.
-
O2 Facebook Page
- We're better, connected
- View More: O2 O2 Facebook Page
- We're better, connected
-
Orange Facebook Page
- We are Orange Helpers – the dedicated online customer support team at Orange UK
- View More: Orange Orange Facebook Page
- We are Orange Helpers – the dedicated online customer support team at Orange UK
-
TalkTalk Contact Details
-
Department
Number
Opening hours
Online help
Sales Hotline 0800 049 7802 Mon - Fri: 8am - 9pm
Sat: 9am - 6pmSales help Customer Services 0870 444 1820
FREE from your TalkTalk landlineMon - Fri: 8am - 8pm
Sat: 9am - 6pm
Sunday: 10am - 5pmMy Account and bill help
Broadband help
Telephone help
Moving home helpNew Lines Customer Service 0870 087 5703 Mon - Fri: 8am - 8pm
Sat: 9am - 6pm
Sun: ClosedNew Phone Line help TalkTalk Mobile 0870 087 8751 Mon - Sun: 8am - 10pm TalkTalk Mobile help Cancelling a New Order 0870 087 8038 Mon - Fri: 8am - 8pm
Sat: 9am - 6pm
Sunday: 10am - 5pmChanged your mind?
- View More: TalkTalk TalkTalk Contact Details
-
-
BT Broadband Contact Details - Technical Queries
-
From a landline dial:
0800 111 4567From a mobile dial:
0330 123 4567*Opening hours
24 hours a day, 365 days a year
Please make sure you're at your computer and it's switched on when you call.For troubleshooting tips and advice visit theBT Community Forums
- View More: BT BT Broadband Contact Details - Technical Queries
-
-
Sky Contact Details - Customer Service and Technical Support
-
Phone us
Our call centres are open 24/7 08442 411 653
 0818 719 819
For full details of call and connection charges to 0844 numbers in the UK and 0818 numbers in the Republic of Ireland with Sky Talk, please see www.sky.com/callpricing
Charges for calls from other networks and mobile phones may vary. Please note that calls may be monitored or recorded for training purposes.
- View More: Sky Sky Contact Details - Customer Service and Technical Support
-
-
O2 Contact Details
-
Home Broadband Technical Support Dial Charges From your O2 mobile 800 230 0202 Free From a landline 0800 230 0202 Free Opening hours Monday - Sunday 24 hours Home Broadband Customer Service Dial Charges From your O2 mobile 800 230 0202 Free From a landline 0800 230 0202 Free Opening hours Monday - Friday 08:00 - 21:00 Saturday 08:00 - 20:00 Sunday 08:00 - 18:00
- View More: O2 O2 Contact Details
-
-
Virgin Media Contact Details
-
If you have not done it already, please check your service status. It might save you a phone call: virginmedia.com/servicestatus
Still need to talk to the team?
Call us on 150 from your Virgin Media home phone or on 0845 454 1111* from any other phone.
* For details about how much it costs to call our team from a Virgin Media home phone, visitvirginmedia.com/callcosts. Call costs from other networks and mobiles vary.`
24 hours a day, 7 days a week
- View More: Virgin Media Virgin Media Contact Details
-
-
Plusnet Contact Details
-
Department Number Availability Residential Sales 0800 432 0200
(option 3)07:00 - 22:00 Monday to Friday
09:00 - 21:00 Saturday and Sunday
Have your payment details handy to place an orderBusiness Sales 0114 296 5182
(option 2)09:00 - 17:30 Monday to Friday
09:00 - 16:00 SaturdayPartner Sales 0114 296 5171
(option 1)09:00 - 17:30 Monday to Friday Residential Support 0800 432 0200 All day, every day
You'll need your username and password handyBusiness Support 0114 296 5182
0845 002 0170All day, every day Cancellations 0845 140 6002 09:00 - 17:30 every weekday (except Bank Holidays)
- View More: Plusnet Plusnet Contact Details
-
-
Orange Contact Details
-
call us:*
0844 873 8586free from an Orange pay monthly phone:
150* Calls from an Orange Home Phone are free. Calls from a BT landline or your second line (if you have one) cost 5.1p a minute. Calls from mobiles and other networks may vary. Calls may be monitored and recorded for training purposes
- View More: Orange Orange Contact Details
-

