Home / Product Selection / Internet / Set Up
-
Setting up your D-Link DSL-2780 Router
-
Follow the steps below to set up your D-Link DSL-2780 router and get connected.
D-Link DSL-2780 
Before you start
Before you set up your router, please ensure that:
- Your router is connected to your computer via an Ethernet cable.
- You have your TalkTalk broadband username and password to hand. You'll need these to complete step 5 below. You can find these details in your welcome letter. If you don't have your welcome letter, you can call 0870 0875 562 to retrieve your details. This call is free from your TalkTalk landline.
Note: You must call this number from your TalkTalk landline for security reasons. If you call from another number you will be unable to retrieve your TalkTalk broadband username and password. - Your router is connected to the phone socket via a microfilter and your cables and connections are set up as they are here:

Setting up your D-Link router
Follow these steps to set up your D-Link router:
- Open a web browser such as Internet Explorer, Firefox or Safari.
- Type http://192.168.1.1 into the Address bar and press Enter on your keyboard.
Note: Do not type www.
- You will be asked to enter a username and password. These details are for your router. They are NOT your TalkTalk broadband username and password. Enter admin in both the User Name and Password boxes. Then click OK.
- Click Quick Start on the left-hand side of the screen.

- Enter your TalkTalk broadband username into the Username box and your password into the Password box. You can find these details in your welcome letter. If you don't have your welcome letter, please call 0870 0875 562 to retrieve your details. You must call this number from your TalkTalk landline. If you call from another number you will be unable to retrieve your details. This call is free of charge.
Note: The next two images are examples only. Please do NOT change your Wireless Network Name (SSID) or Wireless Network Password to match the details in the images.
- Click Connect at the end of the screen.

- Click OK to continue and save the settings.

- In the Address bar, type www.talktalk.co.uk and press Enter on your keyboard.

That's it - you're connected to the internet. Enjoy using your TalkTalk broadband.
Note: If you've completed the above steps and are having problems connecting, please see:I'm unable to connect.
- View More: TalkTalk Setting up your D-Link DSL-2780 Router
-
-
Setting up your Huawei EchoLife HG520b
-
The steps on this page will help you to set up your Huawei HG520b router and get online.

Before you start
Before you set up your router, please ensure that:
- Your router is connected to your computer via an Ethernet cable.
- You have your TalkTalk broadband username and password to hand. You'll need these to complete the steps below. You can find these details in your welcome letter. If you don't have your welcome letter, you can call 0870 0875 562 to retrieve your details. This call is free from your TalkTalk landline.
Note: You must call this number from your TalkTalk landline for security reasons. If you call from another number you will be unable to retrieve your TalkTalk broadband username and password. - Your router is connected to the phone socket via a microfilter and your cables and connections are set up as they are here:

Setting up your Huawei HG520b router
The steps to set up your router differ depending on the type of firmware that's on your Huawei HG520b router. Firmware is the software on your router. Some routers use custom firmware that makes it easy to change the basic settings of the router. Follow the steps below to find out what type of firmware you are using.
- Open a web browser such as Internet Explorer, Firefox or Safari.
- Type http://192.168.1.1 into the Address bar and press Enter on your keyboard.
Note: Do not type www.
- You will be asked to enter a username and password. These details are for your router. They are NOT your TalkTalk broadband username and password. Enter admin in both the User Name and Password boxes. Then click OK.
Here you can tell what type of firmware your router uses:
- If you see a Quick Start option on the left-hand side of the screen, your router uses custom firmware. Please follow the steps below for custom firmware.
- If there's no Quick Start option, please follow the steps for non-custom firmware below.
Custom firmware
If your router uses custom firmware, please continue with the following steps:
- Click Quick Start on the left-hand side of the screen.
- Enter your TalkTalk broadband username into the Username box and your password into the Password box. You can find these details in your welcome letter. If you don't have your welcome letter, please call 0870 0875 562 to retrieve your details. You must call this number from your TalkTalk landline. If you call from another number you will be unable to retrieve your details. This call is free of charge.
Note: The next two images are examples only. Please do NOT change your Wireless Network Name (SSID) or Wireless Network Password to match the details in the images.
- Click Connect at the endof the screen.
- Click OK to continue and save the settings.
- In the Address bar, type www.talktalk.co.uk and press Enter on your keyboard.
That's it - you're connected to the internet. Enjoy using your TalkTalk broadband.
Note: If you've completed these steps and are having problems connecting, please see, I'm unable to connect.
Non-custom firmware
If your router uses non-custom firmware, please continue with the following steps:
- Select Basic on the left-hand side of the screen.

- Select WAN Setting.

- Set VPI to 0 and VCI to 38.
- Select Yes from the Active drop-down list, and select Routing from the Mode drop-down list.
- Select PPPoA from the Encapsulation drop-down list and select VC from the Multiplex drop-down list.
- Enter your TalkTalk broadband username into the Username box and your password into the Password box. You can find these details in your welcome letter. If you don't have your welcome letter, please call 0870 0875 562 to retrieve your details. You must call this number from your TalkTalk landline. If you call from another number you will be unable to retrieve your details. This call is free of charge.

- Under IP Address, set Default Route and NAT to Enable, and then select Set Obtain an IP Address Automatically.
- Under MTU Options, set MTU to 1432 and set RIP to Disable.
- Click Submit at the end of the screen.

- In the Address bar, type www.talktalk.co.uk and press Enter on your keyboard.
That's it - you're connected to the internet. Enjoy your TalkTalk broadband.
Note: If you've completed these steps and are having problems connecting, please see: I'm unable to connect.
- View More: TalkTalk Setting up your Huawei EchoLife HG520b
-
-
Setting up your Netgear DG834G or DG834PN router
-
Follow the steps below to set up your Netgear DG834G or DG834PN router and get connected.

Before you start
Before you set up your router, please ensure that:
- Your router is connected to your computer via an Ethernet cable.
- You have your TalkTalk broadband username and password to hand. You'll need these to complete step 5 below. You can find these details in your welcome letter. If you don't have your welcome letter, you can call 0870 0875 562 to retrieve your details. This call is free from your TalkTalk landline.
Note: You must call this number from your TalkTalk landline for security reasons. If you call from another number you will be unable to retrieve your TalkTalk broadband username and password. - Your router is connected to the phone socket via a microfilter and your cables and connections are set up as they are here:
Setting up your Netgear DG834G or DG834PN router
Follow these steps to set up your Netgear DG834G or DG834PN router:
- Open a web browser such as Internet Explorer, Firefox or Safari.
- Type http://192.168.0.1 into the Address bar and press Enter on your keyboard.
Note: Do not type www.
- You will be asked to enter a username and password. These details are for your router. They are not your TalkTalk broadband username and password. Enter admin in the User Name box and password in the Password box. Then click OK.
- Select Basic Settings on the left-hand side of the screen.

- Enter your TalkTalk username into the Login box and your password into the Password box. You can find these details in your welcome letter. If you don't have your welcome letter, please call 0870 0875 562 to retrieve your details. You must call from your TalkTalk landline. If you call from another number you will be unable to retrieve your details. This call is free of charge.

- Set Internet IP Address to Get Dynamically From ISP, and then set Domain Name Server (DNS) Address to Get Automatically From ISP.
- Set NAT (Network Address Translation) to Enable.
- Click Apply at the end of the screen.

- In the menu on the left, under Setup, select ADSL Settings.
- Set Multiplexing Method to VC-Based. Then set VPI to 0 and VCI to 38 and click Apply.
- In the menu on the left, under Advanced, select WAN Setup.
- Set MTU Size (in bytes) to 1432.
- Click Apply at the end of the screen.
- In the Address bar, type www.talktalk.co.uk and press Enter on your keyboard.
That's it - you're connected to the internet. Enjoy using your TalkTalk broadband.
Note: If you've completed these steps and are having problems connecting, please see: I'm unable to connect.
- View More: TalkTalk Setting up your Netgear DG834G or DG834PN router
-
-
Set up a wired broadband connection
- To set up a wired connection with Sky Broadband you will need the Sky router, a computer or laptop and the yellow (Ethernet) cable. If you want to set up a wireless connection, please read our instructions on
how to set up a wireless connection with Sky Broadband.
First you will need to unpack and start up your Sky Broadband router. You can find help and advice on doing this in our Setting up your Sky Broadband router guide.
Don't forget to check your Sky Broadband activation date - you will not be able to set up your broadband connection if your Sky Broadband has not been activated yet. You should have received this in a letter from Sky or you can check online to see if your service has been activated.
Once you have set up your router, watch the instructional video or follow the step-by-step guide below. Please note that the router in the video may be different from your router at home, but the principle of connecting to the internet is exactly the same.Connect your ethernet cable to your computerTake the yellow Ethernet cable and put one end into the back of your computer or laptop where you see the symbol below and be sure it clicks in.Connect the other end of the ethernet cable to your routerCheck to see that the power light on the router is lit. The internet light should also be on. The internet light on your router may look like an ‘i’ or an ‘@’ sign If these lights are on, push the other end of the Ethernet cable in to the back of the router as shown in the diagram. On the back of the router there are four ports. This will allow you to connect up to four devices (including games consoles and handheld devices) to the internet.Click on your internet browser iconClick on your internet browser icon or your desktop, if you have one there. You should now be able to connect to the internet. To test this, try sending an email or visit Sky.com.Are you still having trouble getting online?If you have any difficulty connecting to the internet, we have information to help you get online in no time.
I can’t connect to the internet or my connection keeps dropping out
My broadband connection is slow
Understand your broadband connection speed
- View More: Sky Set up a wired broadband connection
- To set up a wired connection with Sky Broadband you will need the Sky router, a computer or laptop and the yellow (Ethernet) cable. If you want to set up a wireless connection, please read our instructions on
-
Sky Broadband compatibility
- Sky Broadband is compatible with the major operating systems and games consoles.
- View More: Sky Sky Broadband compatibility
- Sky Broadband is compatible with the major operating systems and games consoles.
-
Has your Sky Broadband service been activated?
-
The easiest way to check when your Sky Broadband line will be activated is by using our onlineOrder Tracking service.
On the My Sky homepage, enter your Sky iD username and password in the Sign in with your Sky iD section. If you don't have a Sky iD, you can create one by selecting Sign up now.
Once you've signed in, look for the My Account section in the top navigation bar. Choose theOrder Tracking link on the left of the page to see the status of your order, including your Sky Broadband line activation date, if it's available.
If you're already a Sky TV customer and you're waiting for a Sky Broadband order to be completed, you can also access Order Tracking using your Sky remote control. Pressinteractive on your Sky remote control and select Sky Active, then choose My Account & Help. Here, you can view your statements, track your orders and manage your account via your TV.
If you provided us with your mobile or landline telephone number and gave us permission to call you when you ordered Sky Broadband, we may send you a text message to let you know when your line's been activated.
Please note that your line activation date may not be the same day as when the engineer visits to install Sky TV, or the day your Sky Broadband router arrives in the post.
- View More: Sky Has your Sky Broadband service been activated?
-
-
Set up a wireless connection
-
To set up a wireless connection with Sky Broadband you will need the Sky wireless router and a wireless-enabled computer. If you want to set up a connection using wires, please read our instructions on
how to set up a wired connection with Sky Broadband.
Your SSID (a unique identifier for your wireless network) and Network Key (a password which keeps your wireless connection secure) are printed on a label on your router.First you will need to unpack and start up your Sky Broadband Wireless router. You can find help and advice on doing this in our Setting up your Sky Broadband router guide.
Don't forget to check your Sky Broadband activation date - you will not be able to set up your wireless connection if your Sky Broadband has not been activated yet. You should have received this in a letter from Sky or you can check online.
Once you have set up your router, watch the relevant instructional video or follow the step-by-step guide below. Please note that the router in the videos may be different from your router at home, but the principle of connecting to the internet is exactly the same.
 STEP 1
Firstly, ensure you can see a wireless symbol on your computer similar to one of the examples in the picture.
If you can't see a symbol like this, or you know that your computer is not wireless-enabled, you can buy an adaptor from Sky Customer Services. See our Contact Us page to find out how to get in touch.
STEP 2
You'll need your SSID and Network Key codes. These ensure that only you can access your internet connection. They are printed on the bottom of your Sky wireless router.STEP 3
Different versions of Windows may have slightly different ways of accessing your wireless network settings. There may be a sticker telling you which operating system you're using, but if you're not sure, use the Start key or menu button, select Run, type'winver' in the text field and select OK.
A pop-up window will display information about your operating system, including the version of Windows you are using. If you are using Linux, Mac OSX or another operating system, you should find that while the menus and buttons may have different names, the process is similar.STEP 4
Right-click the wireless network icon. The exact icon may vary, depending on your brand of computer, but this will commonly feature the connectivity bars, as shown in our examples from Windows XP and Vista and may appear in the lower right corner of your screen.STEP 5You need to see a list of the wireless networks that are in range of your computer, so look for an option that will give you this. If you're using Windows XP, for example, select View Available Wireless Networks. If you're using Windows Vista, choose Connect to a Network. Other operating systems may have different wording.STEP 6When the Wireless Network Connection window appears, select the connection labelled with your Sky SSID and choose Connect. The SSID will appear as written on the bottom of your router and on the 'Keep me handy' card.
If you don't see your network at first, try refreshing network list. The list of available networks looks similar in Windows XP (top image) and Windows Vista (bottom image).
STEP 7
Enter your network key when prompted. It's case sensitive and doesn’t contain any numbers, so there are no zeros, only Os.STEP 8Once you've followed these steps, you should be able to connect to the internet wirelessly. If the yellow ethernet cable is still connected to your computer, remove it. You'll notice that the ethernet lights on your router will go out when you do this. Wait a minute to give your wireless connection time to connect, then open your web browser and start enjoying the web without wires.
- View More: Sky Set up a wireless connection
-
-
Set up a Netgear Wireless Network Adaptor purchased from Sky
-
Insert the install CD supplied with your Netgear Wireless Network Adaptor and follow the instructions on screen. Don't plug the adapter into your computer until you're prompted to do so by the instructions.
During installation you will be asked to select your wireless network (SSID) from a list of options and enter your Network Key (the password that keeps your wireless connection secure). These are both printed on a label on the Sky wireless router.
Your SSID and Network Key will be unique to your Sky Broadband router and use the format:
SSID – SKY12345.
Network Key – ABCDEFGH
- View More: Sky Set up a Netgear Wireless Network Adaptor purchased from Sky
-
-
Connecting your Apple device to your Sky wireless router
- It’s quick and easy to connect your iPhone, iPod Touch or iPad to the internet using your Sky Broadband wireless connection. Before you start, switch on your Apple device and check that your Sky wireless router is connected to the internet.
If you haven't set-up your Sky Broadband router, first you will need to unpack it and start it up. You can find help and advice on doing this in our Setting up your Sky Broadband router guide.
If you've not connected your router yet, don't forget to check your Sky Broadband activation date - you will not be able to set up your broadband connection if your Sky Broadband has not been activated. You should have received this in a letter from Sky or you can check online to see if your service has been activated.
Once you have set up your router, watch our instructional video or follow the step-by-step guide below. Please note that the router in the video may be different from your router at home, but the principle of connecting to the internet is exactly the same.Step 1 - Switch on your apple deviceSwitch on your Apple device and find and select the Settingsicon. Unless you’ve moved it, this should be available on the first screen you see.Step 2 - Select the Wi-Fi optionIn the Settings menu, find and select the Wi-Fi optionStep 3 - Make sure Wi-Fi is set to onIf it’s not already, make sure the Wi-Fi selection option is set to ‘On’.Step 4 - Find your wireless network nameFor the next steps, you’ll need to know your wireless network name, also known as your SSID code. This is printed on the Keep Me Handy Card that came with your Sky Broadband wireless router. If you’ve lost it, don’t worry, your network name can also be found printed on a sticker at the base of your router.
Unless you’ve changed it, your wireless network name will probably be something like “SKY” followed by five numbers. For example SKY 12345.Step 5 - Choose a network on your apple deviceNow that you’ve found your SSID code, go back to your Apple device.
In the “Choose a Network” category, look through the list of available networks until you find your wireless network.Step 6 - Type in your passwordClick on your chosen network and you’ll be asked for a password. Your password can be found below your wireless network name on your Keep Me Handy Card or under your Sky Broadband wireless router. This is also known as Network Key.
The Network Key is case sensitive so make sure you enter the letters exactly as they’re printed. There are no numbers in the Network Key , so if you see any circles they’ll be letter 'O's, not zeros.
When you type in the password you’ll see a series of dots instead of the letters. Don’t worry, your keyboard isn’t broken, this is just for security reasons.Step 7 - Select JoinOnce you’ve entered your network key, select joinStep 8 - That's it. You are now onlineYour iPhone, iPod Touch or iPad will now connect to your Sky Broadband network and you’ll see a tick against your highlighted wireless network name.
- View More: Sky Connecting your Apple device to your Sky wireless router
- It’s quick and easy to connect your iPhone, iPod Touch or iPad to the internet using your Sky Broadband wireless connection. Before you start, switch on your Apple device and check that your Sky wireless router is connected to the internet.
-
Set up your Sky wireless router
-
This guide explains how to set up your router and get online wirelessly with Sky Broadband. You can download our PDF wireless set up guide so you can follow the instructions on your computer when you're not connected to the internet. You could also save the PDF to a memory stick and read the instructions on your home computer while you're setting up the connection. To set up the Sky wireless router, you'll need the cables we sent in your pack and microfilters for each telephone socket in use in your home. It’s also important to fit microfilters to the sockets connected to your set top boxes. Microfilters are very important, as they stop your broadband signal interrupting other devices that plug into your phone line, like telephones or your Sky box.
If you've already plugged in your router and attached microfilters to your telephone points, and would like to set up a wireless connection, use the following link to find out how.Setting up a wireless connection with Sky Broadband
New to Sky or installing a replacement router? Use the following link to find out how to set up a wireless connection.Set up a wireless connection with your Sky wireless N router
If you want to set up a connection using wires, please read our instructions on
how to set up a wired connection with Sky Broadband.
To find out how to set up your Sky wireless router, watch the instructional video or follow the step-by-step guide below. Please note that the router in the video may be different from your router at home, but the principle of connecting to the internet is exactly the same.
- View More: Sky Set up your Sky wireless router
-
-
Static IP addresses explained
-
An IP address is an identifier giving you a location on the internet, and you will be assigned one each time you log on.
A static IP address means that instead of getting a different IP address each time you log on to the internet you will keep the same one.
This is useful if you are running a server from within your home, or if you have set up remote access from another location to your home PC. This is an optional extra and doesn't carry a general benefit for standard internet use.
If you would find a static IP address useful, we can add this to your account for an additional £5.11 per month charge to your regular O2 Home Broadband bill.
You can opt for this at the "sign-up" stage or after your service has gone live with us.
- View More: O2 Static IP addresses explained
-
-
Setting up your static IP address
-
If you chose the static IP address option when you signed up for O2 Home Broadband, you'll need to enter your static IP details to get everything set up.
You can find all the information you'll need in your Welcome Pack, and we emailed it to you as well. The set up CD will prompt you for this information when you get to the 'testing your connection' stage. Just type it into the relevant boxes.
Check out our O2 Guru TV video below:
Help VideosHow to apply static IP on O2 Home Broadband

- View More: O2 Setting up your static IP address
-
-
About the O2 Home Broadband advanced settings
-
The O2 Home Broadband advanced settings let you view and change settings that can't be altered using the set up CD. These include:
- Checking your connection speed accurately
- Seeing statistics for your connection
- Changing some of the security settings
- Returning to the O2 wireless box's standard settings
- Changing the name of your wireless network
- Viewing information about the computers connected to the O2 wireless box
The O2 Home Broadband advanced settings are stored on your O2 wireless box. You can access them through a web browser, so they're sometimes referred to as the 'web interface' or 'Router GUI'.
If you can, we recommend using the set up CD rather than the O2 Home Broadband advanced settings to make changes to your set up. This is because changing the advanced settings can affect your broadband if you’re not 100% sure on what you’re doing.
Most common tasks can be carried out using the set up CD, including adding computers to your connection and setting up a home network.
For more information about accessing the O2 Home Broadband advanced settings, see 'How to open the O2 Home Broadband advanced settings'.
View our interactive guide to get more support setting up and going wireless
- View More: O2 About the O2 Home Broadband advanced settings
-
-
How to open the O2 Home Broadband advanced settings
-
You can change the settings of your O2 wireless box through the O2 Home Broadband advanced settings. You can reach these through your browser:
- Make sure your computer is connected to the O2 wireless box, either wirelessly or via a network cable. If you can see websites then you're connected.
- Open your your internet browser, such as Internet Explorer
- Type 'http://o2wirelessbox.lan' into the browser's address bar and press 'Enter'.
- The O2 Home Broadband advanced settings should load.
View our interactive guide to get more support setting up and going wireless
- View More: O2 How to open the O2 Home Broadband advanced settings
-
-
Already got O2 Home Broadband?
-
If you're an existing O2 Home Broadband customer and decided to add a static IP address, you'll need to set this up manually instead. We'll send you the details you need in the post and via email.
You need to open the O2 Home Broadband advanced settings and enter this information. We've explained exactly what to do here – but please don't follow these instructions until you've received the details through the post.
This guide will only work if you're using the O2 wireless box to connect to O2 Home Broadband. If you're using your own router then please consult the manufacturer's instructions.Ready to go? Here's what you need to do:
- Open Microsoft Internet Explorer. - In Windows XP, click on the 'Start' button and choose 'Internet'.
- Type 'http://o2wirelessbox.lan' into Internet Explorer's address bar and press 'Enter'.
- The O2 Home Broadband advanced settings should load in Internet Explorer. If you have trouble accessing them, see the 'Related Links', below, for troubleshooting advice.
- A new window will open. Click 'Next'.
- You’ll see the text 'Select a service' with a list by it. Click 'Static IP' so it's highlighted in blue, and then click 'Next'.
- In the 'Static WAN IP Address' text box enter the 'Static IP address' that's printed on the letter we sent in your Welcome Pack.
- You don't need to change anything in the 'WAN NetMask' box.
- In the 'Gateway IP address' text box, enter the 'Default gateway' that's printed on the letter we sent you.
- Click 'Next'.
- The next window will contain two text boxes. You don't need to change anything here, so just click 'Next' again.
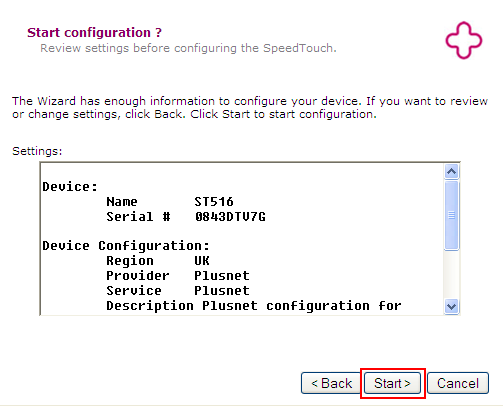
- You'll see a screen summarising the information you entered
- Click 'Start'. The O2 wireless box will restart itself.
- When the screen changes to say that 'You have successfully completed the SpeedTouch™ Easy Setup', click 'Finish'.
That's it – you'll now be connected to O2 Home Broadband with your static IP address.
- View More: O2 Already got O2 Home Broadband?
-
-
When to set up your O2 Home Broadband connection
-
This is how long it should take to get you up and running:
- Broadband only: 6-10 working days
- Broadband and Home Phone: 10 working days. But if you’re having a new line installed, it could actually be bit quicker than this.
Note: a working day is Monday to Friday, and not on a public holiday
We'll send you a text message and email when it's done. If you’re taking home phone from us too, everything will go live on the same day.
You'll probably be raring to go by then. So as soon as the message comes through, you can insert the set up CD, follow the instructions and connect your O2 wireless box.
The O2 Home Broadband Pack will probably arrive before your line is activated. When it turns up, check that we've included everything.
Please don't try and connect your O2 wireless box before your get our message to say the line's been activated.
- View More: O2 When to set up your O2 Home Broadband connection
-
-
How do I set up O2 Broadband?
-
Yes, but don't start until after we've connected your line. We'll send you a text and email when everything's ready.
The easiest way to get going with broadband is to use your installation CD. If you're having trouble with it, or you prefer to do the job manually, this is what you do.
Broadband filters
Plug in your broadband filters first. They're the small boxes that look like telephone adapters.- If a telephone's plugged into your telephone socket, unplug it.
- Plug a broadband filter into the socket.
- Plug your telephone into the phone socket on the broadband filter.
- Add a filter to anything else that's connected to your landline: other telephones, fax machines, Sky boxes – the lot. Anything that's plugged into a phone socket needs a filter.

O2 wireless boxConnect your O2 wireless box next.
- Plug one end of the grey DSL cable into the socket marked ADSL modem on the broadband filter.
- Plug the other end of the grey cable into the grey socket marked DSL on your O2 wireless box.
- Plug the Ethernet cable (the cable with the yellow ends) into the yellow socket marked 1 on your O2 wireless box.
- Plug the other end of the Ethernet cable into your PC or laptop. There's usually only one place where it fits.
- Connect the wire for the power supply to the O2 wireless box. The power socket's just by the aerial.
- Plug the power supply into your wall socket and switch on.
- If you have the Pro Router , all the lights on the front of the O2 wireless box will come on as green. On other routers, they all show green apart from one – the Wireless light, which is amber.
- If the lights show any other colour, check the troubleshooting links below.
- When all the lights are on, you can get onto the internet by opening your browser.
- If your wireless PC or laptop has no Ethernet port, check the link below about setting up wirelessly without the O2 broadband setup CD. If your PC or laptop isn’t wireless and has no Ethernet port, you'll have to buy a USB Ethernet or wireless adapter.
- If you chose a static IP , your Internet light will stay red until you put your static IP details into the box. See the link below for instructions on setting up a static IP.

Check out our O2 Guru TV video below:
Help VideosHow to set up an O2 Wireless Box
- View More: O2 How do I set up O2 Broadband?
-
-
Setting up O2 Home Broadband on another PC
-
You've set up broadband on your main computer and now you want the Internet on all your other computers too. Don't worry it's not as complicated as it sounds. Just follow our step-by-step guide and you'll be up and running in no time:
- Insert your set up CD into the computer you want to set broadband up on. Don't put it in your main computer - it already has broadband and might get confused.
- You'll be asked whether you want to set up O2 Home Broadband for the first time or whether you have already set up O2 Home Broadband. Choose 'Add an extra computer to my O2 Home Broadband connection'.
- Next, choose whether you want to set up a wireless or wired / ethernet network. You'll need a standard network cable to set up a wired connection. You can use the yellow Ethernet cable that was included in your O2 Home Broadband pack. If you're already using it, it's too short, or the cat chewed it, you should be able to buy another one from most computer stores.
- If you chose the wireless option, you'll be asked to enter your 'SSID' and 'WEP' codes. You can find them on the bottom of your O2 wireless box or on the label of your quick start guide.
- Then you just need to click 'Next' when asked and your computer will set up the O2 Home Broadband Assistant. If anything goes wrong in the future, this'll help you fix it.
- That's it. You're ready for action.
Got a problem?
If you used the CD to set up O2 Home Broadband, the O2 Home Broadband Assistant will guide you through quick fixes for most common problems.If you're still having issues, try one of the following.
- Check your cables – are they all properly plugged in? If you find any loose ones, plug them in and start the process again.
- If you're using wireless, check you typed the SSID and WEP codes correctly and that caps lock hasn't been accidentally turned on.
- All cables and codes present and correct? It might just be a glitch, so try the whole thing from the start again.
Still not working?
Sadly not everything can be solved this easily. So if you're still have problems, call us on 0800 230 0202 free from a landline, or drop the first '0' to call free from an O2 mobile. One of our customer service advisors will take you through the whole process, if it is your first wireless or first wired PC. If it is an additional device, this would fall into the remit of our O2 Techies and would be potentially a chargeable service. Please see our related link about O2 Techies and what they do.View our interactive guide to get more support setting up and going wireless
- View More: O2 Setting up O2 Home Broadband on another PC
-
-
How do I set up O2 Home Broadband on my Mac?
-
If you’ve got Mac OS 10.4 or higher, just pop in our setup CD and follow the instructions. It’ll help you get your wireless going too. Just make sure you’ve switched on AirPort. And when it asks for a password, you need the one for your Mac.
If you don’t have 10.4 or higher, or if the CD doesn’t work, here’s what you need to do. (It’ll help if you’re near a landline socket.)
Step 1: Plug in your broadband filters
- Unplug everything that’s plugged into your landline (phones, fax machines, answering machine).
- Plug a broadband filter into every phone socket you use.
- Plug all your other equipment into the broadband filters. (Use slot marked ‘phone’.)
Step 2: Plug in your O2 wireless box
- Plug one end of the grey DSL cable into the ‘ADSL modem’ slot on your broadband filter.
- Plug the other end into your wireless box. (Use the grey DSL socket.)
- Plug the yellow Ethernet cable into your wireless box. (Use socket ‘1’.)
- Plug your wireless box’s power cable in.
- Switch it on.
Step 3: Connect your Mac
- Make sure your Mac is off.
- Plug the yellow Ethernet cable from your wireless box into the Ethernet socket on your Mac.
- Make sure your wireless box is on.
- When the lights marked ‘Power’, ‘Broadband/DSL’ and ‘Internet’ go green, switch on your Mac.
That’s it. When your Mac starts up, it’ll connect to the internet automatically. To test it, just try to open any website in an internet browser (like Safari).
Problems?
- Make sure your landline and broadband line have been activated. If you haven’t had a text or email from us saying it’s ready, you’ll have to wait until we do and try again. (It normally takes us a couple of weeks to activate your broadband from the time you order it.)
- Check if the ‘Broadband/DSL’ and ‘Internet’ lights on your wireless box are green. .
- Check that AppleTalk is switched on, on your Mac:
- 'Go to the Apple menu’.
- 'Choose ‘System preferences’.
- 'Choose ‘Network.
- 'Choose ‘Built-in Ethernet’ from the ‘Show’ menu.
- 'Under ‘TC/IP’, choose ‘Using DHCP’.
- 'Under AppleTalk, click ‘Make AppleTalk Active’.
- 'Look for the ‘Configure’ dropdown menu, under Ethernet.
- 'Choose ‘Automatically’.
- 'Click ‘Apply now’.
View our interactive guide to get more support setting up and going wireless
And if you’re still stuck, call 0800 230 0202 free from any landline (drop the first ‘0’ to call us free from your O2 mobile).
Check out our O2 Guru TV video below:
Help VideosHow to connect to O2 Home Broadband when using a Mac
- View More: O2 How do I set up O2 Home Broadband on my Mac?
-
-
How to set up O2 Home Broadband on your own router
-
If the you want to use O2 Home Broadband with your own router, you may need to enter some settings for it to work properly.
Some routers come set up correctly. Others will come with a set up CD or wizard to help you get connected. You'll need to refer to the manufacturer's instructions to find out exactly how to enter these details.
If your router has an ADSL2+ setting, make sure it's enabled. ADSL2+ is the technology we use to get a high-speed connection into your home.
There are different settings for our service depending on whether you are using our standard service or our Home Access service. Settings for both are provided below:
Standard settings (Standard, Premium, Pro, The Basics, The All Rounder, and The Works packages)These are the other settings you'll need to enter into your router:
- ISP name: O2 Home Broadband
- Multiplexing method: LLC-Based
- VPI: 0
- VCI: 101
- Username: leave blank
- Password: leave blank
- Domain name: leave blank
- IP address type: this depends on whether you chose our static IP address option or not:
- If you didn't choose our static IP address option, set this to dynamic IP
- If you did choose our static IP address, enter the IP address printed in your welcome letter
- DNS servers: choose to get these dynamically from the Internet provider
- NAT: enable
- Primary DNS server: 87.194.255.154
- Secondary DNS server: Leave blank
Once you've entered these, you should be able to connect your router to your landline as described in the manufacturer's instructions, and get online.
Please note that if you have problems using your own router, we can't offer any help to fix it.
If you have a static IP address, you should enter the following DNS server address:
Primary DNS server: 87.194.255.155
Home Access settings
These are the IP Stream settings you will need to enter into the router:
Username: Radius Name
Password: Radius Password
Your radius username and password will have been sent to you when you joined. If you've lost them, click on the 'Email us' link below and ask us to re-send them to you.- IP Address: Get automatically from ISP
- DNS (Domain Name Server): Get automatically from ISP
- NAT (Network Address Translation): On
- VPI: 0
- VCI: 38
- MTU Size: 1492
- Multiplexing Method: VC Based
- Encapsulation: PPPoA (PPP over ATM)
- DSL Modulation: G.DMT (Optional)
- Security Type: CHAPS
- Does Internet Connection Require Login: Yes
- QoS: UBR (Optional)
- Primary DNS Server: 87.194.255.154
- Secondary DNS Server: Leave blank
Please note: If there are complications or technical issues whilst using a third party router, we can't offer any further support. This is because there are so many makes and models of router it would be almost impossible to offer accurate and up to date support for them all.
- View More: O2 How to set up O2 Home Broadband on your own router
-
-
Information about using your own router
-
O2 Home Broadband comes with the O2 wireless box. It's a fully-featured wireless router which has been designed to work specifically with O2 Home Broadband. We recommend you use the O2 wireless box because it's easy to set up, and we can offer comprehensive help if you run into any problems.
Having said that, you're welcome to use your own router with O2 Home Broadband if you want to. Just bear in mind that if you do this, we can't offer support if anything goes wrong. It's not that we don't want to – it would just be really difficult for us to learn how every single router works.
If you do want to use your own router, you need to make sure it can work with ADSL2+. That's the technology we use to get such high connection speeds into your home.
You'll also need to enter some settings into your router. You can get these from the previous FAQ above this one: 'How to set up O2 Home Broadband on your own router'.
- View More: O2 Information about using your own router
-
-
Guide To Fitting Microfilters
-
For a reliable broadband service, you must have correctly fitted microfilters. These modest devices stop the voice service on your telephone and your broadband signal from interfering with each other. If this happens your broadband connection may not work, or you may hear high-pitched noises when you make phone calls.
Fitting microfilters is straightforward, but can get more difficult if you have a more complicated arrangement of telephone equipment and line extensions. Things like Sky TV's telephone connection, fax machines and burglar alarms can all cause problems. This guide will tell you everything you need to know to make sure you have your microfilters attached correctly.Key terms
Microfilter (also known as a filter or splitter)
It looks like a telephone adapter/line splitter (a device that lets you connect two telephones to one line). A microfilter is different because it filters out signals that might cause problems. There are two sockets on a microfilter, one for your broadband hardware, and one for an optional telephone device.
Telephone master socket
This is the box into which your telephone line arrives from outside. You might have several telephone sockets in your home or office, but this is the one from which all other sockets are extended.
Telephone extension
These can be built in, and may look just like your master socket, or you might use a "loose wire" extension. Extensions can give you more options for the placement of your broadband connected computer, but can cause problems if they are of poor quality, or damaged. Faulty extensions are a common cause of broadband faults. The first thing you should do if you suffer a connection problem is test your service from your master socket.Connecting direct to the master socket
This is the ideal layout, with less potential for problems. If you experience problems with your broadband connection, you need to test your service with this layout to confirm the problem isn't down to a bad extension cable, or interference from another connected telephone device. In case there is a problem with your telephone handset, you should disconnect it from your microfilter duing testing.
If you still find you have problems, make sure that you test an alternative microfilter. Broadband hardware is usually supplied with a spare microfilter.
Note that it is possible to connect your broadband hardware to the phone point without the use of a microfilter IF you have the appropriate modem cable (a telephone cable from an old dial-up modem will often work). Make sure that there are no other telephone devices plugged in on the same line, or extensions.
Connecting using an extension
Many people need their broadband service carried to a different room in the house from the one containing the telephone master socket. Unless you are using wireless equipment this is done using a telephone extension of some type. It is vital that a microfilter is placed on all extension points on which telephone devices are attached.
Connecting with a complicated layout
If you have a complicated arrangement of telephone equipment and extensions on your line, it becomes increasingly important that you test your broadband service from the master socket, with all other devices disconnected. You can then re-connect each device in sequence to see which device is causing the problem.
Attaching more than 4 telephone devices (phones, fax machines etc) to a telephone line is likely to cause problems as each device reduces the signal strength and increases noise.Connecting it wrongly
You should never have your broadband equipment attached to a telephone extension that is itself attached to another microfilter. This is because the broadband signal will be mostly blocked, and is unlikely to work at all.
- View More: Plusnet Guide To Fitting Microfilters
-
-
Plusnet Fibre install guide
-
Your Plusnet Fibre service will be installed by a BT Openreach engineer. This involves work at your telephone exchange, your green street cabinet and your home. The engineer will replace your master socket and install a BT fibre modem in your home (the engineer will bring this).
This guide will help you know what to expect on the day and explain how to get your new broadband service up and running quickly.
- View More: Plusnet Plusnet Fibre install guide
-
-
Thomson 585: Setup guide
-
Before you get started
- If you have any questions about your router or you're having trouble getting connected, please see Thomson 585: FAQs and troubleshooting
- Make sure your broadband connection is up and running before you set up your router - we'll contact you (via email and text message if we have your mobile number) when it's ready
- Broadband works best when your router is connected to the master telephone socket (it’s usually the one closest to where your phone line enters your home)
- Your router can get too warm if air can’t flow around it. Try to avoid putting it under a desk, on a carpet/other fabric, or behind large objects
- If you’re going to use wireless, try to place your router close to where you’ll be using broadband the most. Thick walls, concrete floors and large metal surfaces can weaken the wireless signal, so try to avoid these where possible
- We recommend leaving your router switched on all the time (even if you're not using it - read our broadband speed tips to find out why). If you can, connect it to an unused power socket and make sure that it won't be switched off with other items
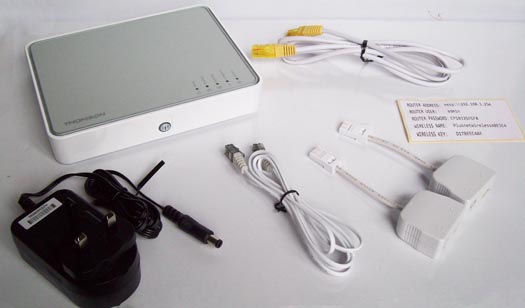
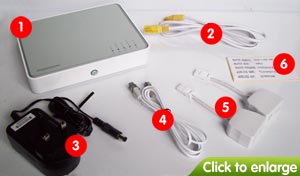
1. What's in the box?Check that you've got the following items:
- Your Thomson 585 router
- Ethernet cable (yellow ends)
- Power supply (two-part)
- Internet cable (grey ends)
- Microfilters
- Setup sticker
- Setup guide (not shown)
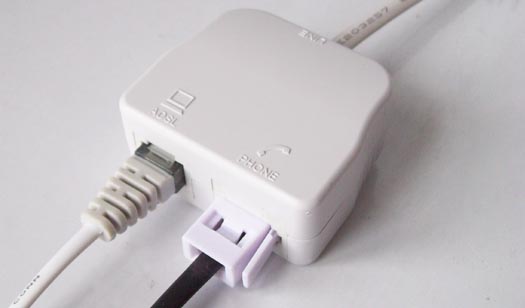
 2. Connect your microfilters
Plug a microfilter into each telephone socket you use in your property. If you had to unplug something you can plug it back into thePhone socket of the microfilter.
Phone sockets can be used by phones, alarm systems, fax machines and digital TV boxes, so make sure you don't miss anything out. Microfilters are essential for keeping your phone and Internet services from interfering with each other. Without microfilters you'll see poor speeds and connection drops.
- You can use a microfilter before or after an extension lead, but not both
- You can connect two devices to one microfilter if you use a phone adapter
- If you need more microfilters, you can get them from most electrical stores and supermarkets
- Don't plug a microfilter into the socket of another microfilter
For more help, please see our guide to fitting microfilters.
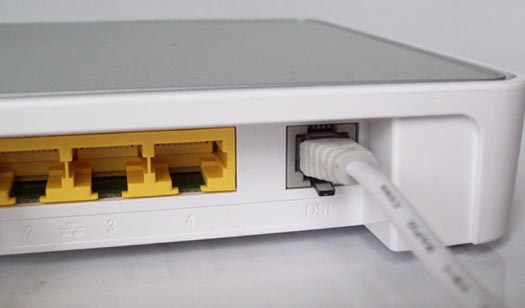
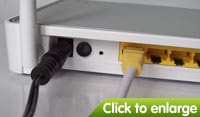
3.Connect your router
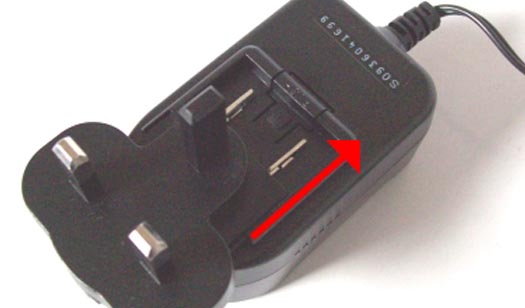
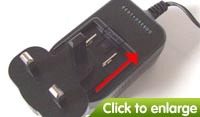
4. Connect your computerStep 1 Assemble the power adapter by sliding the smaller three-pin plug onto it until it clicks into place, as shown.
Once assembled, connect it to the mains and the power socket on the back of the router.
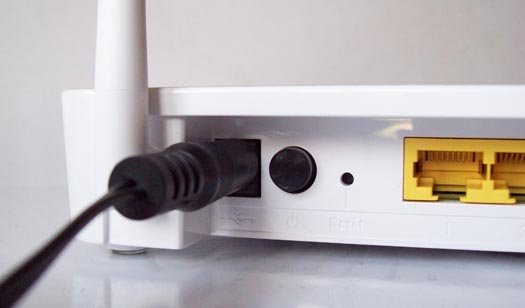
Step 2 Switch the router on using the circular black button next to the power socket (this may be on the left or right side).
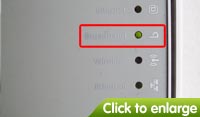
Wait for the power light to turn green before you continue.
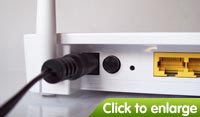
Step 3 Plug the Internet cable (grey ends) into the microfilter socket marked ADSL

Step 4 Plug the other end of the Internet cable into the grey DSLsocket on the back of the router.
Step 5 The Broadband light will flash, wait for it to turn green before you continue (this can take up to 5 minutes).
If the Broadband light doesn't turn green, please see Troubleshooting.
When setting up for the first time, we think it’s easier to use the Ethernet cable. This way you can make sure everything is working and you’ll be online in no time.
If using the Ethernet cable isn’t convenient or you’d prefer to use wireless right away, please see our Wireless connection guides (remember to return here and follow part 5 when you're done!)
How to connect using the Ethernet cable
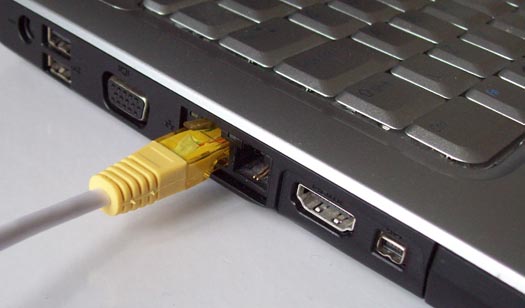
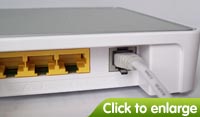
5. Get OnlineStep 1 Plug the Ethernet cable (yellow ends) into one of the 4 yellow Ethernet sockets on the back of your router.
Step 2 Plug the other end of the Ethernet cable into your computer's Ethernet socket. The Ethernet light on the router will turn green or flash.
Your computer is now connected to your router, please go to part 5.

You're nearly there! At this point your router should be plugged in, switched on and connected to your telephone line and computer. The Broadband light should be green.
If the Broadband light is NOT green, please read Thomson 585: FAQs and troubleshooting.. When the broadband Light turns green, please return to this guide and follow the next steps.
Make yourself a tea or coffee and don't touch your computer or router for 15 minutes.
(Don't try to use the Internet while you're waiting, as your router might still be setting itself up)
After 15 minutes, open your computer's web browser (e.g. Internet Explorer, Safari or Firefox).
And that's it. You should see your web browser's home page - congratulations! You're now connected and able to browse the Internet
If you didn't see your home page, you'll probably see one of the screens below:
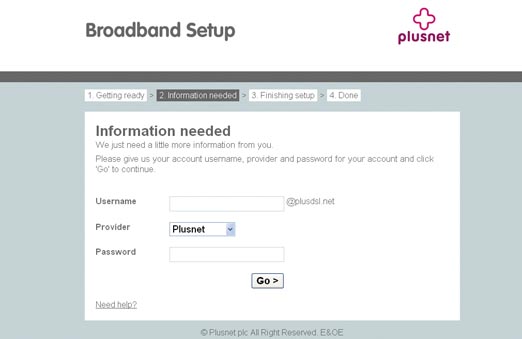
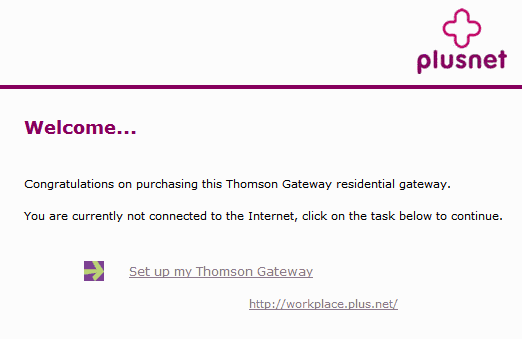
I see the Broadband Setup page I see the Welcome page 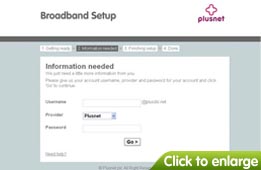

Enter your Account Username and password (the ones you use to log into this site), choose your provider and press Go.
You'll see a confirmation screen shortly afterwards and you'll be able to start browsing.
Please click here for further instructions.
(If you print this guide, the further instructions will be shown underneath)
- View More: Plusnet Thomson 585: Setup guide
-
-
SpeedTouch 516v6 1-Port Router - Setup Guide
- 1. Before you begin
This guide will take you through setting up your SpeedTouch router from scratch and applies to both Windows and Apple OS X systems.
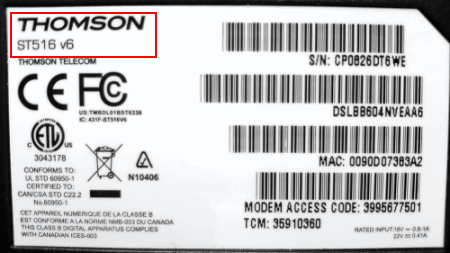
Check the label on the bottom of your router and make sure it says ST516v6 in the top left corner (pictured below). If the label on your router says ST510v6, you need to follow the ST510 Connection guide.
Make sure your broadband connection is up and running before you set up your router - we'll email you when it's ready.
Your package contains:

- Ethernet cable
- SpeedTouch ST516v6 router
- Power supply
- Setup guide
- Microfilter
- Broadband cable
Microfilters
Microfilters look small and unimportant but they’re essential for keeping your phone and Internet services from interfering with each other. Without microfilters you'll see poor speeds and connection drops
- Plug a microfilter into each telephone socket that's used at your property
- If you had to unplug something you can plug it back into the Phone socket of the microfilter
- If you need more filters, you can order them from us or buy them from most electrical or computer stores
- See our Guide To Fitting Microfilters if you need more help with this
Cables
- Plug the grey broadband cable into the microfilter socket marked ADSL
- Plug the other end of the cable into the DSL socket on the back of the router
- If you've received a 2-part power supply (as in the picture above), clip the pins onto the adapter
- Connect the power supply and switch the router on with the power button at the back
The Power light will turn red at first and the DSL light will flash - wait until they've turned green (and stopped flashing) before continuing.
3. Connecting to your ComputerFollow these steps to get the SpeedTouch router connected to your computer.
- Plug the yellow Ethernet cable into the Ethernet socket on the back of your router
- Plug the other end of the Ethernet cable into your computer's Ethernet socket
- The Ethernet light on the front of the router will now light up - move onto the next section, Connecting to the Internet
Once you've connected the 516v6 to your computer and switched it on, leave it for about 5 minutes. The Internet light will turn green by the time you come back - go to Step 2.
If the Internet light does not turn green after 5 minutes, go to the next section: The Internet light is OFF or Flashing after 5 minutes.
- On your computer, open a Web Browser (such as Internet Explorer or Safari).
- If you see your homepage and you're able to browse then you're connected and you don't need to do anything else - congratulations!
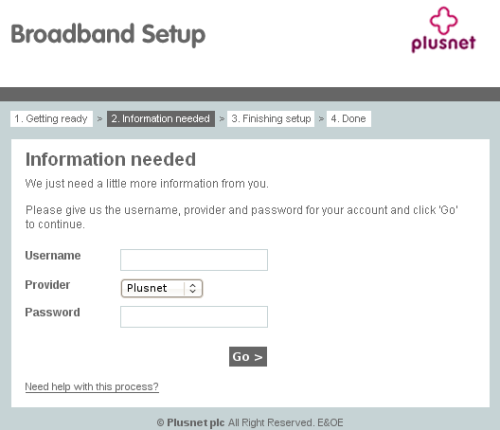
- If you're redirected to the Broadband Setup page (pictured below), go to Step 3.
- Enter your Username & Password (the ones you use to log into this site), choose your provider and press Go. Shortly after, you'll see a confirmation screen shortly afterwards and you'll be able to start browsing.
The Internet light is OFF or Flashing after 5 minutes
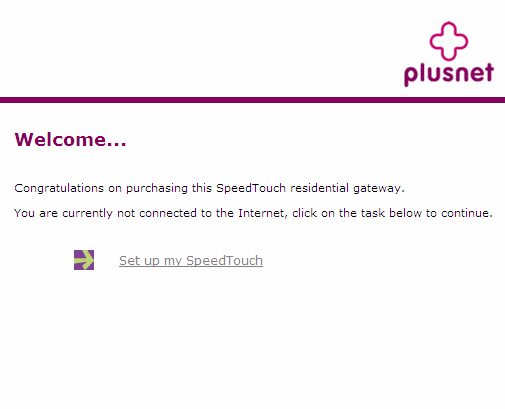
On your computer, open a Web Browser, such as Internet Explorer or Safari. You'll see The SpeedTouch welcome page. (If you get an error page, see No Welcome Page?).
Click Set up my SpeedTouch and go to step 2.
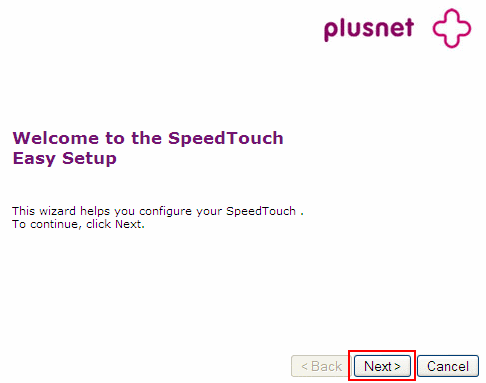
The Easy Setup wizard will open in a new window. Click Next.
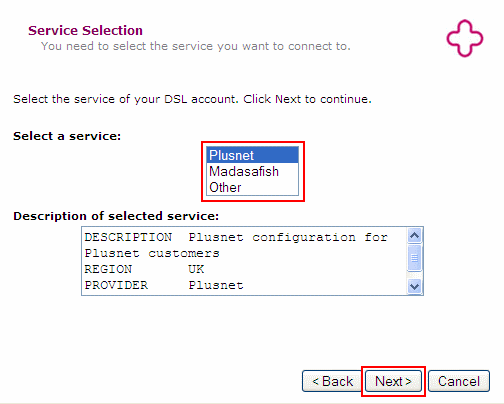
On the Service Selection screen, choose Plusnet and click Next. Only choose Other if you want to use No-NAT or other advanced setup options.
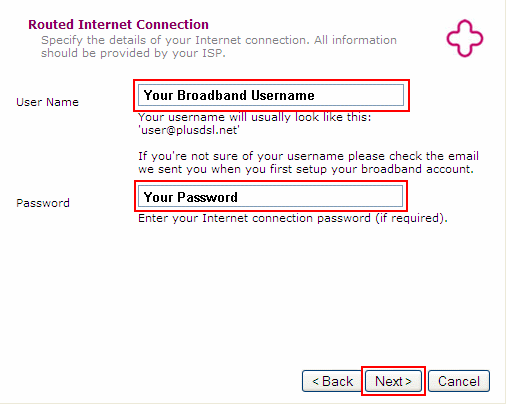
Enter your Broadband Username and Password and click Next.
- Find your Broadband Username under Connection Settings in My Account
- The Password is the one that you use to log in to this website
Finally you'll see a summary screen. Have a quick check through the settings to make sure everything is correct. Use the Backbutton if there's anything you need to change. Press Start to finish the setup wizard and connect to broadband.
After about a minute the Internet light on the router will go green and you'll see a confirmation screen. Click Finish.
That's it! You're connected to Broadband.
Troubleshooting
No welcome page?
If you see an error page during step 1 of The Internet light is OFF or Flashing after 5 minutes, type http://192.168.1.254 into the address bar and press enter on your keyboard.
You'll be taken to the SpeedTouch home page. Click SpeedTouch on the left menu. Next, click Set Up (under Pick a Task... at the bottom of the page) and go back to step 2 to continue configuring your router.
What are the router username & password?
If you've not changed or added a password then the details you'll need to use depend on when you received your kit.
Date received Router Username Router Password 27th Nov - 3rd Dec 2008 Administrator Serial Number 3rd Dec 2008 onwards Administrator No Password - All details are Case Sensitive
- The Serial Number is shown on the bottom of the SpeedTouch router
Resetting your router
If you have any problems setting up your SpeedTouch router, you can reset it and start again.
Use a paperclip, pen or pointed object to press into the reset pin hole on the back of the router. Keep the button pressed in for at least 7 seconds. When the power light goes red, release the button and wait until the power light turns green again.
You now need to apply your settings again. Follow this guide again from Connecting to the Internet.
Your router's lights
Here we'll explain what the different lights on the router mean:
Power Status Off Router not powered, check power cable and button Red Router is starting up, should turn green after a short while Green Router is powered up DSL Status Off No DSL cable connected. Microfilter or phone line problem Blinking Green Router is attempting to connect to the local telephone exchange Green Connection is OK Internet Status Off No device connected Green Device connected Ethernet Status Off No device connected Green Device connected Flashing Green Device sending / receiving data
- View More: Plusnet SpeedTouch 516v6 1-Port Router - Setup Guide
- 1. Before you begin
-
Where can I find the manual for my router?
- For a printable pdf of your router instructions click here
- View More: Tesco Broadband Where can I find the manual for my router?
- For a printable pdf of your router instructions click here
-
Setting up your D-Link DSL-2680 Router
-
Follow the steps below to set up your D-Link DSL-2680 router and get connected.
D-Link DSL-2680 
Before you start
Before you set up your router, please ensure that:
- Your router is connected to your computer via an Ethernet cable.
- You have your TalkTalk broadband username and password to hand. You'll need these to complete step 5 below. You can find these details in your welcome letter. If you don't have your welcome letter, you can call 0870 0875 562 to retrieve your details. This call is free from your TalkTalk landline.
Note: You must call this number from your TalkTalk landline for security reasons. If you call from another number you will be unable to retrieve your TalkTalk broadband username and password. - Your router is connected to the phone socket via a microfilter and your cables and connections are set up as they are here:
Setting up your D-Link router
Follow these steps to set up your D-Link router:
- Open a web browser such as Internet Explorer, Firefox or Safari.
- Type http://192.168.1.1 into the Address bar and press Enter on your keyboard.
Note: Do not type www. - You will be asked to enter a username and password. These details are for your router. They are NOT your TalkTalk broadband username and password. Enter admin in both the User Name and Password boxes. Then click OK.
- Click Quick Start on the left-hand side of the screen.
- Enter your TalkTalk broadband username into the Username box and your password into the Password box. You can find these details in your welcome letter. If you don't have your welcome letter, please call 0870 0875 562 to retrieve your details. You must call this number from your TalkTalk landline. If you call from another number you will be unable to retrieve your details. This call is free of charge.
Note: The next two images are examples only. Please do NOT change your Wireless Network Name (SSID) or Wireless Network Password to match the details in the images. - Click Connect at the end of the screen.
- Click OK to continue and save the settings.
- In the Address bar, type www.talktalk.co.uk and press Enter on your keyboard.
That's it - you're connected to the internet. Enjoy using your TalkTalk broadband.
Note: If you've completed the above steps and are having problems connecting, please see:I'm unable to connect.
- View More: TalkTalk Setting up your D-Link DSL-2680 Router
-
-
Setting up your D-Link DSL-2640R or DSL-2740R router
-
Follow the steps below to set up your D-Link DSL-2640R or DSL-2740R router and get connected.
D-Link DSL-2640R D-Link DSL-2740R 

Before you start
Before you set up your router, please ensure that:
- Your router is connected to your computer via an Ethernet cable.
- You have your TalkTalk broadband username and password to hand. You'll need these to complete step 5 below. You can find these details in your welcome letter. If you don't have your welcome letter, you can call 0870 0875 562 to retrieve your details. This call is free from your TalkTalk landline.
Note: You must call this number from your TalkTalk landline for security reasons. If you call from another number you will be unable to retrieve your TalkTalk broadband username and password. - Your router is connected to the master phone socket via a microfilter and your cables are setup as in the picture below:
Setting up your D-Link router
Follow these steps to set up your D-Link router:
- Open a web browser such as Internet Explorer, Firefox or Safari.
- Type http://192.168.1.1 into the Address bar and press Enter on your keyboard.
Note: Do not type www. - You will be asked to enter a username and password. These details are for your router. They are NOT your TalkTalk broadband username and password. Enter admin in both the User Name and Password boxes. Then click OK.
- Click Quick Start on the left-hand side of the screen.
- Enter your TalkTalk broadband username into the Username box and your password into the Password box. You can find these details in your welcome letter. If you don't have your welcome letter, please call 0870 0875 562 to retrieve your details. You must call this number from your TalkTalk landline. If you call from another number you will be unable to retrieve your details. This call is free of charge.
Note: The next two images are examples only. Please do NOT change your Wireless Network Name (SSID) or Wireless Network Password to match the details in the images. - Click Connect at the end of the screen.
- Click OK to continue and save the settings.
- In the Address bar, type www.talktalk.co.uk and press Enter on your keyboard.
That's it - you're connected to the internet. Enjoy using your TalkTalk broadband.
Note: If you've completed the above steps and are having problems connecting, please see:I'm unable to connect.
- View More: TalkTalk Setting up your D-Link DSL-2640R or DSL-2740R router
-
-
Setting up your Huawei HG521 Router
-
Follow the steps below to set up your Huawei HG521 router and get connected.
Huawei HG521 
Before you start
Before you set up your router, please ensure that:
- Your router is connected to your computer via an Ethernet cable.
- You have your TalkTalk broadband username and password to hand. You'll need these to complete step 5 below. You can find these details in your welcome letter. If you don't have your welcome letter, you can call 0870 0875 562 to retrieve your details. This call is free from your TalkTalk landline.
Note: You must call this number from your TalkTalk landline for security reasons. If you call from another number you will be unable to retrieve your TalkTalk broadband username and password. - Your router is connected to the phone socket via a microfilter and your cables and connections are set up as they are here:
Setting up your Huawei router
Follow these steps to set up your Huawei router:
- Open a web browser such as Internet Explorer, Firefox or Safari.
- Type http://192.168.1.1 into the Address bar and press Enter on your keyboard.
Note: Do not type www. - You will be asked to enter a username and password. These details are for your router. They are NOT your TalkTalk broadband username and password. Enter admin in both the User Name and Password boxes. Then click OK.
- Click Quick Start on the left-hand side of the screen.
- Enter your TalkTalk broadband username into the Username box and your password into the Password box. You can find these details in your welcome letter. If you don't have your welcome letter, please call 0870 0875 562 to retrieve your details. You must call this number from your TalkTalk landline. If you call from another number you will be unable to retrieve your details. This call is free of charge.
Note: The next two images are examples only. Please do NOT change your Wireless Network Name (SSID) or Wireless Network Password to match the details in the images. - Click Connect at the end of the screen.
- Click OK to continue and save the settings.
- In the Address bar, type www.talktalk.co.uk and press Enter on your keyboard.
That's it - you're connected to the internet. Enjoy using your TalkTalk broadband.
Note: If you've completed the above steps and are having problems connecting, please see:I'm unable to connect.
- View More: TalkTalk Setting up your Huawei HG521 Router
-
-
Setting up your Huawei HG532 Router
-
Follow the steps below to set up your Huawei HG532 router and get connected.
Huawei HG532 
Before you start
Before you set up your router, please ensure that:
- Your router is connected to your computer via an Ethernet cable.
- You have your TalkTalk broadband username and password to hand. You'll need these to complete step 5 below. You can find these details in your welcome letter. If you don't have your welcome letter, you can call 0870 0875 562 to retrieve your details. This call is free from your TalkTalk landline.
Note: You must call this number from your TalkTalk landline for security reasons. If you call from another number you will be unable to retrieve your TalkTalk broadband username and password. - Your router is connected to the phone socket via a microfilter and your cables and connections are set up as they are here:
Setting up your Huawei router
Follow these steps to set up your Huawei router:
- Open a web browser such as Internet Explorer, Firefox or Safari.
- Type http://192.168.1.1 into the Address bar and press Enter on your keyboard.
Note: Do not type www. - You will be asked to enter a username and password. These details are for your router. They are NOT your TalkTalk broadband username and password. Enter admin in both the User Name and Password boxes. Then click OK.
- Click Quick Start on the left-hand side of the screen.
- Enter your TalkTalk broadband username into the Username box and your password into the Password box. You can find these details in your welcome letter. If you don't have your welcome letter, please call 0870 0875 562 to retrieve your details. You must call this number from your TalkTalk landline. If you call from another number you will be unable to retrieve your details. This call is free of charge.
Note: The next two images are examples only. Please do NOT change your Wireless Network Name (SSID) or Wireless Network Password to match the details in the images. - Click Connect at the end of the screen.
- Click OK to continue and save the settings.
- In the Address bar, type www.talktalk.co.uk and press Enter on your keyboard.
That's it - you're connected to the internet. Enjoy using your TalkTalk broadband.
Note: If you've completed the above steps and are having problems connecting, please see:I'm unable to connect.
- View More: TalkTalk Setting up your Huawei HG532 Router
-
-
Setting up your Huawei EchoLife HG520s
-
Follow the steps below to set up your Huawei HG520s router and get connected.

Before you start
Before you set up your router, please ensure that:
- Your router is connected to your computer via an Ethernet cable.
- You have your TalkTalk broadband username and password to hand. You'll need these to complete step 9 below. You can find these details in your welcome letter. If you don't have your welcome letter, you can call 0870 0875 562 to retrieve your details. This call is free from your TalkTalk landline.
Note: You must call this number from your TalkTalk landline for security reasons. If you call from another number you will be unable to retrieve your TalkTalk broadband username and password. - Your router is connected to the phone socket via a microfilter and your cables and connections are set up as they are here:
Setting up your Huawei EchoLife HG520s router
Follow these steps to set up your Huawei HG520s router:
- Open a web browser such as Internet Explorer, Firefox or Safari.
- Type http://192.168.1.1 into the Address bar and press Enter on your keyboard.
Note: Do not type www. - You will be asked to enter a username and password. These details are for your router. They are NOT your TalkTalk broadband username and password. Enter admin in both the User Name and Password boxes. Then click OK.
- Click Basic on the left-hand side of the screen.
- Select WAN Setting.
- Set VPI to 0 and VCI to 38.
- Select Yes from the Active drop-down list, and select Routing from the Mode drop-down list.
- Select PPPoA from the Encapsulation drop-down list and select VC from the Multiplex drop-down list.
- Enter your TalkTalk broadband username into the Username box and your password into the Password box. You can find these details in your welcome letter. If you don't have your welcome letter, please call 0870 0875 562 to retrieve your details. You must call this number from your TalkTalk landline. If you call from another number you will be unable to retrieve your details. This call is free of charge.
- Under IP Address, set Default Route and NAT to Enable, and then select Set Obtain an IP Address Automatically.
- Under MTU Options, set MTU to 1432 and set RIP to Disable.
- Click Submit at the bottom of the page.
- In the Address bar, type www.talktalk.co.uk and press Enter on your keyboard.
That's it - you're connected to the internet. Enjoy using your TalkTalk broadband.
- View More: TalkTalk Setting up your Huawei EchoLife HG520s
-
-
Setting up your Netgear DGN2000 router
-
Follow the steps below to set up your Netgear DGN2000 router and get connected.

Before you start
Before you set up your router, please ensure that:
- Your router is connected to your computer via an Ethernet cable.
- You have your TalkTalk broadband username and password to hand. You'll need these to complete step 5 below. You can find these details in your welcome letter. If you don't have your welcome letter, you can call 0870 0875 562 to retrieve your details. This call is free from your TalkTalk landline.
Note: You must call this number from your TalkTalk landline for security reasons. If you call from another number you will be unable to retrieve your TalkTalk broadband username and password. - Your router is connected to the phone socket via a microfilter and your cables and connections are set up as they are here:
Setting up your Netgear DGN2000 router
Follow these steps to set up your Netgear DGN2000 router:
- Open a web browser such as Internet Explorer, Firefox or Safari.
- Type http://192.168.1.1 into the Address bar and press Enter on your keyboard.
Note: Do not type www. - You will be asked to enter a username and password. These details are for your router. They are not your TalkTalk broadband username and password. Enter admin in both the User Name and Password boxes. Then click OK.
- Click Quick Start on the left-hand side of the screen.
- Enter your TalkTalk username into the Login box and your password into the Password box. You can find these details in your welcome letter. If you don't have your welcome letter, please call 0870 0875 562 to retrieve your details. You must call from your TalkTalk landline. If you call from another number you will be unable to retrieve your details. This call is free of charge.
Note: The next two images are examples only. Please do NOT change your Wireless Network Name (SSID) or Wireless Network Password to match the details in the images. - Click Connect at the end of the screen.
- Click OK to continue and save the settings.
- In the Address bar, type www.talktalk.co.uk and press Enter on your keyboard.
That's it - you're connected to the internet. Enjoy using your TalkTalk broadband.
Note: If you've completed the above steps and are having problems connecting, please see:I'm unable to connect.
- View More: TalkTalk Setting up your Netgear DGN2000 router
-
-
Settings you need to connect any router to the TalkTalk network
-
Unfortunately, we cannot provide you with assistance or support while you are setting up an unsupported router or troubleshooting any issues with one - apart from providing you with the settings listed below.
When you set up your router, you will be prompted to enter certain details. Depending on the router you have, the method for entering these details will differ. In some cases the options are named differently, so if you have any have problems please refer to the documentation included with your router or contact the manufacturer of the router.
Note: Some early models of Netgear router (including the DG834 v1 and v2) are not compatible with TalkTalk and may display an error message, even when the correct details are entered.
Generic router settings
- Username: Your telephone number@talktalk.net, for example 02079460009@talktalk.net*
- Password: Your TalkTalk broadband password*
- VPI: 0
- VCI: 38
- MTU: 1432
- DNS settings: Set to obtain automatically (or equivalent)
- Encapsulation: PPP over ATM (PPPoA) using VC-MUX
- Modulation Type: Auto
*We sent your TalkTalk broadband username and password to you in a letter when you joined TalkTalk. If you can't find this letter or can't remember your details, please call our automated service on 0870 0875 562 at any time FOR FREE from your TalkTalk home phone line.
Wireless setup
If you need help setting up wireless on an unsupported router, please consult the documentation that came with your router. Otherwise contact the manufacturer.
Did you know that you can purchase broadband equipment from us?
Any router purchased from TalkTalk will be fully supported by our Tech advisors.
Visit our DSL Shop for more information.
- View More: TalkTalk Settings you need to connect any router to the TalkTalk network
-
-
How do I Install the 585v6 Wireless Router manually?
-
This answer only applies to ex-Tiscali customers who originally signed up with Tiscali, but have now joined us as TalkTalk members
To enter the web admin for your 585 wireless router, open a browser window (Internet explorer or equivalent) and type 192.168.1.254 into the address bar or click here.

This will open the Speedtouch web admin screen. If this screen does not open then you do not have an active connection to the router. If you are running in wired mode, ensure your Ethernet cable is connected to port 1 on the router. If you are running on a wireless connection, double check your wireless connection is connecting correctly, to prove the router is operational try connecting via a wired connection with the supplied RJ45 lead.

At the bottom of this screen is a section to 'Pick a task…'

From this menu select 'Set Up'
This will open the Speedtouch Easy Setup Wizard.

Click 'Next' to start the wizard.
The next screen will detail the settings for the broadband connection. The default service will setup the router correctly for TalkTalk broadband.

Click the 'Next' button to accept these settings.
The next screen that opens will display the default VPI/VCI (0.38) and Connection Type (PPPoA).

Enter your username and your password in the relevant areas.

Then click the 'Next' button.
This will open the next screen detailing the settings you have entered that will be stored by the router.

Review the details, if you find anything is incorrect click the back button and correct the information.
The key elements to ensure are correct are the VPI/VCI, the connection type and that your username is correct.
Once you are happy with the contents click the 'Start' button.
The setup wizard will now write those settings to the routers memory.
Once this action has been completed the following screen will be displayed.

Click finish to complete the wizard.
You should now be able to connect to the Internet.
- View More: TalkTalk How do I Install the 585v6 Wireless Router manually?
-
-
How do I Install the Speedtouch 585v7 and 585v8 Wireless Router
-
This article only applies to ex-Tiscali customers who originally signed up with Tiscali, but have now joined us as TalkTalk members
To enter the web admin for your 585 wireless router, open a browser window (Internet explorer or equivalent) and type 192.168.1.254 into the address bar or click here.
This will open the Speedtouch web admin screen. If this screen does not open then you do not have an active connection to the router. If you are running in wired mode, ensure your Ethernet cable is connected to port 1 on the router. If you are running on a wireless connection, double check your wireless connection is connecting correctly, to prove the router is operational try connecting via a wired connection with the supplied RJ45 lead.
If you are prompted for a Username and Password to login to the router and you do not know this information please see this answer for guidance.

Click on Thomson Gateway from the menu.

At the bottom of this screen is a section to Pick a task…

From this menu select Set Up.
This will open the Speedtouch Easy Setup Wizard.

Click Next to start the wizard.
The next screen will detail the settings for the broadband connection. The default service will setup the router correctly for you to access your broadband.

Click the Next button to accept these settings.

Enter your username and your password in the relevant areas.

Then click the Next button.
This will open the next screen detailing the settings you have entered that will be stored by the router.

Review the details, if you find anything is incorrect click the back button and correct the information.
The key elements to ensure are correct are the VPI/VCI, the connection type and that your username is correct.Once you are happy with the contents click the Start button.
The setup wizard will now write those settings to the routers memory.
Once this action has been completed the following screen will be displayed.

Click Finish to complete the wizard.
You should now be able to connect to the Internet.
- View More: TalkTalk How do I Install the Speedtouch 585v7 and 585v8 Wireless Router
-
-
how to set up broadband
- What will happen during the broadband installation?We'll send you an email informing you that your broadband connection has been activated and that you can install the wireless router and connect using the username and password providedTo install this equipment simply follow the instructions supplied with your routerAlternatively, you'll find more help in these articleshow do I install my wireless router?A typical broadband installationYou've sent me my 'All-in-one connection pack', which includes filters. What do I do with the filters?Install a filter with each telephone you have in your home, to do this disconnect each telephone from the wall socket, plug a filter into the socket and then re-cconnect the phone cable into the filter socket.Filters will need to be installed for other devices connected to your phone line including answering machines, fax machines, conventional modems (used with another computer at home) and digital satellite TV receivers with a built-in modemYou'll find more help with this in the article how to set up broadband filtersHow many filters do I need and where can I get more if required?The filters allow the broadband modem and phone services to run simultaneously so in order to avoid any interruptions to your phone service a filter is needed for every phone socket you use, for any device, such as a phone, answer machine or fax machine.The modem connection pack comes with two filters. You can buy extra filters online here.Wireless home networking and broadband telephonyAll customers now get a top-of-the-range 'N' class wireless router, this will provide you with improved speed and range for wireless connections in your home.Does it matter where in the house I would like to use my broadband connection?With our wireless router you'll be able to connect additional PC's or Laptop's wirelessly from anywhere in your home within range of the router.How many computers can be connected to my broadband connection?With our wireless router you'll be able to connect a PC, laptop, or games console with the Ethernet cable we provide. You can also connect additional computers wirelessly by using a USB wireless adapter, avalible at http://www.orangeaccessories.co.uk/broadband.html or by using an internal wireless card if your PC or laptop has one.
- View More: Orange how to set up broadband
-
-
problem with the Livebox set-up CD
-
It's been brought to our attention that our Livebox set-up CD (version 1.4 or 1.5) isn't compatible with the most recent version of Adobe Flash Player. If you've installed Flash version 9, it's likely that buttons on the CD don't work correctly on your computer. We're currently working on a solution; however in the meantime we've provided a couple of options below, which will allow you to connect your Livebox to the Internet using the CD, or via a manual process.
using the CD
- insert the Livebox installation CD into your computer - the CD will load
- hover your mouse pointer over the Install Livebox for the first time button - the pointer will turn to a hand
- click once on Install Livebox for the first time
- the button will become highlighted, however nothing will happen - don't worry!
- move your mouse pointer down into the area just below the button you've just clicked (as below)
- the pointer will change to an arrow
- click once to move to the next screen
You'll need to repeat the above process for all buttons on the Livebox CD, i.e.
- click to highlight
- hover down
- click again
Please note: it's important that you don't click more than once on a button. If you do, and the steps above don't work, you may need to remove the CD, and start again.
manual process
If you experience problems with the suggestion above, we recommend that you set up your Livebox manually. You'll find more help in the article below:
how to manually install your Livebox
uninstall Flash Player 9 as a temporary measure
If you prefer, you can uninstall Flash Player 9, then re-install once you've completed Livebox installation. You can do this following the instructions below:
- click Start
- click Control Panel
- click Add or Remove Programs (or Programs and Features if you're using Vista)
- click on Adobe Flash Player 9 Active X
- click Change/ Remove
- try loading the Livebox installation CD again
If you encounter problems uninstalling Flash Player, you'll find more instructions here.
- View More: Orange problem with the Livebox set-up CD
-
-
how do I set up a manual connection to my Netgear DGN1000 when using Windows 7
-
To set up a wireless connection to the Netgear DGN1000 router, firstly ensure that you have set up a wired connection and that you have your wireless security details (the router name and security key) to hand. These are the details that you selected when setting up a wired connection for the first time.
To set up a secure connection to your Netgear router:
- Click on the 'Network' icon in your computers notification area:
- 'View Available Networks' (VAN) will open - a list of available 'wireless network connections' will display.
- Locate your router in the list of wireless network connections - the network name (SSID) was chosen when setting up the router for the first time.
Note: WiFi security is enabled by default on a Pre-Configured Netgear DGN 1000 router - the default mode is Mixed WPA/WPA2. Wireless network name (SSID) and security key are located at the bottom of the router.
- Click on the 'Network' icon in your computers notification area:
- View More: Orange how do I set up a manual connection to my Netgear DGN1000 when using Windows 7
-
-
how do I set up a wired connection to a Netgear DGN1000 router
-
ensure your service is activated
Before you begin to set up the router ensure that your broadband connection has been activated. We will have sent you an email or text message to confirm this.
If it has been more than 10 days since you registered for broadband and you haven’t received a confirmation from us contact our Customer Support department who will investigate this for you.
check you have everything you need
All boxes should contain the following items:
N150 Wireless Modem Router
AC power adapter
Ethernet cable (Cat 5)
Broadband cable (RJ-11)
Broadband filter (microfilter) x 2
Orange branded setting up guide
step 1 - connecting the cables
Unplug all equipment connected to your phone line – this is just to make sure that nothing disrupts the set-up.
Plug the grey broadband cable into the grey socket labelled ADSL on the back of the router:
Plug the other end of the broadband cable into the ADSL socket of the broadband filter:
Plug the broadband filter into your phone socket:Plug one end of the yellow Ethernet cable into any of the yellow Ethernet sockets on the router:
Plug the other end of the Ethernet socket into the Ethernet socket on the computer:
Plug the power adapter into the power socket on the router:
Plug the power adapter into a working power socket and ensure it’s turned on.
Plug the other end into a mains socket near the router and make sure it’s turned on:
Double check that all cables have been connected correctly:
If the router’s lights don’t come on, switch it on by pushing in the Power ON/OFF switch, then wait about a minute until the Power light and DSL light are solid green:
step 2 - check for a working connection
- Once the router has been powered up, you’ll see a sequence of lights on the router.
- After about a minute the lights will settle down and you should see that:
- The power light is solid green.
- One of the LAN ports solid green.
- The DSL light will be solid green.
- You can find more information on what the lights mean on your router here.
- If you see this screen check the cables are all set up correctly - see Step 1 for more information
- If you don’t see this light sequence contact us and we’ll take you through the rest of the installation process.
step 3 – connect the router to the Internet
At this point during the installation you’ve established that your computer is speaking to the router and that the router can detect a broadband signal through your telephone line.
You now need to get your router to connect to the broadband signal that is being sent to your telephone line.
Open a browser, eg Internet Explorer
Safari
or Firefox
.
In the address bar, type http://192.168.0.1 or http://www.routerlogin.com.
A log in window (similar to the one below) will prompt you to log into the router’s admin pages – enter the details below:
user name: admin
password: password
The Netgear SMARTWIZARD admin pages will open:
Every time you log into the admin pages the Firmware Upgrade assistant will check for a new version of Firmware
We recommend you allow this check to take place as it may help reduce potential problems at a later date.
Or if you wish to do this at a later date press skip.
Click Basic Settings under the ‘Setup’ menu:
In the Login field, enter the broadband username – letters should be entered in lower case, and remember to add @fs at the end.
If you have the Pre-configured Netgear DGN 1000 router you will see a wireless settings sticker at bottom of the router. WiFi security key and SSID is printed on this sticker. The broadband username and password are pre-configured on the router before they are shipped out. This means that you don't need to enter the broadband username and password, unless the router is returned to factory default settings..
You will have chosen these details at registration and we will have confirmed them by email – if you’re unsure of these details contact our Customer Support department
In the password field, enter the broadband password.
Click Apply and wait for the page to refresh.
Step 4 - set up wireless security
You now need to set up the wireless security settings on the router. Ensure you make a note of the details you choose as you will need these to set up the wireless connection or connect wirelessly to your router.
Select Wireless Settings from the Setup menu:
In the ‘Wireless Network’ field:
change the SSID name to something other than NETGEAR, and unique i.e. Orange58647 or your preferred option of 32 alphanumeric characters
set the region to
set the channel to Auto
set ‘Mode’ to Up to 150Mbps
In the Wireless Access Point field:
ensure that ‘Enable Wireless Access Point’ is checked (unless the customer doesn’t want a wireless connection)
ensure that ‘Allow Broadcast of Name (SSID) is check
ensure that ‘Wireless Isolation’ is not checked
In the ‘Security Options’ field, select the option ‘Mixed WPA-PSK+WPA2-PSK:
If you've received a Netgear DGN 1000 router after 05 May 2011, then you'll have the Pre-configured Netgear DGN 1000 router. These routers can be identified by the presence of a wireless settings sticker at bottom of the router. WiFi security is enabled by default on a Pre-Configured Netgear DGN 1000 router - the default mode is Mixed WPA/WPA2 to maximize compatibility with different operating systems. WiFi security key and SSID are located at the bottom of the router.
In the ‘Network Key’ field, enter a security key for the connection – this should be over 8 characters and can be made up of upper and lower case letters from a-z and numbers 0-9.
Once complete, select Apply – the page will refresh and new settings will be visible.
You can now go on to set up a wireless connection between your computer and the router
- View More: Orange how do I set up a wired connection to a Netgear DGN1000 router
-
-
How to set up security on the Netgear DGN1000
-
how to identify which operating system your computers using
-
Windows 7
If you have a circular 'Start' button that remains within the task bar, you're using Windows 7.
Windows Vista
If you have a circular 'Start' button that rises above the task bar, you're using Windows Vista:
For instructions to find the specification and service pack installed, click here.
Windows XP
If you have a green start button as below, you're using Windows XP
For instructions to find the specification and service pack installed, click here.
Other
If you have any other type of start button (similar to below), you could be using any of the versions of Windows, above Windows 95.
To find which version you're using:
- Click the Start button:
- The version of the operating system will be displayed - in the example below, the computer's using Windows 2000.
For instructions to find the specification and service pack installed, click here.
- View More: Orange how to identify which operating system your computers using
-
-
Windows Vista - what should I do if my installation CD doesn't automatically open?
-
If the CD doesn't automatically run you'll need to manually open the software on the CD.
- click Start
- click Computer
- locate the Orange icon listed under the heading of 'Devices with removable storage'
- double-click on the Orange icon, which should launch the installation
If installation doesn't start follow the instructions below:
- right-click on the Orange icon
- left-click on Open
- choose the equipment you want to run the installation for:
- USB modem - OrangeBroadband.exe
- Livebox - Setup
- Orange Wireless Router (Siemens) - Setup
- Windows will prompt that 'An unidentified program wants access to your computer' - select Allow
- the CD will load and an installation window will now appear, you can continue with installation
- View More: Orange Windows Vista - what should I do if my installation CD doesn't automatically open?
-
-
Can I connect my broadband router using a telephone extension lead or socket doubler?
-
You can use extension leads or a socket doubler with your broadband router, but please follow our advice on installing them. Extension leads:
Ideally, your Home Hub or router should be positioned within easy reach of a telephone socket. If you need to use an extension lead, make sure that it is not made of aluminium and is no longer than 10 metres.
There are two ways to connect your extension lead.
1. If you need an extension lead for your Home Hub or router, plug the extension lead into the telephone socket first. Then plug the microfilter into the extension lead, and your broadband cable and telephone into the correct sockets of the microfillter. 
2. If you need an extension lead for your telephone only, plug the microfilter into the telephone socket first. Then plug the extension lead into the phone socket of the microfilter, and your telephone into the extension lead. 
Socket doublers:
If you use a socket doubler to connect more than one phone to a single socket, you can use a single microfilter. Plug the microfilter into the telephone socket first, then plug the socket doubler into the phone socket of the microfilter. Then plug your telephones into the socket doubler.

Broadband equipment is designed for easy installation. However, you can arrange for an engineer to install it for you with our new Broadband Install service.
- View More: BT Can I connect my broadband router using a telephone extension lead or socket doubler?
-
-
I cannot get the BT Broadband CD-ROM to work - what should I do?
-
Your BT Broadband CD-ROM will not start automatically in all computers.
If you are using a PC:
- Wait 30 seconds
- Click on ‘My Computer’ in the Windows Start menu
- Click the CD icon
- In the list of files, double-click ‘setup’
If you are using a Mac: double-click the ‘BT Home Hub’ desktop icon
If your CD still doesn’t work, try using another CD to check if your CD drive is working. If your CD drive works okay but the BT Total Broadband CD still doesn’t run, please call the technical helpdesk on 0800 111 4567. Lines are open 24 hours a day, 7 days a week.
- View More: BT I cannot get the BT Broadband CD-ROM to work - what should I do?
-
-
Why do I need microfilters and where do they go?
-
A microfilter is a device that allows broadband to work at the same time as your telephone service. Without microfilters you may experience problems with your BT Broadband and telephone line.
You need a microfilter for every telephone socket in your home that has equipment plugged in. Equipment that needs to be plugged into microfilter includes:
- Broadband modem or router
- Telephones
- Answering machines
- Digital TV boxes (for example, BT Vision, Sky)
- Fax machines
- Alarm systems
You can use a maximum of four microfilters to a single telephone line.
You don't need microfilters if your master socket has a broadband accelerator faceplate or if you've got fibre broadband, like BT Infinity.
Plugging in your microfilters
At each phone socket where a device plugs in:
- Unplug the device from the socket
- Plug a microfilter into the socket
- Plug the device you have just unplugged into the microfilter's phone socket, and plug your broadband equipment into the computer's socket.

View our video
Extension leads
If you need to use an extension lead, make sure that it's no longer than 10 metres as this may affect your line stability and speed.
There are two ways to connect your extension lead:
- If you need an extension lead for your Home Hub or router:
- If you need an extension lead for your telephone only:
Socket doublers
If you use a socket doubler to connect more than one phone to a single socket plug the microfilter into the telephone socket first, and then plug the socket doubler into the phone socket of the microfilter.
You'll get two microfilters with your BT Home Hub. To order more microfilters from BT, go towww.bt.com/shop.
- View More: BT Why do I need microfilters and where do they go?
-
-
Can I use a longer line cord for my ADSL equipment?
- Using a longer line cord for BT Broadband is not advised. A longer modem/router line cord can lead to a reduction in the quality of the service. If you do not have a telephone socket near enough to your computer, you should use a telephone extension lead. Details of the correct set-up are available here.
- View More: BT Can I use a longer line cord for my ADSL equipment?
- Using a longer line cord for BT Broadband is not advised. A longer modem/router line cord can lead to a reduction in the quality of the service. If you do not have a telephone socket near enough to your computer, you should use a telephone extension lead. Details of the correct set-up are available here.
-
How do I set my computer to obtain an IP address from my router/Hub automatically?
-
BT routers/Hubs are configured to automatically provide an IP address to the computers connected to it. For this to work, your computers have to accept this address instead of using a static IP address.
Instructions for Windows operating systems
- Click on ‘Start’ menu, then ‘Settings’ or ‘Control Panel’ and then ‘Network Connections’
- Under ‘Local Area Network’, right-click the network adapter you use to connect to your router, then click Properties
- Select Internet Protocol (TCP/IP) connection at the bottom of the list, then click Properties
- Select Obtain an IP address automatically
- Select Obtain DNS server address automatically
- Click on OK twice to confirm the settings.
Instructions for MAC OSX operating systems:
- From the Apple menu, open System Preferences and click on Network. The Network window opens. Note: If the New Port Detected window appears, click OK.
- Click on the drop down menu Show: and select the network adapter used to connect to your router
- Select the TCP/IP Tab.
- Click on the drop down menu Configure: and select the option Using DHCP
- Click Apply now and close the window.
 We’ve got great Tech Experts that could help you setup your games console for online gaming?
If you urgently need to set up your games console or do not have the time to troubleshoot your problem, BT Tech Experts are here to help.
 Find out more about BT Tech Experts
- View More: BT How do I set my computer to obtain an IP address from my router/Hub automatically?
-
-
How do I find the wireless network name (SSID) and wireless key for my BT Home Hub?
-
You will need your wireless network name (SSID) and wireless key to connect wirelessly.
Choose from the BT Hubs below to see where to find these.
BT Home Hub 3

The Hub 3 has a handy Hub Settings Card that contains the wireless network/SSID and the wireless key. This and other information is also displayed underneath the Hub.

BT Home Hub 2.0

You'll find your BT Home Hub's SSID and wireless key printed on a label on the back of the Hub. In the example shown, the SSID is BTHomeHub2-ABCD and the wireless key is 1234abcdef.

BT Home Hub 1.0 or 1.5


You'll find your Hub's SSID and wireless key printed on a label on the back of the Hub. In the example shown, the SSID is BTHomeHub-022B and the wireless key is ac551a5fed.

Further help & information
 Desktop Help is our free tool that helps you fix broadband and email problems, keeping you connected when you most need to be. Desktop Help will:
- Help you get back online if you're disconnected;
- Set up your email account and fix issues if it stops working;
- Work in the background, fixing the problems it finds;
- Help you set up your home network so you can share folders and printers; and
- Update automatically, giving you the latest solutions.
 Find out more about BT Broadband Desktop Help
- View More: BT How do I find the wireless network name (SSID) and wireless key for my BT Home Hub?
-
-
How do I connect an iPad to my BT Home Hub?
-
- From the iPad home screen, select Settings

- Select Wi-Fi from the left menu and make sure the Wi-Fi switch is set to On

- Select your Hub from the list

- Enter your wireless key and select Join. Your wireless key can be found on the label on the back of your Hub

- After a few seconds you should see a tick next to your Hub

- You'll see the Wi-Fi icon in the top left-hand corner whenever you're connected via Wi-Fi

- From the iPad home screen, select Settings
- View More: BT How do I connect an iPad to my BT Home Hub?
-
-
How do I connect an iPhone or iPod Touch to my BT Home Hub?
-
- From the home screen, select Settings

- Select Wi-Fi from the list

- Make sure the Wi-Fi switch is set to On

- Select your Hub from the list

- Enter your wireless key and select Join. If you don't know your wireless key you can find it on the label on the back of your Hub

- After a few seconds you should see a tick next to your Hub

- You'll see the Wi-Fi icon in the top left-hand corner whenever you are connected via Wi-Fi

- From the home screen, select Settings
- View More: BT How do I connect an iPhone or iPod Touch to my BT Home Hub?
-
-
How do I connect an Amazon Kindle to my BT Home Hub?
-
- First press the Menu button on the keypad

- Scroll down and select Settings

- Scroll down to "Wi-Fi Settings" and select view

- If asked to "Turn Wireless On?", select OK

- Scroll down to your BT Home Hub and select connect

- Enter your wireless key and select submit

- You'll see the "Wi-Fi" icon in the top right-hand corner whenever you're connected wirelessly

- First press the Menu button on the keypad
- View More: BT How do I connect an Amazon Kindle to my BT Home Hub?
-
-
Set up your Sky Broadband router
-
How to apply static IP on O2 Home Broadband
-
How to understand the lights on a wireless box on O2 Home Broadband
-
How to connect to O2 Home Broadband when using a Mac
-
How to set up O2 Home Broadband without the installation CD
-
TalkTalkCare
- Top tips from TalkTalk to help you make the most of the web. For support, please follow
- View More: TalkTalk TalkTalkCare
- Top tips from TalkTalk to help you make the most of the web. For support, please follow
-
BT Twitter Page
- Have a question? Follow us and let us help!
- View More: BT BT Twitter Page
- Have a question? Follow us and let us help!
-
O2 on Twitter
- The official home of O2 UK on Twitter. Run by the social media team. We’re helping wherever we can.
- View More: O2 O2 on Twitter
- The official home of O2 UK on Twitter. Run by the social media team. We’re helping wherever we can.
-
Plusnet Twitter Page
- @plusnet Sheffield
- View More: Plusnet Plusnet Twitter Page
-
-
Virgin Media Twitter Page
- Follow Virgin Media on Twitter
- View More: Virgin Media Virgin Media Twitter Page
- Follow Virgin Media on Twitter
-
Orange Twitter Page
- @OrangeHelpers
- View More: Orange Orange Twitter Page
-
-
The TalkTalk Blog
-
Welcome to the TalkTalk blog. Here you'll find regular entries from our Chairman Charles Dunstone, our CEO Dido Harding and members of the TalkTalk team.
From the launch of free broadband in 2006 to the release of our innovative new myTalkTalk package, we're always thinking of ways to change the phone and broadband market for the better. Through the blog you'll be the first to hear any news.
If you have any general comments or questions about TalkTalk, or would like to get the latest service updates, then feel free to visit TalkTalk Members
- View More: TalkTalk The TalkTalk Blog
-
-
BT Life Blog
-
Welcome to the BT Life blog
BT Life is the technology and lifestyle blog from BT, with the latest on entertainment, communications, online safety and more.
- View More: BT BT Life Blog
-
-
O2 Blog
- Welcome to O2's Blog, where you can pick up news from O2 and subscribe to updates.
- View More: O2 O2 Blog
- Welcome to O2's Blog, where you can pick up news from O2 and subscribe to updates.
-
Plusnet Blog
- Latest News from Plusnet
- View More: Plusnet Plusnet Blog
- Latest News from Plusnet
-
TalkTalk Facebook Page
- Welcome to the official TalkTalk Facebook page. Here you can find out all...
- View More: TalkTalk TalkTalk Facebook Page
- Welcome to the official TalkTalk Facebook page. Here you can find out all...
-
BT Facebook Page
- Hello! Thanks for visiting. We're here to help you connect, chat, play, watch great digital TV and more.
- View More: BT BT Facebook Page
- Hello! Thanks for visiting. We're here to help you connect, chat, play, watch great digital TV and more.
-
O2 Facebook Page
- We're better, connected
- View More: O2 O2 Facebook Page
- We're better, connected
-
Orange Facebook Page
- We are Orange Helpers – the dedicated online customer support team at Orange UK
- View More: Orange Orange Facebook Page
- We are Orange Helpers – the dedicated online customer support team at Orange UK
-
TalkTalk Contact Details
-
Department
Number
Opening hours
Online help
Sales Hotline 0800 049 7802 Mon - Fri: 8am - 9pm
Sat: 9am - 6pmSales help Customer Services 0870 444 1820
FREE from your TalkTalk landlineMon - Fri: 8am - 8pm
Sat: 9am - 6pm
Sunday: 10am - 5pmMy Account and bill help
Broadband help
Telephone help
Moving home helpNew Lines Customer Service 0870 087 5703 Mon - Fri: 8am - 8pm
Sat: 9am - 6pm
Sun: ClosedNew Phone Line help TalkTalk Mobile 0870 087 8751 Mon - Sun: 8am - 10pm TalkTalk Mobile help Cancelling a New Order 0870 087 8038 Mon - Fri: 8am - 8pm
Sat: 9am - 6pm
Sunday: 10am - 5pmChanged your mind?
- View More: TalkTalk TalkTalk Contact Details
-
-
BT Broadband Contact Details - Technical Queries
-
From a landline dial:
0800 111 4567From a mobile dial:
0330 123 4567*Opening hours
24 hours a day, 365 days a year
Please make sure you're at your computer and it's switched on when you call.For troubleshooting tips and advice visit theBT Community Forums
- View More: BT BT Broadband Contact Details - Technical Queries
-
-
Sky Contact Details - Customer Service and Technical Support
-
Phone us
Our call centres are open 24/7 08442 411 653
 0818 719 819
For full details of call and connection charges to 0844 numbers in the UK and 0818 numbers in the Republic of Ireland with Sky Talk, please see www.sky.com/callpricing
Charges for calls from other networks and mobile phones may vary. Please note that calls may be monitored or recorded for training purposes.
- View More: Sky Sky Contact Details - Customer Service and Technical Support
-
-
O2 Contact Details
-
Home Broadband Technical Support Dial Charges From your O2 mobile 800 230 0202 Free From a landline 0800 230 0202 Free Opening hours Monday - Sunday 24 hours Home Broadband Customer Service Dial Charges From your O2 mobile 800 230 0202 Free From a landline 0800 230 0202 Free Opening hours Monday - Friday 08:00 - 21:00 Saturday 08:00 - 20:00 Sunday 08:00 - 18:00
- View More: O2 O2 Contact Details
-
-
Virgin Media Contact Details
-
If you have not done it already, please check your service status. It might save you a phone call: virginmedia.com/servicestatus
Still need to talk to the team?
Call us on 150 from your Virgin Media home phone or on 0845 454 1111* from any other phone.
* For details about how much it costs to call our team from a Virgin Media home phone, visitvirginmedia.com/callcosts. Call costs from other networks and mobiles vary.`
24 hours a day, 7 days a week
- View More: Virgin Media Virgin Media Contact Details
-
-
Plusnet Contact Details
-
Department Number Availability Residential Sales 0800 432 0200
(option 3)07:00 - 22:00 Monday to Friday
09:00 - 21:00 Saturday and Sunday
Have your payment details handy to place an orderBusiness Sales 0114 296 5182
(option 2)09:00 - 17:30 Monday to Friday
09:00 - 16:00 SaturdayPartner Sales 0114 296 5171
(option 1)09:00 - 17:30 Monday to Friday Residential Support 0800 432 0200 All day, every day
You'll need your username and password handyBusiness Support 0114 296 5182
0845 002 0170All day, every day Cancellations 0845 140 6002 09:00 - 17:30 every weekday (except Bank Holidays)
- View More: Plusnet Plusnet Contact Details
-
-
Orange Contact Details
-
call us:*
0844 873 8586free from an Orange pay monthly phone:
150* Calls from an Orange Home Phone are free. Calls from a BT landline or your second line (if you have one) cost 5.1p a minute. Calls from mobiles and other networks may vary. Calls may be monitored and recorded for training purposes
- View More: Orange Orange Contact Details
-